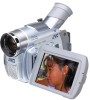
JVC GR D90U Instructions - Page 14
Tape Playback, Recording From The Middle Of A Tape - remote control
 |
UPC - 046838161018
View all JVC GR D90U manuals
Add to My Manuals
Save this manual to your list of manuals |
Page 14 highlights
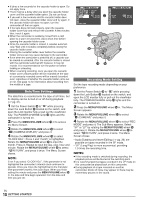
Time Code During recording, a time code is recorded on the tape. This code is to confirm the location of the recorded scene on the tape during playback. If recording starts from a blank portion, the time code begins counting from "00:00:00" (minute:second:frame). If recording starts from the end of a previously recorded scene, the time code continues from the last time code number. If during recording a blank portion is left partway through the tape, the time code is interrupted. When recording is resumed, the time code starts counting up again from "00:00:00". This means the camcorder may record the same time codes as those existing in a previously recorded scene. To prevent this, perform "RECORDING FROM THE MIDDLE OF A TAPE" in the following cases; • When shooting again after playing back a recorded tape. • When power shuts off during shooting. • When a tape is removed and re-inserted during shooting. • When shooting using a partially recorded tape. • When shooting on a blank portion located partway through the tape. • When shooting again after shooting a scene then opening/closing the cassette holder cover. Display Minutes Seconds 12 : 34 : 24 Frames (30 frames = 1 second) Frames are not displayed during recording. Normal Playback 1 Load a tape (੬ pg. 9). 2 Set the VIDEO/DSC Switch 4 to "VIDEO" (GR-D90/ D70 only), then set the Power Switch y to "PLAY" while pressing down the Lock Button t located on the switch. To start playback, press 4/6 7. • To stop playback temporarily (Still Playback), press 4/6 7. • To stop playback, press 5 5. • Press 2 6 to rewind, or 3 8 to fast-forward the tape during Stop mode. • High-speed picture search (Shuttle Search) is possible by pressing 2 6 or 3 8 during playback (holding 2 6 or 3 8 down during playback continues search until released). • Press the Zoom Button T ; on the remote control to zoom in (up to 44X), or W A to zoom out. You can also magnify a particular part of an image (GR-D90/ D70 only ੬ pg. 35). • At any time, pressing 4/6 7 resumes normal playback. Slow-Motion Playback/Playback Special Effects/ Playback Zoom: Available only with the remote control (provided with GR-D90/D70 only, ੬ pg. 35) To Control The Speaker Volume: Rotate the MENU/VOLUME wheel % so that the volume level indicator T on the display moves to obtain the appropriate volume. ATTENTION During Shuttle Search, parts of the picture may not be clearly visible, particularly on the left side of the screen. RECORDING FROM THE MIDDLE OF A TAPE 1 Play back a tape or use Blank Search (੬ pg. 15) to find the spot at which you want to start recording, then engage the Still Playback mode (੬ pg. 14, "Normal Playback"). 2 Set the Power Switch y to " " or " " while pressing down the Lock Button t located on the switch, then start recording. NOTES: ● The time code cannot be reset. ● During fast-forwarding and rewinding, the time code indication does not move smoothly. ● The time code is displayed only when "TIME CODE" is set to "ON" (੬ pg. 31). EN 14 TAPE RECORDING TAPE PLAYBACK
-
 1
1 -
2
-
3
-
4
-
5
-
6
-
7
-
8
-
 9
9 -
 10
10 -
 11
11 -
 12
12 -
 13
13 -
 14
14 -
 15
15 -
 16
16 -
 17
17 -
 18
18 -
 19
19 -
20
-
21
-
22
-
23
-
24
-
25
-
26
-
27
-
28
-
29
-
30
-
31
-
32
-
33
-
34
-
35
-
36
-
37
-
38
-
39
-
40
-
41
-
42
-
43
-
44
-
45
-
46
-
47
-
48
-
49
-
50
-
51
-
52
-
53
-
54
-
55
-
56
 |
 |
