JVC GR-SXM740U User Manual - Page 11
Recording, Playback - s vhs c
 |
UPC - 046838160400
View all JVC GR-SXM740U manuals
Add to My Manuals
Save this manual to your list of manuals |
Page 11 highlights
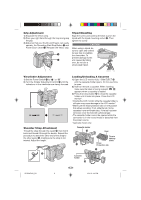
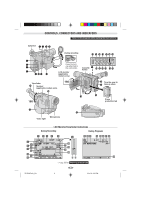
RECORDING Set REC MODE, S-VHS (S-VHS ET)**, TAPE LENGTH and DATE/TIME in SYSTEM MENU. (੬ pg. 18 - 21, "MENU SETTINGS") 1 Remove the lens cap. Set the Power Switch @ to " " or " ". Shooting while using the viewfinder: Make sure the LCD monitor* is closed and locked. Shooting while using the LCD monitor*: Make sure the LCD monitor* is fully open. The camcorder enters the Record-Standby mode and "PAUSE" ) is displayed. • The viewfinder and LCD monitor cannot be used simultaneously on this camcorder. Therefore, when opening the LCD monitor and tilting it upward to 180°, you cannot view any image in the viewfinder, however you can shoot yourself while viewing your own image in the LCD monitor. 2 Press the Recording Start/Stop Button !. 7 appears while recording is in progress. • To stop recording, press the Recording Start/Stop Button !. The camcorder re-enters the RecordStandby mode. To Adjust The Brightness Of The LCD Monitor*, rotate the BRIGHT Wheel 1 until the bright level indiator # on the display moves and the appropriate brightness is reached. • If you are using the GR-AX970, it is also possible to adjust the brightness of the viewfinder by adjusting as described above. * Applicable models only. ** GR-SXM740/SXM340/SXM240 only. • Tapes recorded on S-VHS or S-VHS ET (੬ pg. 18, 20) cannot be played back correctly on a normal VHS VCR. To playback on a regular VHS VCR, use a VHS tape and select S-VHS ET (OFF) in SYSTEM MENU (੬ pg. 18, 20). PLAYBACK 1 Load a tape (੬ pg. 8, "Loading/Unloading A Cassette"). 2 Set the Power Switch @ to " ". To start playback, press 4/6 ^ or T. To stop playback temporarily (Still Playback), press 4/6 ^ or s. To stop playback, press 5 $. Press 2 % to rewind, or 3 & to fast-forward the tape. High-speed picture search (Shuttle Search) is possible by pressing 2 % or 3 & during playback (holding 2 % or 3 & down during playback continues search until released). To resume normal playback, press 4/6 ^ or T. For VIDEO RECORDING/VIDEO PLAYBACK • The camcorder shuts off automatically after about 5 minutes in the Record-Standby or Stop mode. To turn on again, set the Power Switch @ to "OFF", then to " ", " " or " ". • When the Power Switch @ is set to " ", " " or " " and the LCD monitor* is opened at an angle of 60 degrees or more, the LCD monitor* switches on and the viewfinder switches off automatically to save power. • The playback picture can be viewed in the viewfinder (with the LCD monitor* shut), on the LCD monitor* or on a connected TV (੬ pg. 15, "Connections To A TV/VCR"). • To remove the indications, ੬ pg. 21, DISPLAY or OSD OUTPUT in SYSTEM MENU. • To control the speaker* volume, slide VOL. 3 towards "+" to turn up, or towards "-" to turn down. While shooting, sound is not heard from the speaker*. • If TBC (੬ pg. 14) is engaged during Still Playback, noise bars will not appear (GR-SXM740/SXM340 only). * Applicable models only. GR-SXM740U_EN 11 11 02.4.22, 6:02 PM
-
 1
1 -
2
-
3
-
4
-
5
-
 6
6 -
 7
7 -
 8
8 -
 9
9 -
 10
10 -
 11
11 -
 12
12 -
 13
13 -
 14
14 -
 15
15 -
 16
16 -
17
-
18
-
19
-
20
-
21
-
22
-
23
-
24
-
25
-
26
-
27
-
28
-
29
-
30
-
31
-
32
 |
 |