JVC GR-SXM740U User Manual - Page 18
Menu Settings - camcorder
 |
UPC - 046838160400
View all JVC GR-SXM740U manuals
Add to My Manuals
Save this manual to your list of manuals |
Page 18 highlights
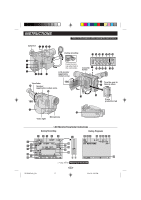
MENU SETTINGS 1 Set the Power Switch @ to " ". 2 Press the MENU Wheel 1 in. The Menu Screen appears. Rotate the MENU Wheel 1 to select the desired function. • To go from CAMERA MENU to SYSTEM MENU, rotate the MENU Wheel 1 to select "4TO SYSTEM MENU" and press it. SYSTEM MENU is composed of 2 pages. To go to the next page, rotate the MENU Wheel 1 to select "4NEXT" and press it. • To return to CAMERA MENU from page 2 of SYSTEM MENU, rotate the MENU Wheel 1 to select "4TO CAMERA MENU" and press it. CAMERA MENU ᮣ TO SYSTEM MENU FOCUS AUTO EXPOSURE AUTO M.W. B . AUTO S . LX MAX T I TLE DATE / T I ME D I SP . ᮣ RE T URN SYSTEM MENU ᮣNEXT REC MODE SP D. ZOOM 50x WI DE OF F S - VHS ON TAPE LENGTH T30 D I SPLAY FULL OSD OUTPUT ON ᮣ RE T URN 3 Press the MENU Wheel 1 in to display the Setting Menu and rotate it to select the desired setting. 4 Press the MENU Wheel 1 in. The Menu Screen reappears with the highlight bar on "4RETURN". Press the MENU Wheel 1 in. The normal screen reappears. CAMERA MENU FOCUS If correct focus cannot be obtained with AUTO FOCUS, set to MANU to use manual focusing. " " appears. To focus on a farther subject, rotate the MENU Wheel 1 upward. "1" appears and blinks. To focus on a nearer subject, rotate the MENU Wheel 1 downward. "4" appears and blinking. • If the lens is smeared or blurred, accurate focusing is not possible. • When shooting a subject close to the lens, zoom out first (੬ pg. 13, "Zooming"). If zoomed in in the auto focus mode, the camcorder could automatically zoom out depending on the distance between the camcorder and the subject. This does not occur with "TELE MACRO" (੬ pg. 21) in SYSTEM MENU. • Be sure to focus the lens in the maximum telephoto position when you use the Manual Focus mode. If you focus in on a certain subject in the wide-angle position, sharply focused images cannot be obtained when zoomed in because the depth-of-field is reduced at longer focal lengths. • When the focus level cannot be adjusted any farther or closer, " " or " " will blink. EXPOSURE Manual exposure adjustment is recommended in the following situations: • When shooting using reverse lighting or when the background is too bright. • When shooting on a reflective natural background such as at the beach or when skiing. • When the background is overly dark or the subject light. To brighten the image, rotate the MENU Wheel 1 downward. To darken the image, rotate the MENU Wheel 1 upward. The exposure control level increases/decreases (maximum ±06). GR-SXM740U_EN 18 18 02.4.22, 6:02 PM
-
 1
1 -
2
-
3
-
4
-
5
-
6
-
7
-
8
-
9
-
10
-
11
-
12
-
 13
13 -
 14
14 -
 15
15 -
 16
16 -
 17
17 -
 18
18 -
 19
19 -
 20
20 -
 21
21 -
 22
22 -
 23
23 -
24
-
25
-
26
-
27
-
28
-
29
-
30
-
31
-
32
 |
 |
