JVC GV-LS2W Basic User Guide - Page 11
Attaching/Removing Devices
 |
View all JVC GV-LS2W manuals
Add to My Manuals
Save this manual to your list of manuals |
Page 11 highlights
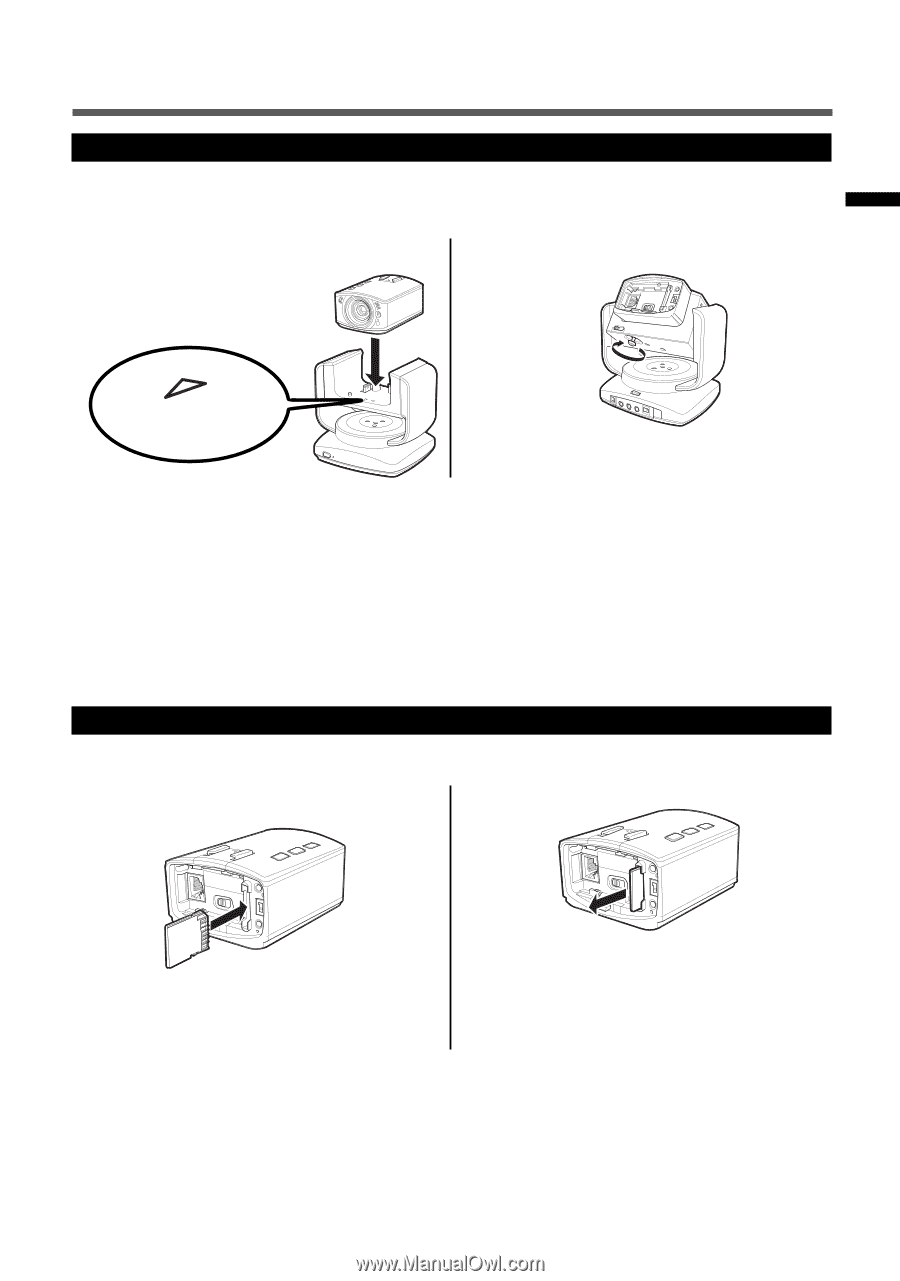
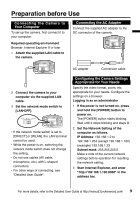
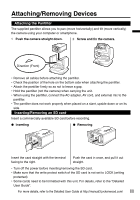
Attaching/Removing Devices Attaching the Pantilter The supplied pantilter allows you to pan (move horizontally) and tilt (move vertically) the camera using your computer or smartphone. 1 Push the camera straight down. 2 Screw and fix the camera. Direction (Front) MIC PPLOUWGEIRN AV EXTEND DC • Remove all cables before attaching the pantilter. • Check the position of the hole on the bottom side when attaching the pantilter. • Attach the pantilter firmly so as not to leave a gap. • Hold the pantilter (not the camera) when carrying the unit. • When using the pantilter, connect the AC adapter, AV cord, and external mic to the pantilter. • The pantilter does not work properly when placed on a slant, upside down or on its side. Inserting/Removing an SD card Insert a commercially available SD card before recording. ● Inserting ● Removing Insert the card straight with the terminal facing to the right. Push the card in once, and pull it out straight. • Turn off the power before inserting/removing the SD card. • Make sure that the write protect switch of the SD card is not set to LOCK (writing protected). • Some cards need to be formatted with this unit. For details, refer to the "Detailed User Guide". For more details, refer to the Detailed User Guide at http://manual3.jvckenwood.com/ 11
-
 1
1 -
2
-
3
-
4
-
5
-
 6
6 -
 7
7 -
 8
8 -
 9
9 -
 10
10 -
 11
11 -
 12
12 -
 13
13 -
 14
14 -
 15
15 -
 16
16 -
17
-
18
-
19
-
20
-
21
-
22
-
23
-
24
-
25
-
26
-
27
-
28
-
29
-
30
-
31
-
32
-
33
-
34
-
35
-
36
-
37
-
38
-
39
-
40
-
41
-
42
-
43
-
44
-
45
-
46
-
47
-
48
-
49
-
50
-
51
-
52
-
53
-
54
-
55
-
56
-
57
-
58
-
59
-
60
-
61
-
62
-
63
-
64
 |
 |