JVC GV-LS2W Basic User Guide - Page 9
Preparation before Use
 |
View all JVC GV-LS2W manuals
Add to My Manuals
Save this manual to your list of manuals |
Page 9 highlights
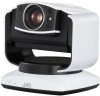
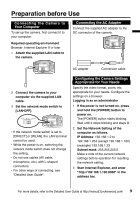
Preparation before Use Connecting the Camera to Your Computer To set up the camera, first connect it to your computer. Required operating environment Browser: Internet Explorer 9 or later 1 Attach the supplied LAN cable to the camera. RESET DIRECT WLAN LAN(OFF) ETHERENT PLUG IN POWER MIC DC AV Connecting the AC Adapter Connect the supplied AC adapter to the DC connector of the camera. RESET DIRECT WLAN LAN(OFF) ETHERENT PLUG IN POWER MIC DC AV AC adapter Conversion cable 2 Connect the camera to your computer via the supplied LAN cable. 3 Set the network mode switch to [LAN•OFF]. DIRECT WLAN LAN(OFF) RESET DIRECT WLAN LAN(OFF) ETHERENT PLUG IN POWER MIC DC AV • If the network mode switch is set to [DIRECT] or [WLAN], the LAN terminal cannot be used. • While the power is on, switching the network mode switch does not change the setting. • Do not use cables (AV cable, microphone, etc.) with L-shaped connecters. • For other ways of connecting, see "Detailed User Guide". Configuring the Camera Settings Appropriate for Your Needs Specify the video format, zoom, etc. appropriate for your needs. Configure the settings on a browser. Logging in as an administrator 1 If the power is not turned on, press and hold the [POWER] button to power on. The [POWER] button starts blinking. Wait until it stops blinking and stays lit. 2 Set the Network Setting of the computer as follows. IP Address: 192.168.1.2 to 192.168.1.254 (except 192.168.1.100) (example) 192.168.1.23 Subnet mask: 255.255.255.0 Make a note of the current network settings before operation for resetting the network setting. 3 Start Internet Explorer, and enter "http://192.168.1.100:8000" in the address bar. For more details, refer to the Detailed User Guide at http://manual3.jvckenwood.com/ 9
-
 1
1 -
2
-
3
-
 4
4 -
 5
5 -
 6
6 -
 7
7 -
 8
8 -
 9
9 -
 10
10 -
 11
11 -
 12
12 -
 13
13 -
 14
14 -
15
-
16
-
17
-
18
-
19
-
20
-
21
-
22
-
23
-
24
-
25
-
26
-
27
-
28
-
29
-
30
-
31
-
32
-
33
-
34
-
35
-
36
-
37
-
38
-
39
-
40
-
41
-
42
-
43
-
44
-
45
-
46
-
47
-
48
-
49
-
50
-
51
-
52
-
53
-
54
-
55
-
56
-
57
-
58
-
59
-
60
-
61
-
62
-
63
-
64
 |
 |
