JVC HD 52Z575 Instructions - Page 9
Quick Setup, Unpacking your TV
 |
UPC - 046838013034
View all JVC HD 52Z575 manuals
Add to My Manuals
Save this manual to your list of manuals |
Page 9 highlights
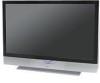
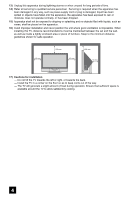
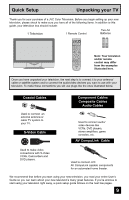
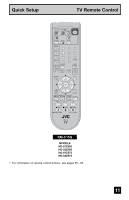
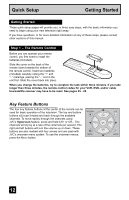
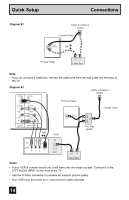
Quick Setup Unpacking your TV Thank you for your purchase of a JVC Color Television. Before you begin setting up your new television, please check to make sure you have all of the following items. In addition to this guide, your television box should include: 1 Television 1 Remote Control Two AA Batteries AA Alkaline AA Alkaline TV CATV VCR DVD POWER ASPECT TWIN MULTI SCREEN INDEX FREEZE SWAP SELECT INPUT 1 V1 1 2 3 INPUT 2 V2 4 5 6 INPUT 3 V3 7 8 9 INPUT 4 V4 TUNE RETURN+ 0 TV THEATER DIGITAL-IN PRO D-IN VIDEO STATUS SLEEP TIMER DISPLAY SOUND LIGHT + MUTING CH C.C. C.C. VOL OK VOL Note: Your television CH MENU BACK and/or remote VCR CHANNEL VCR / DVD PREV NEXT POWER TV / VCR REW PLAY FF control may differ PROGRAM POWER REC STOP PAUSE OPEN CLOSE STILL PAUSE from the examples RM-C15G illustrated here. Once you have unpacked your television, the next step is to connect it to your antenna/ cable or satellite system and to connect the audio/video devices you want to use with your television. To make these connections you will use plugs like the ones illustrated below. Coaxial Cables Used to connect an external antenna or cable TV system to your TV. S-Video Cable Component Cables Composite Cables Audio Cables Used to connect audio/ video devices like VCRs, DVD players, stereo amplifiers, game consoles, etc. AV CompuLink Cable Used to make video connections with S-Video VCRs, Camcorders and DVD players. Used to connect JVC AV CompuLink capable components for an automated home theater. We recommend that before you start using your new television, you read your entire User's Guide so you can learn about your new television's many great features. If you're anxious to start using your television right away, a quick setup guide follows on the next few pages. 9
-
 1
1 -
2
-
3
-
 4
4 -
 5
5 -
 6
6 -
 7
7 -
 8
8 -
 9
9 -
 10
10 -
 11
11 -
 12
12 -
 13
13 -
 14
14 -
15
-
16
-
17
-
18
-
19
-
20
-
21
-
22
-
23
-
24
-
25
-
26
-
27
-
28
-
29
-
30
-
31
-
32
-
33
-
34
-
35
-
36
-
37
-
38
-
39
-
40
-
41
-
42
-
43
-
44
-
45
-
46
-
47
-
48
-
49
-
50
-
51
-
52
-
53
-
54
-
55
-
56
-
57
-
58
-
59
-
60
-
61
-
62
-
63
-
64
-
65
-
66
-
67
-
68
-
69
-
70
-
71
-
72
-
73
-
74
-
75
-
76
-
77
-
78
-
79
-
80
 |
 |
