JVC RX5050 Instruction Manual - Page 17
Muting the Sound, Using the Sleep Timer, Press SLEEP repeatedly. - 20
 |
UPC - 046838017629
View all JVC RX5050 manuals
Add to My Manuals
Save this manual to your list of manuals |
Page 17 highlights
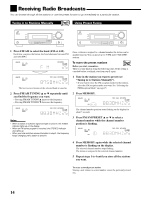
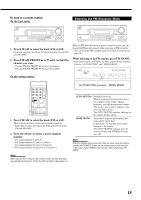
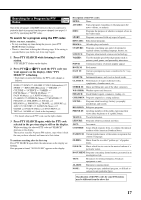
The following basic operations are possible only using the remote control. TA/NEWS/INFO REW REC PAUSE SLEEP FF CD-DISC Using the Sleep Timer MUTING Muting the Sound Muting the Sound Press MUTING to mute the sound through all speakers and headphones connected. "MUTING" appears on the display and the volume turns off (the VOLUME indicator and its level indication go off). To restore the sound, press MUTING again. • Turning MASTER VOLUME on the front panel or pressing VOLUME +/- on the remote control also restores the sound. Recording a source You can record any sources playing through the receiver to a cassette deck (or a CD recorder) connected to the TAPE/CDR jacks and the VCR connected to the VCR jacks at the same time. While recording, you can listen to the selected sound source at whatever sound level you like without affecting the sound levels of the recording. Note: The output volume level, Midnight Mode (see page 22), Equalization patterns (see page 25), Surround modes and DSP modes (see pages 26 to 29) cannot affect the recording. Basic adjustment auto memory This receiver memorizes sound settings for each source- • when you turn off the power, • when you change the source, • when you change the analog/digital input modes, and • when you assign the source name (see page 12). When you change the source, the memorized settings for the newly selected source are automatically recalled. The following can be stored for each source: • Analog/digital input mode (see page 11) • Input attenuator mode (see page 12) • Equalization pattern (see page 25) • Speaker output levels (see page 25) • Surround and DSP mode selection (see pages 26 and 29) Notes: • If the source is FM or AM, you can assign a different setting for each band. • A sound setting assigned for a digital component is valid for both the analog and digital input modes. Using the Sleep Timer Using the Sleep Timer, you can fall asleep while listening to music. When the shut-off time comes, the receiver turns off automatically. Press SLEEP repeatedly. The SLEEP indicator lights up on the display, and the shut-off time changes in 10 minutes intervals: 10 20 30 40 50 60 70 80 90 OFF (Canceled) To check or change the time remaining until the shut-off time: Press SLEEP once. The remaining time until the shut-off time appears in minutes. • To change the shut-off time, press SLEEP repeatedly. To cancel the Sleep Timer: Press SLEEP repeatedly until "SLEEP OFF" appears on the display. The SLEEP indicator goes off. • Turning off the power also cancels the Sleep Timer. 13
-
 1
1 -
2
-
3
-
4
-
5
-
6
-
7
-
8
-
9
-
10
-
11
-
 12
12 -
 13
13 -
 14
14 -
 15
15 -
 16
16 -
 17
17 -
 18
18 -
 19
19 -
 20
20 -
 21
21 -
 22
22 -
23
-
24
-
25
-
26
-
27
-
28
-
29
-
30
-
31
-
32
-
33
-
34
-
35
-
36
-
37
-
38
-
39
 |
 |
