Jenn-Air JGD8130ADS Installation Instruction - Page 7
To Convert Appliance For Use With Natural, Warning - burners
 |
View all Jenn-Air JGD8130ADS manuals
Add to My Manuals
Save this manual to your list of manuals |
Page 7 highlights
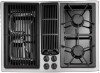
TO CONVERT APPLIANCE FOR USE WITH NATURAL GAS Propane Gas (LP) To Natural Gas Conversion Instructions If this appliance has been converted for use with LP Gas, each of the following modifications must be performed to convert the unit back to Natural Gas. WARNING Natural Gas conversion is to be performed by a Jenn-Air Authorized Service Contractor (or other qualified agency) in accordance with the manufacturer's instructions and all codes and requirements of the authority having jurisdiction. Failure to follow instructions could result in serious injury or property damage. The qualified agency performing this work assumes responsibility for this conversion. WARNING ELECTRICAL POWER AND GAS MUST BE TURNED OFF PRIOR TO CONVERSION Models - JGD8130 & JGD8345 Series Manifold - Natural Gas pressure required - 5² W.C. Incoming Natural Gas pressure required to appliance pressure regulator - 6² - 7² W.C. Natural Gas input specified, Model JGD8130/JGD8345 36,000 BTU/hr / 56,000 BTU/hr. A. Replace all orifice hoods - Perform steps 1 through 4 on page 4. Locate the (4) four or (2) two Natural Gas hoods (with small numbers stamped on their sides) saved from the original Natural Gas unit. Page 5 Illustration "E". The two hoods with .0520 (#55 orifice) stamped on them are for the left front and left rear burners. The two hoods with the .0550 (#54 orifice) stamped on them are for the two right burners. To make these conversion adjustments follow the instructions and illustrations ("A" through "E") pages 4 and 5. B. Invert cap in appliance pressure regulator (see Illustration "D"). With the appliance installed, the appliance pressure regulator is located on the center underside of the appliance at the inlet to the gas manifold. Identify the type of appliance pressure regulator on the unit and follow the instructions in the appropriate illustration. C. Adjust low flame setting for each burner. Follow the instructions for burner low flame adjustment on page 4 to increase the simmer flame size. RR LR CR RF JGD8345 (Shown) TIE DOWN BOLT ON EACH END GREASE CONTAINER LF CF APPLIANCE PRESSURE REGULATOR WIRING BOX COVER BLOWER CAN BE SWIVELED 90_ BURNER Left Rear (LR) Left Front (LF) Right Rear (RR) Right Front (RF) Center Rear (CR) Center Front (CF) BTU/hr 8,000 8,000 10,000 10,000 10,000 10,000 ORIFICE #55 #55 #54 #54 #54 #54 INCHES DIAMETER .0520 .0520 .0550 .0550 .0550 .0550 COLOR Brass Brass Brass Brass Brass Brass 7
-
 1
1 -
 2
2 -
 3
3 -
 4
4 -
 5
5 -
 6
6 -
 7
7 -
 8
8 -
 9
9 -
 10
10 -
 11
11 -
 12
12 -
13
-
14
-
15
-
16
-
17
-
18
-
19
-
20
-
21
-
22
-
23
-
24
 |
 |
