Jensen JGC9536ADB Installation Manual - Page 3
Shutter Adjustment, Grill Burner and Surface Burner Cartridge Air, Shutters, Illustrations - installation
 |
UPC - 719881123813
View all Jensen JGC9536ADB manuals
Add to My Manuals
Save this manual to your list of manuals |
Page 3 highlights
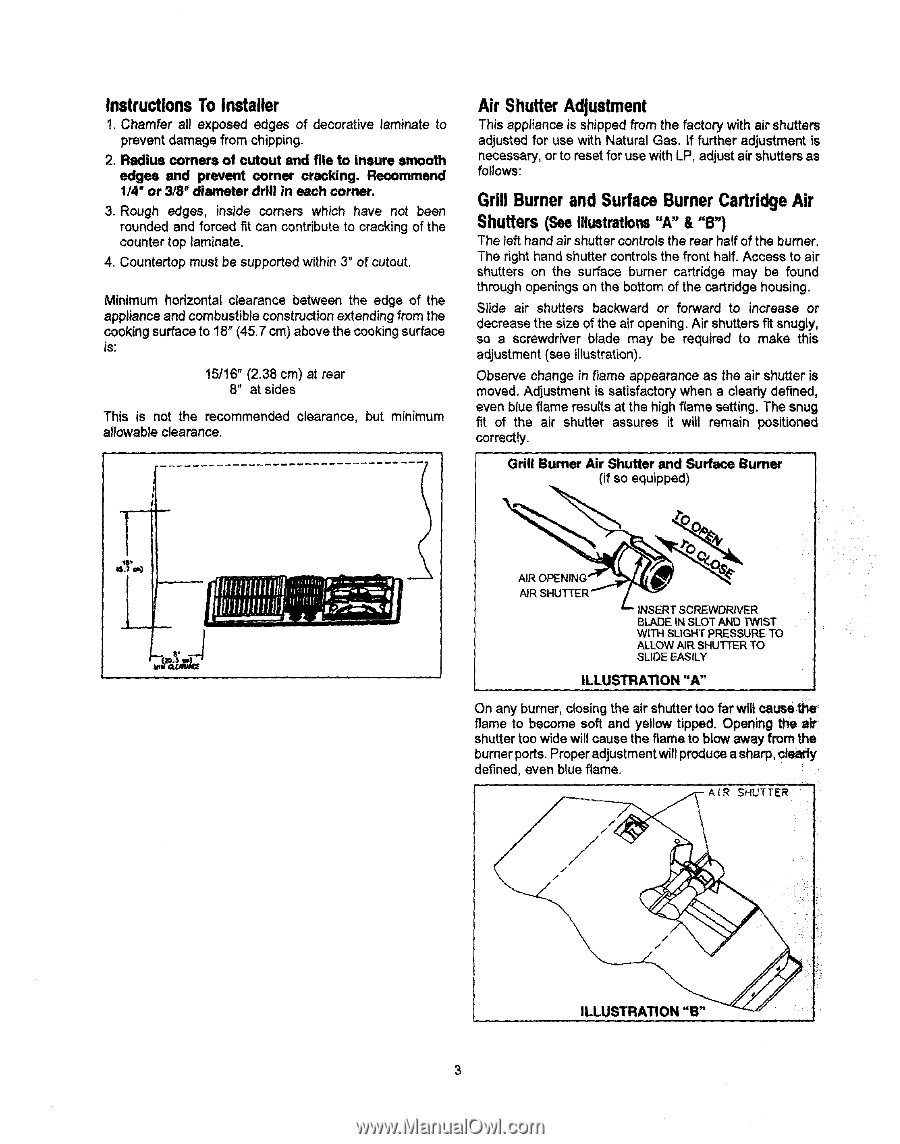
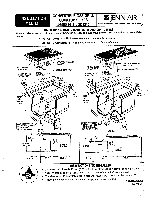
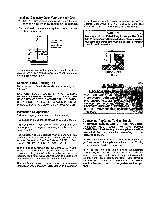
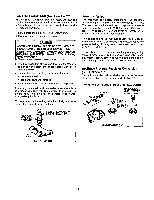
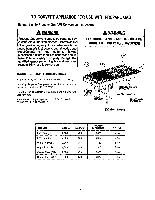
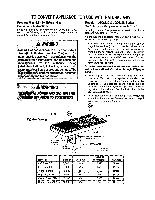
InstructionsTo Installer 1. Chamfer all exposed edges of decorative laminate to prevent damage from chipping. 2, Radius corners of cutout and file to insure smooth edges and prevent corner cracking. Recommend 1/4" or 3/8" diameter drill in each corner, 3. Rough edges, inside comers which have not been rounded and forced fit can contribute to cracking of the counter top laminate. 4. Countertop must be supported within 3" of cutout. Minimum horizontal clearance between the edge of the appliance and combustible construction extending from the cookingsurface to 18" (45,7 cm) above the cooking surface is: 15116"(2.38 cm) at rear 8" at sides This is not the recommended clearance, but minimum allowable clearance. Nr Shutter Adjustment This appliance is shipped from the factory with air shutters adjusted for use with N=ural Gas. If further adjustment is necessary, or to reset for use with LP, adjust air shutters as follows: Grill Burner and Surface Burner Cartridge Air Shutters (SeeIllustration"sA" & "B") The left hand air shuttercontrols the rear half of the burner. The right hand shutter controlsthe front half. Access to air shutters on the surface burner cartridge may be found through openings on the bottom of the cartridge housing. Slide air shutters backward or forward to increase or decrease the size of the air opening. Air shutters fit snugly, so a screwdriver blade may be required to make this adjustment (see illustration). Observe change in flame appearance as the air shutter is moved. Adjustment is satisfactory when a cleady defined, even blue flame results at the high flame setting. The snug fit of the air shutter assures it will remain positioned correctly. Grill Burner Air Shutter end Surface Bumer (if so equipped) AIR INSERT SCREWDRIVER BLADE IN SLOT AND TWIST WITH SLIGHT PRESSURE TO ALLOW AIR SHUTTER TO SLIDE EASILY ILLUSTRATION "A" On any burner, closingthe air shuttertoo far wilt cause the flame to become soft and yellow tipped. Opening the air shutter too wide will cause the flame to blow away from the burner ports. Proper adjustmentwill produce a sharp, clearly defined, even blue flame. -A{R SHUTTER ILLUSTRATION "B"
-
 1
1 -
 2
2 -
 3
3 -
 4
4 -
 5
5 -
 6
6 -
 7
7 -
 8
8
 |
 |