Jensen JiMS 220 User Guide - Page 6
Radio Operations, Location Of Controls - manual
 |
UPC - 077283932014
View all Jensen JiMS 220 manuals
Add to My Manuals
Save this manual to your list of manuals |
Page 6 highlights
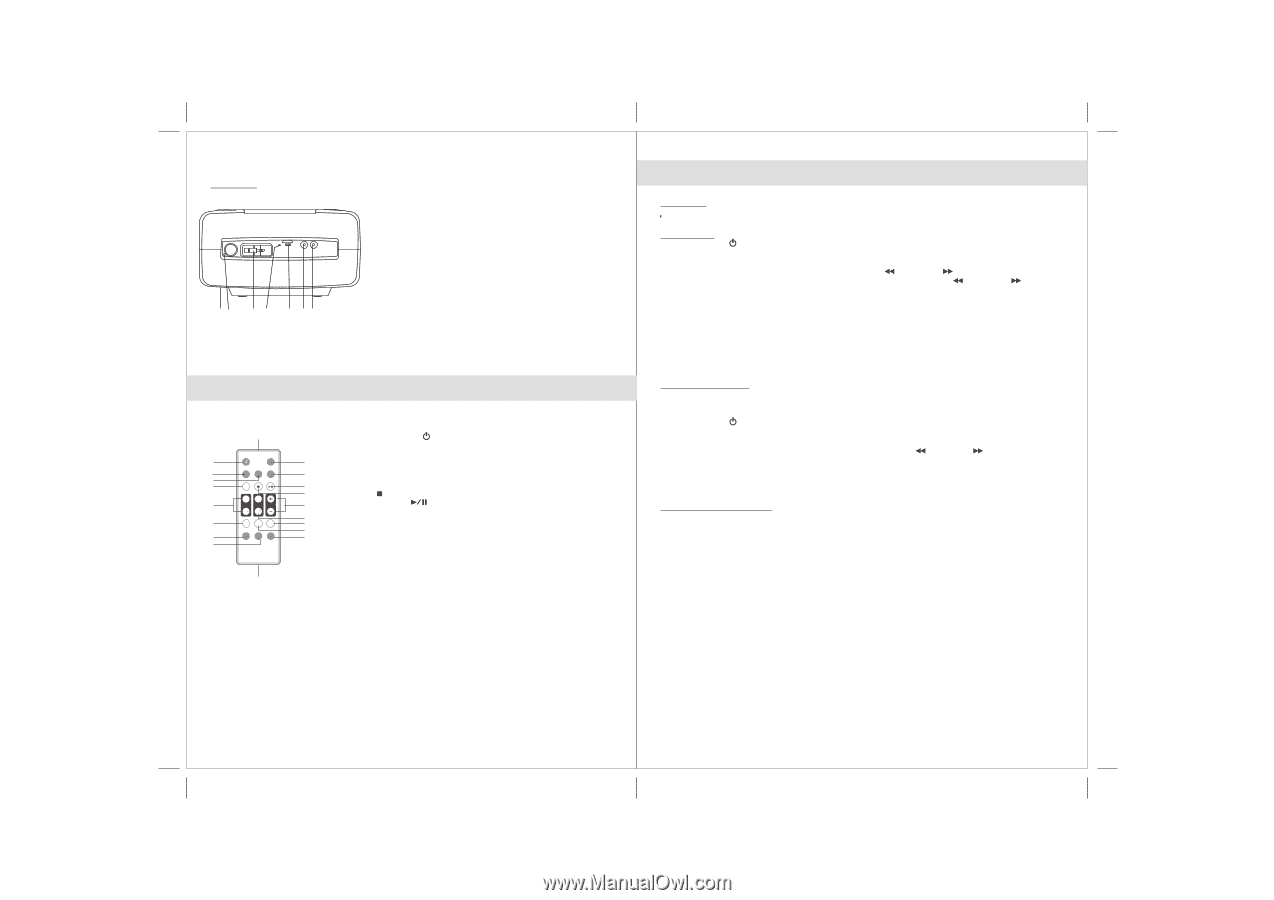
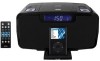
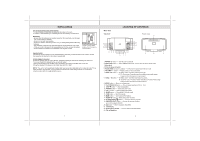
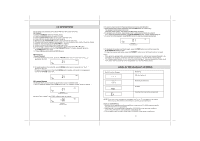
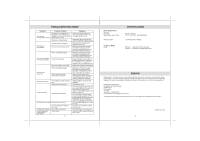
Rear view 29 26 27 28 25 24 30 24. Headphone Jack 25. BACKLIGHT Dimmer ---- Select LCD back-lit Dim/Bright. 26. FM Antenna wire 27. AUX IN ---- An audio signal input cable with a 3.5mm stereo plug for the connection of external audio device. 28. RESET ---- For resetting the unit. 29. Battery Compartment ---- Located at bottom of the unit. 30. DC IN Jack ---- To connect to external DC power supply LOCATION OF CONTROLS Remote Control 1 3 4 5 7 10 13 16 17 SLEEP POWER ON/OFF FUNC P-MODE MODE BAND CH+ CH TUN+ FF TUN FR VOLUME MEM PGM MUTE LIGHT EQ SNOOZE ON/OFF ALARM 2 6 9 8 12 11 15 14 18 19 1. Infra-red Transmitter 2. POWER On/Off button 3. SLEEP button - Select sleep timer duration 4. FUNCTION button - Select AM/FM radio, iPod, CD and AUX mode 5. P-MODE button - Select CD play mode 6. MODE button - Enter the setting mode 7. BAND button - Selects AM / FM radio band 8. STOP button - Stop CD playback 9. PLAY/PAUSE button - Play or pause playback of CD or iPod 10. CH+/- button - Select preset radio station 11. TUNE + /FF and TUNE - /FR button Tune the radio channel frequency up or down; Skip forward or skip backward in iPod, CD mode 12. VOLUME + / - button - Adjust volume level up and down 13. MEM button -Save radio preset station 14. PGM button - Set CD program 15. MUTE button - Mute volume 16. SNOOZE/LIGHT button - Activate the snooze functio, turn LCD backlight ON / OFF 17. EQ button - Select equalizer (EQ) effect 18. ALARM ON/OFF button - Turn the alarm on and off 19. Battery Compartment RADIO OPERATIONS FM Antenna Unwrap and fully extend the FM Antenna wire for best FM radio reception. Radio Tuning 1. Press POWER button to turn on the unit. 2. Press the FUNCTION button to select radio mode. Press BAND button to select AM / FM radio band, if necessary. 3.To manually tune to desired station, repeatedly press the / TUNE- or / TUNE + button. 4.To automatically search for stations with strong signals, press and hold the / TUNE- or / TUNE + button until the frequency digits on display begins to scan then release the button. The tuner will stop on the first strong station signal it finds. Notes: • Manual tune to select weaker stations that might be by passed during automatic tuning. • If the automatic tuning does not stop on the exact frequency of the station, for example, it stops on 100.9 MHz instead of 100.8 MHz, use the manual tuning method to "fine tune" to the exact frequency of the desired station. • In FM mode, you may press the MODE button to select FM stereo or mono receiving mode, if necessary. Radio Preset Stations The unit allows you to store up to 10 AM and 10 FM stations for easy recall at any time. Manual Preset 1. Press POWER button to turn on the unit. 2. Press the FUNCTION button to select radio mode. Press BAND button to select AM / FM radio band, if necessary. 3. Tune to the radio station you want to store in memory using the / TUNE- or 4. Press the MEM button. The preset channel number "01" appears on display. 5. To select desired preset station number, press CH + / - button. 6. To confirm preset location, press the MEM button. 7. To store up to 10 AM and 10 FM station presets, repeat steps 3 to 6 above. / TUNE + button. Tips for the Best Reception To obtain the best AM reception, slightly rotate the unit until the clearest signal is recrived or place it near outdoor. To obtain the best FM reception, fully extend the FM Antenna and adjust its direction. NOTE: The iPod may cause interference to the AM reception if it is docked and turned ON. You should turn off the iPod manually or remove it from the unit for better reception. 9 10
-
 1
1 -
 2
2 -
 3
3 -
 4
4 -
 5
5 -
 6
6 -
 7
7 -
 8
8 -
 9
9 -
 10
10
 |
 |