Jensen NVXM1000 User Manual - Page 7
Operating Navigation with XM, Ready, Getting Started - cradle
 |
UPC - 044476036439
View all Jensen NVXM1000 manuals
Add to My Manuals
Save this manual to your list of manuals |
Page 7 highlights
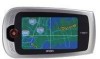
Power On/Off Slide Switch BOTTOM Input/Output Connector for Optional Cradle Docking Figure 1B. NVXM1000 Controls, Indicators and Connectors Note: To prolong battery life, make sure the Power On/Off slide switch is in the Off position whenever the unit is not in use or is being moved to another location or vehicle. 2. Operating Navigation with XM® Ready Navigation with XM® Ready is designed for easy operation. Consistent with these criteria, a minimum of hardware buttons is used on the NVXM1000; these consist of the Home button, Power On/Off slide switch and the Volume control. The remaining controls are operated by touching the LCD screen to access submenus pertaining to the various operating modes and their submenus and lists. 3. Getting Started To initialize NVXM1000 operation, proceed as follows: a. Connect the adapter power cord to a power source (home, car adapter); then plug the adapter DC power connector into the DC connector on the right side of the unit. b. If the XM® receiver is to be used, connect the XM antenna cable to the XM ANT connector on the rear left side of the unit. c. Adjust the tilt, angle and horizontal position of the unit to suit your personal preference. Note: If the unit is being turned on for the first time, or after a prolonged period of not being used, perform step d; otherwise, perform step e. d. On the bottom of the unit, on the right side, position the power On/Off slide switch to the On position to initially turn on the unit; the JENSEN logo appears on the screen for about 10 seconds, after which the operational modes default display appears. 6
-
 1
1 -
 2
2 -
 3
3 -
 4
4 -
 5
5 -
 6
6 -
 7
7 -
 8
8 -
 9
9 -
 10
10 -
 11
11 -
 12
12 -
13
-
14
-
15
-
16
-
17
-
18
-
19
-
20
-
21
-
22
-
23
-
24
-
25
-
26
-
27
-
28
-
29
-
30
-
31
-
32
-
33
-
34
-
35
-
36
-
37
-
38
-
39
-
40
-
41
 |
 |
