Jensen UPA424CS Owners Manual - Page 6
Low Level Input LOW-INPUT, Input Level LEVEL, High Level Input HIGH LEVEL
 |
View all Jensen UPA424CS manuals
Add to My Manuals
Save this manual to your list of manuals |
Page 6 highlights
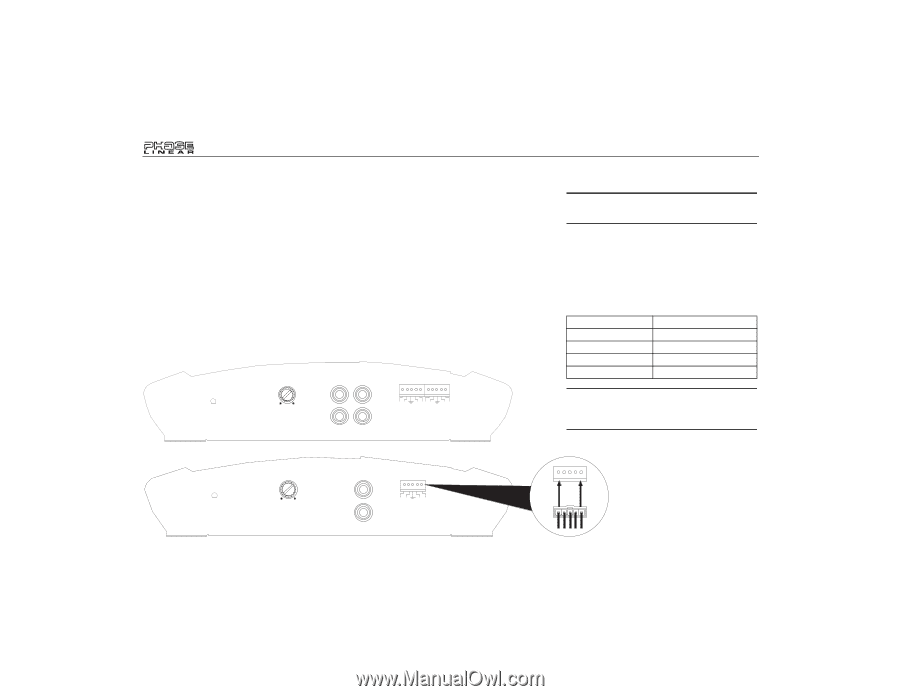
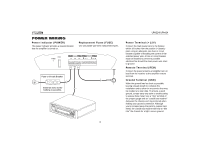
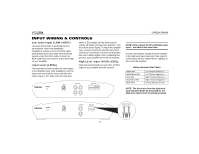
INPUT WIRING & CONTROLS Low Level Input (LOW-INPUT) Low level (RCA) input is preferred for best performance. Most trunk/hatchback installations require a 15-20 foot RCA cable, while pickup trucks and under-seat mounting require a 6-12 foot RCA cable. Connect an RCA cable from your receiver to the RCA input on your amplifier. Input Level (LEVEL) The input level control matches the radio output to the amplifier input. After installation, turn the input level control all the way to the left, then insert a tape or CD. Make sure the bass and treble or EQ settings are flat, then turn the volume up slowly until you hear distortion. Turn the volume down slightly. To match the amplifier input, slowly increase the amplifier input level control (turn clockwise) until you hear distortion, then turn it down slightly. After completing this process, your amplifier levels will be matched. High Level Input (HIGH LEVEL) High level input should be used when an RCA output is not available from the receiver. UPA424 POWER LEVEL MIN MAX LOW-INPUT CH1 CH3 CH2 CH4 HIGH LEVEL CH1/2INPUT CH3/4INPUT + - +-+- + - UPA224/UPA424 NOTE: Only connect the RCA OR High-Level Input - not both at the same time. Connect the speaker outputs from the receiver to the high level input connector, then plug the connector(s) into the "HIGH INPUT" outlet(s) on the end of the amplifier. Wiring Harness Color Codes White Wire White/Black Wire Gray Wire Gray/Black Wire Black Wire Left Channel Positive (+) Left Channel Negative (-) Right Channel Positive (+) Right Channel Negative (-) Chassis (Power) Ground NOTE: The black wire from the high-level input harness MUST be grounded for the high-level input circuit to operate properly. UPA224 POWER LEVEL MIN MAX LOW-INPUT CH1 CH2 HIGH LEVEL CH1/2INPUT +- +- 6
-
 1
1 -
 2
2 -
 3
3 -
 4
4 -
 5
5 -
 6
6 -
 7
7 -
 8
8 -
 9
9 -
 10
10 -
 11
11 -
 12
12 -
13
-
14
-
15
-
16
-
17
-
18
-
19
-
20
-
21
-
22
-
23
-
24
-
25
-
26
-
27
-
28
-
29
 |
 |