Jensen VM9022HD Operation Manual - Page 22
Exiting the System Setup Menu
 |
UPC - 043258304292
View all Jensen VM9022HD manuals
Add to My Manuals
Save this manual to your list of manuals |
Page 22 highlights
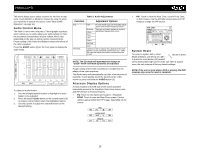
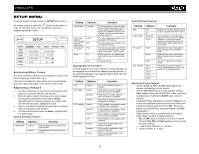
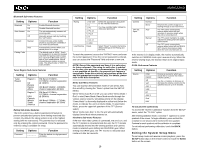
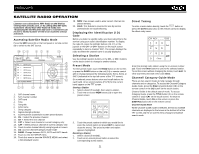
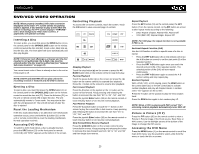
VM9022HD Bluetooth Sub-menu Features Setting Options Function Bluetooth On Off Auto Answer On Off Connect Manual Auto Pairing Code Enable Bluetooth function. Disable Bluetooth function. The unit automatically answers all incoming calls. Manually answer calls by touching the "call" button. Connect the last active mobile phone by touching the CONNECT icon when disconnected. Automatically connect when your paired phone is in range. The default code is "1234". Touch the keypad icon to open the keypad and enter the pairing code or pass key required for Bluetooth connection to your mobile phone. Not all phones/devices require a pairing code. The default code is "0000" for many models. Tuner Region Sub-menu Features Setting Tuner Region Options Function Region 1 UK Europe Russia Africa Region 2 USA Canada Mexico South America FM Band: 87.6MHz 107.9MHz, channel separation @ 100kHz AM Band: 531kHz - 1602kHz, channel separation @ 9kHz FM Band: 87.9MHz 107.9MHz, channel separation @ 200kHz AM Band: 530kHz - 1710kHz, channel separation @ 10kHz Rating Sub-menu Features The DVD system has a built-in parental lock feature to prevent unauthorized persons from viewing restricted disc content. By default, the rating system is set at the highest setting (with no restrictions). The parental lock is released only by entering the correct password. Once the password is entered, rating is available for setup. Setting Password Options Function _ _ _ _ _ _ Enter the default six-digit password (012345). Setting Options Function Rating Load Factory 1. Kid Safe 2. G 3. PG 4. PG-13 5. PG-R 6. R 7. NC-17 8. Adult Reset Select the appropriate rating level for the intended audience. You may override higher ratings by using your password. Select "Reset" to restore the factory default settings for the Rating system only. To reset the password, access the "RATING" menu and enter the current password. Once the correct password is entered, you can access the "Password" field and enter a new one. NOTE: Record the password and keep it in a safe place for future reference. The rating for each disc is marked on the disc, disc packing, or documentation. If the rating is not available on the disc, the parental lock feature is unavailable. Some discs restrict only portions of the disc and the appropriate content will play. For details, please refer to the disc description. Demo Sub-Menu Features You can stop/run demonstration mode or turn Demo Auto Run on/off by chooing the "Demo" option from the SETUP MENU. When "Demo Auto Run" is Off, you can select "Demo Mode > Run" to start Demo Mode. Demo Mode scrolls through the various source screens, simulating activity on the display. "Demo Mode" is discreetly displayed in yellow text (below the clock), to indicate the unit is in Demo Mode. To stop Demo Mode, press the upper-left quadrant of the TFT (Source select). When "Demo Auto Run" is On, the unit will automatically display Demo Mode when powered on. Hardware Sub-menu Features If the rear-view video camera is connected, the unit is on, and the TFT monitor is retracted inside the unit, the TFT monitor automatically moves into the viewing position and Camera mode is selected upon shifting into REVERSE gear. When shifting into DRIVE gear, the TFT monitor is retracted back inside unit after ten seconds. 18 Setting Camera TFT Set Open Options Function Normal Mirror Auto Manual Off Reverse the camera image as if looking through a rear-view mirror. The TFT panel automatically retracts when turned off and resumes its previous angle when the unit is turned back on. The TFT panel maintains its angle adjustment setting when the radio is turned on/off. The TFT panel automatically retracts when turned off and DOES NOT resume its previous angle when the unit is turned back on. If the monitor is in display mode, the monitor automatically switches to CAMERA mode upon reverse driving. When the reverse driving stops, the monitor return to its original input mode. P.VOL Sub-menu Features Setting Source Options Function DISC RADIO SD SAT AUX 1 USB BT AUX 2 iPod NAV Choose a source for which you would like to increase the relative volume (LEVEL). Use the +/- buttons to increase or decrease the relative volume for the specified source up to 6 decibels. TS Cal (Screen Calibration) To access the "Screen Calibration" function from the SETUP menu, select the "TS CAL" option. After entering calibration mode, a crosshair appears in a corner quadrant of the screen. To begin calibration, press and hold the crosshair for one second until it moves to the next quadrant. Continue for each quadrant until the calibration is completed. To exit without performing calibration, touch the BACK button. Exiting the System Setup Menu To exit setup mode and resume normal playback, press the SETUP button (31) on the remote control or touch the BACK button on the screen.
-
 1
1 -
2
-
3
-
4
-
5
-
6
-
7
-
8
-
9
-
10
-
11
-
12
-
13
-
14
-
15
-
16
-
 17
17 -
 18
18 -
 19
19 -
 20
20 -
 21
21 -
 22
22 -
 23
23 -
 24
24 -
 25
25 -
 26
26 -
 27
27 -
28
-
29
-
30
-
31
-
32
-
33
-
34
-
35
-
36
-
37
-
38
-
39
-
40
-
41
-
42
-
43
-
44
-
45
-
46
 |
 |