Jensen VM9410 Owners Manual - Page 16
Tuner Operation
 |
UPC - 043258301819
View all Jensen VM9410 manuals
Add to My Manuals
Save this manual to your list of manuals |
Page 16 highlights
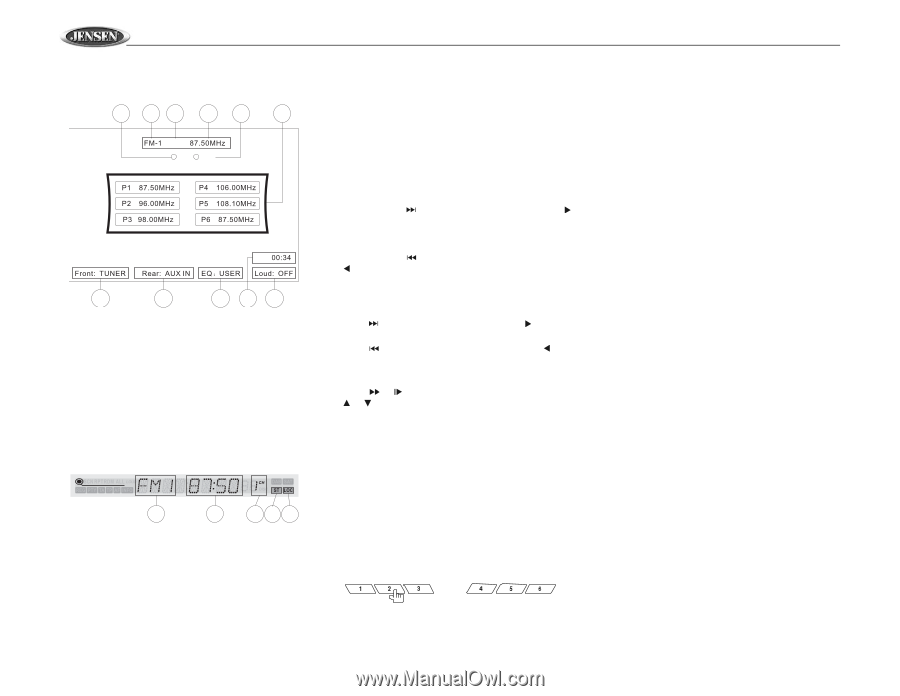
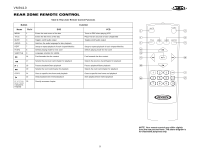
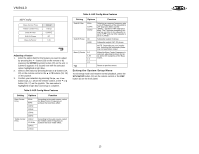
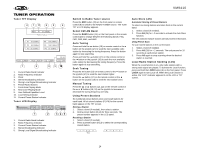
TUNER OPERATION Tuner TFT Display 4 1 11 2 5 6 P1 ST Loc 7 8 9 3 10 1. Current Radio Band Indicator 2. Radio Frequency Indicator 3. Clock 4. Stereo Broadcasting Indicator 5. Strong Local Signal Broadcasting Indicator 6. Preset Radio Stations 7. Front Zone Playing Mode 8. Rear Zone Playing Mode 9. User Defined Equalizer Level 10. Loud Setting Indicator 11. Current Preset Station Indicator Tuner LCD Display 1 2 345 1. Current Radio Band Indicator 2. Radio Frequency Indicator 3. Current Preset Station Indicator 4. Stereo Broadcasting Indicator 5. Strong Local Signal Broadcasting Indicator VM9410 Switch to Radio Tuner source Press the SRC button (15) on the front panel or remote control (8) to switch to the RADIO TUNER source. The Tuner TFT or LCD display appears. Select FM/AM Band Press the BAND button (14) on the front panel or the remote control (20) to change between the following bands: FM1, FM2, FM3, AM1, and AM2. Auto Tuning Press and hold the button (19) on remote control or the button on the joystick (17) to seek the next available radio station by increasing the tuning frequency. Press the button again to stop searching. Press and hold the button (17) on the remote control or the button on the joystick (16) to seek the next available radio station by decreasing the tuning frequency. Press the button again to stop searching. Seek Tuning Press the button (19) on remote control or the button on the joystick (17) to seek the next station higher. Press the button (17) on the remote control or the button on the joystick (16) to seek the next station lower. Manual Tuning Press the or buttons (14, 22) on the remote control or the or buttons (18, 19) on the joystick to increase or decrease the tuning frequency one step. Using Preset Stations Six numbered preset buttons store and recall stations for each band. All six stored stations (P1-P6) for the current band appear on the TFT screen. Storing a Station 1. Select a band (if needed), then select a station. 2. Hold a preset button (8-13) for three seconds. The preset number appears in the LCD panel. Recalling a Station 1. Select a band (if needed). 2. Press a preset button (8-13) to select the corresponding stored station. Auto Store (AS) Automatic Storing of Preset Stations To select six strong stations and store them in the current band: 1. Select a band (if needed). 2. Press AS (26) for > 2 seconds to activate the Auto Store function. The new stations replace stations already stored in that band. Using Preset Scan To scan stored stations in the current band: 1. Select a band (if needed). 2. Press AS (26) for < 2 seconds. The unit pauses for 10 seconds at each preset station. 3. Press AS again to stop scanning when the desired station is reached. Local Radio Station Seeking (LOC) When the Local function is on, only radio stations with a strong radio signal are played. To activate the Local function, press and hold the LO/DX button (6) on the front panel. Press LO/DX again to turn Local off. When the Local function is active, the "LOC" indicator appears lit on the LCD or TFT screen. 14
-
 1
1 -
2
-
3
-
4
-
5
-
6
-
7
-
8
-
9
-
10
-
 11
11 -
 12
12 -
 13
13 -
 14
14 -
 15
15 -
 16
16 -
 17
17 -
 18
18 -
 19
19 -
 20
20 -
 21
21 -
22
-
23
-
24
-
25
 |
 |