Kenmore 33124 Owners Manual - Page 10
the Water, Heater, Wiring, Diagram
 |
View all Kenmore 33124 manuals
Add to My Manuals
Save this manual to your list of manuals |
Page 10 highlights
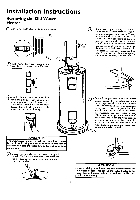
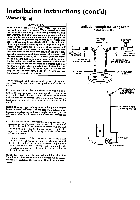
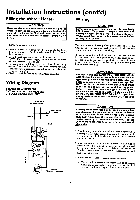
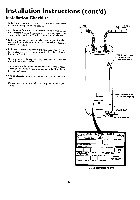
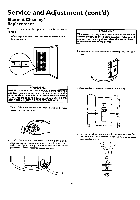
Installation Instructions (cont'd) Filling the Water Heater Wiring A CAUTION . JNever use this water heater unlessit is completely full of J Jwater. To prevent damage to the tank and heating ele- J Jment, the tank must be filled with water. Water mustJ Jflow from the hot water faucet before turning "ON"[ j power. [ A CAUTION ] Never use this wat_ss it is completelyJ full of water. To prevent damage to the tank andJ heating element, the tank must he filled with water. J Water must flow from the hot water faucet beforeJ turning "ON" power. J To fill the water heater with water: • Close the water heater drain valve by turning the handle to the tight (clockwise). The drain valve is on the lower front of the water heater. • Open the cold water supply valve to the water heater. NOTE: The cold water supply valve must be left open when the water heater is in use. • To insure complete filling of the tank, allow air to exit by opening the nearest hot water faucet. Allow water to run until a constant flow is obtained. This will let air out of the water heater and the piping. • Check all new water piping for leaks. Repair as needed. Wiring Diagram STANDARD WIRING FOR 2 WIRE LEAD WATER HEATERS 240 VOLT SINGLE ELEMENT TO ELECTRIC POWER SUPPLY You must provide all wiring of the proper size outside of the water hearer. You must obey local codes and electric company requirements when you install this wiring. lfyou are not familiar with electric codes and practices, or if you have any doubt, even the slightest doubt, in your ability to connect the wiring to this water heater, obtain the service of a competent electrician. Contact your Sears salesperson to arrange for a professional electrician. A WARNING WATER HEATERS EQUIPPED FOR ONE VOLTAGE ONLY: This water heater is equipped for one type voltage only. Check the rating plate near the bottom access panel for the correct voltage. DO NOT use this water heater with any voltage other than the one shown on the model rating plate. Failure to use the correct voltage can cause problems which can result in DEATH, SERIOUS BODILY INJURY, OR PROPERTY DAMAGE. If you have any questions or doubts consult your electric company. &CAUTION If wiring from your fuse box or circuit breaker box was aluminum for your old water heater, replace it with copper wire. If you wish to reuse the existing aluminum wire, have the connection at the water heater made by a competent electrician. Contact your Sears salesperson to arrange for a professional electrician. -__HE LOWER ATING ELEMENT 1. Provide a way to easily shut off the electric power when working on the water heater. This could be with a circuit breaker or fuse block in the entrance box or a separate disconnect switch. 2. Install and connect a circuit directly from the main fuse or circuit breaker box. This circuit must be the right size and have its own fuse or circuit breaker. Refer to the chart in the "Product Specifications" section for the correct size wire and fuse or circuit bteaker. 3. If metal conduit is used for the grounding conductor: A. The grounding electrode conductor shall be of copper, aluminum, or copperclad aluminum. The material shall be of one continuous length without a splice or joint. 10
-
 1
1 -
2
-
3
-
4
-
 5
5 -
 6
6 -
 7
7 -
 8
8 -
 9
9 -
 10
10 -
 11
11 -
 12
12 -
 13
13 -
 14
14 -
 15
15 -
16
-
17
-
18
-
19
-
20
-
21
-
22
-
23
-
24
 |
 |
