Kenmore 60581 Use and Care Guide - Page 3
Remove, Existing, Disposer, Clean, Drain, Prepare, Dishwasher, Connection, Applicable - disposal
 |
View all Kenmore 60581 manuals
Add to My Manuals
Save this manual to your list of manuals |
Page 3 highlights
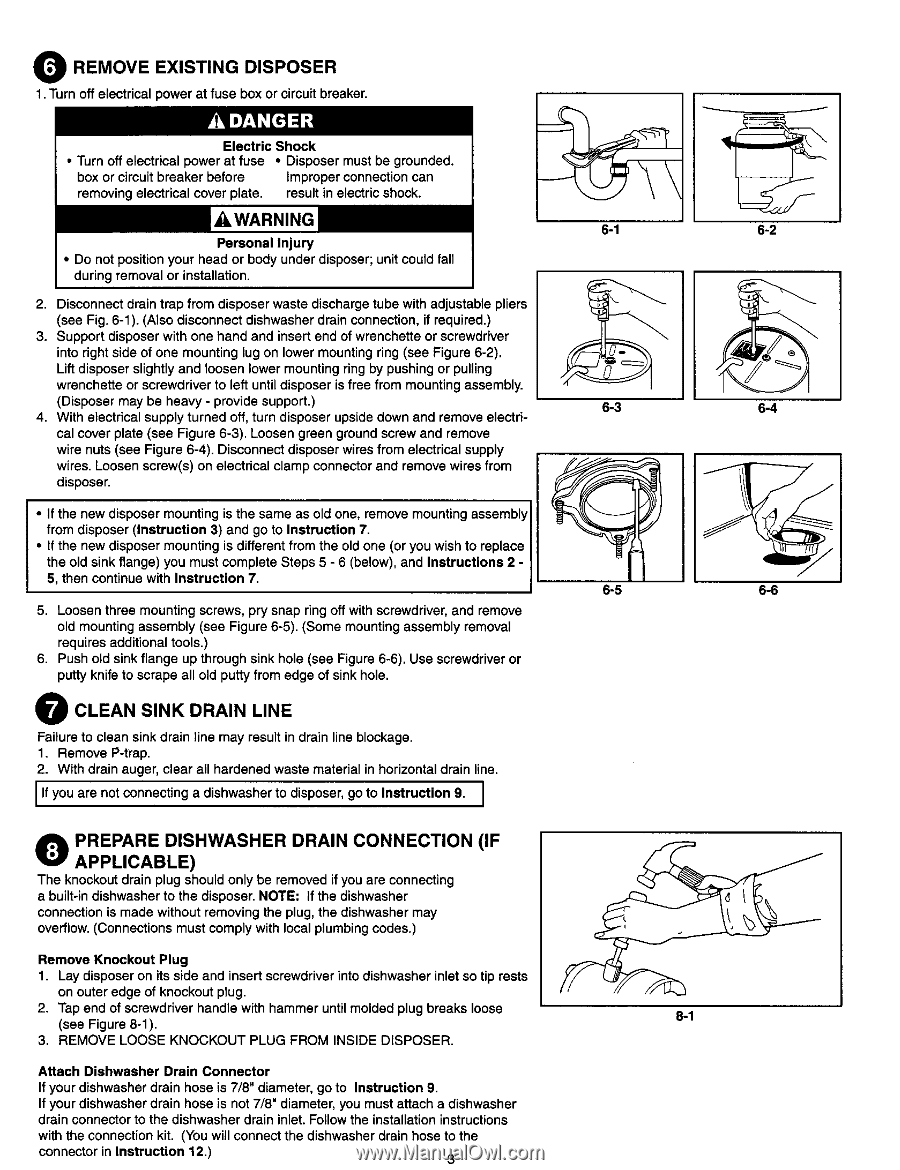
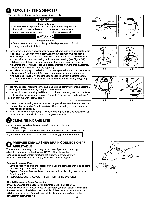
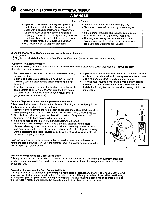
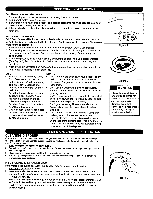
O REMOVE EXISTING DISPOSER 1, Turn off electrical power at fuse box or circuit breaker. _WARNING Personal Injury • Do not position your head or body under disposer; unit could fall during removal or installation. 6-1 6-2 2. Disconnect drain trap from disposer waste discharge tube with adjustable pliers (see Fig. 6-1). (Also disconnect dishwasher drain connection, if required.) 3. Support disposer with one hand and insert end of wrenchette or screwdriver into right side of one mounting lug on lower mounting ring (see Figure 6-2). Lift disposer slightly and loosen lower mounting ring by pushing or pulling wrenchette or screwdriver to left until disposer is free from mounting assembly. (Disposer may be heavy - provide support.) 6-3 4. With electrical supply turned off, turn disposer upside down and remove electri- cal cover plate (see Figure 6-3). Loosen green ground screw and remove wire nuts (see Figure 6-4). Disconnect disposer wires from electrical supply wires. Loosen screw(s) on electrical clamp connector and remove wires from disposer. If the new disposer mounting is the same as old one, remove mounting assembly I from disposer (Instruction 3) and go to Instruction 7. • If the new disposer mounting is different from the old one (or you wish to replace I the old sink flange) you must complete Steps 5 - 6 (below), and Instructions 2 - | 5, then continue with Instruction 7. J 6-5 5. Loosen three mounting screws, pry snap ring off with screwdriver, and remove old mounting assembly (see Figure 6-5). (Some mounting assembly removal requires additional tools.) 6. Push old sink flange up through sink hole (see Figure 6-6). Use screwdriver or putty knife to scrape all old putty from edge of sink hole. O CLEAN SINK DRAIN LINE Failure to clean sink drain line may result in drain line blockage. 1. Remove P-trap. 2. With drain auger, clear all hardened waste material in horizontal drain line. If you are not connecting a dishwasher to disposer, go to Instruction 9. 1 J O PARPEPPLIACRAEBLED)ISHWASHER DRAIN CONNECTION (IF The knockout drain plug should only be removed if you are connecting a built-in dishwasher to the disposer. NOTE: If the dishwasher connection is made without removing the plug, the dishwasher may overflow. (Connections must comply with local plumbing codes.) Remove Knockout Plug 1. Lay disposer on its side and insert screwdriver into dishwasher inlet so tip rests on outer edge of knockout plug. 2. Tap end of screwdriver handle with hammer until molded plug breaks loose (see Figure 8-1). 3. REMOVE LOOSE KNOCKOUT PLUG FROM INSIDE DISPOSER. Attach Dishwasher Drain Connector If your dishwasher drain hose is 7/8" diameter, go to Instruction 9. If your dishwasher drain hose is not 7/8" diameter, you must attach a dishwasher drain connector to the dishwasher drain inlet. Follow the installation instructions with the connection kit. (You will connect the dishwasher drain hose to the connector in Instruction 12.) 3
-
 1
1 -
 2
2 -
 3
3 -
 4
4 -
 5
5 -
 6
6 -
 7
7 -
 8
8
 |
 |