Kenmore 60581 Use and Care Guide - Page 5
Attach Discharge Tube To Waste Drain Line - # disposal
 |
View all Kenmore 60581 manuals
Add to My Manuals
Save this manual to your list of manuals |
Page 5 highlights
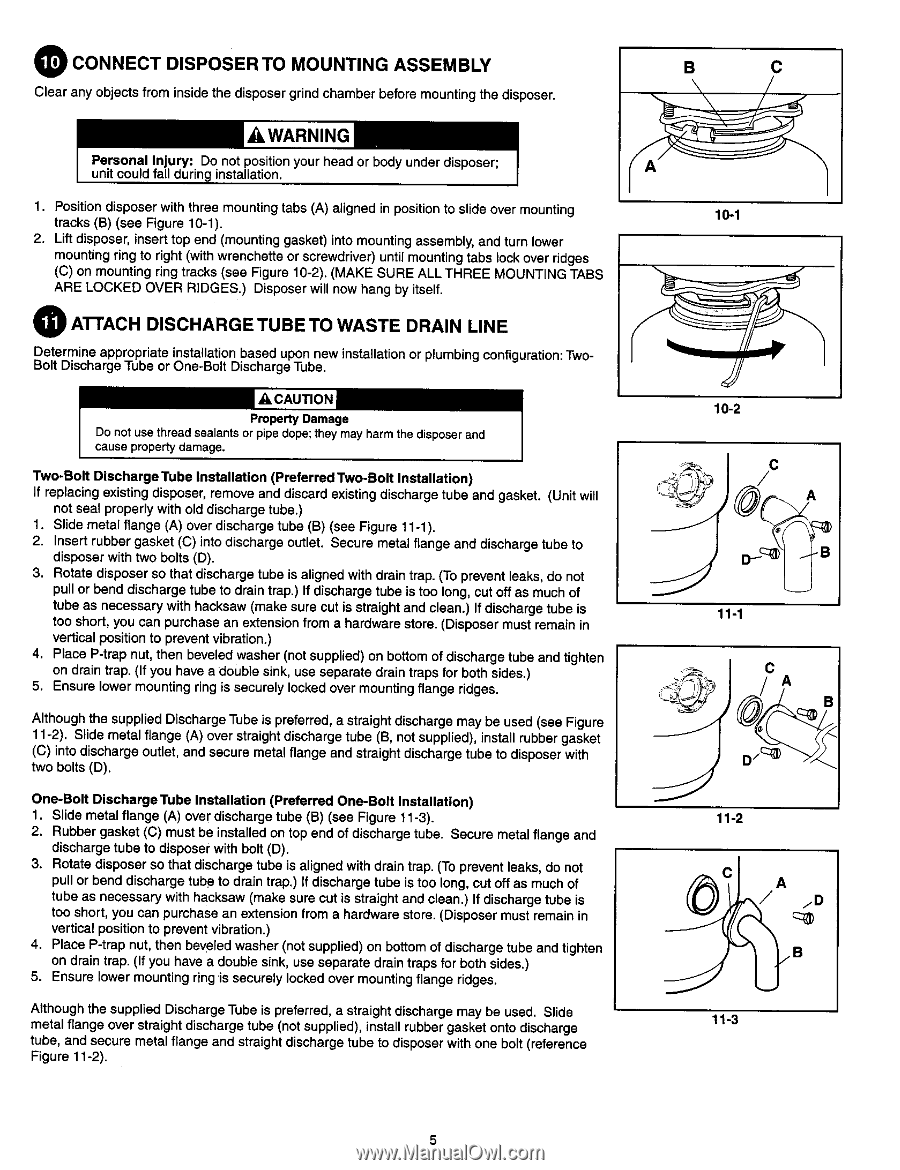
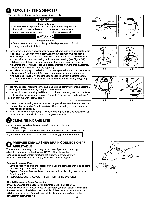
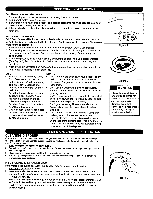
O CONNECT DISPOSERTO MOUNTING ASSEMBLY Clear any objects from inside the disposer grind chamber before mounting the disposer. _WARNING Personal Injury: Do not position your head or body under disposer; unit could fall during installation. 1. Position disposer with three mounting tabs (A) aligned in position to slide over mounting tracks (B) (see Figure 10-1). 2. Lift disposer, insert top end (mounting gasket) into mounting assembly, and turn lower mounting ring to right (with wrenchette or screwdriver) until mounting tabs lock over ridges (C) on mounting ring tracks (see Figure 10-2). (MAKE SURE ALL THREE MOUNTING TABS ARE LOCKED OVER RIDGES.) Disposer will now hang by itself. 1ATTACH DISCHARGE TUBE TO WASTE DRAIN LINE Determine appropriate installation based upon new installation or plumbing configuration: TwoBolt Discharge Tube or One-Bolt Discharge Tube. Property Damage Do not use thread sealants or pipe dope; they may harm the disposer and cause property damage. Two-Bolt DlechargeTube Installation (PreferredTwo-Bolt Installation) if replacing existing disposer, remove and discard existing discharge tube and gasket. (Unit will not seal properly with old discharge tube.) 1. Slide metal flange (A) over discharge tube (B) (see Figure 11-1). 2. Insert rubber gasket (C) into discharge outlet. Secure metal flange and discharge tube to disposer with two bolts (D). 3. Rotate disposer so that discharge tube is aligned with drain trap. (To prevent leaks, do not pull or bend discharge tube to drain trap.) If discharge tube is too long, cut off as much of tube as necessary with hacksaw (make sure cut is straight and clean.) If discharge tube is too short, you can purchase an extension from a hardware store. (Disposer must remain in vertical position to prevent vibration.) 4. Place P-trap nut, then beveled washer (not supplied) on bottom of discharge tube and tighten on drain trap. (If you have a double sink, use separate drain traps for both sides.) 5. Ensure lower mounting ring is securely locked over mounting flange ridges. Although the supplied Discharge Tube is preferred, a straight discharge may be used (see Figure 11-2). Slide metal flange (A) over straight discharge tube (B, not supplied), install rubber gasket (C) into discharge outlet, and secure metal flange and straight discharge tube to disposer with two bolts (D). One-Bolt Discharge Tube Installation (Preferred One-Bolt Installation) 1, Slide metal flange (A) over discharge tube (B) (see Figure 11-3). 2. Rubber gasket (C) must be installed on top end of discharge tube. Secure metal flange and discharge tube to disposer with bolt (D). 3. Rotate disposer so that discharge tube is aligned with drain trap. (To prevent leaks, do not pull or bend discharge tube to drain trap.) If discharge tube is too long. cut off as much of tube as necessary with hacksaw (make sure cut is straight and clean.) If discharge tube is too short, you can purchase an extension from a hardware store. (Disposer must remain in vertical position to prevent vibration.) 4. Place P-trap nut, then beveled washer (net supplied) on bottom of discharge tube and tighten on drain trap. (If you have a double sink, use separate drain traps for both sides.) 5. Ensure lower mounting ring 'is securely locked over mounting flange ridges. Although the supplied Discharge Tube is preferred, a straight discharge may be used. Slide metal flange over straight discharge tube (not supplied), install rubber gasket onto discharge tube, and secure metal flange and straight discharge tube to disposer with one bolt (reference Figure 11-2). B C 10-1 10-2 / 11-1 _ C D 11-2 11-3
-
 1
1 -
 2
2 -
 3
3 -
 4
4 -
 5
5 -
 6
6 -
 7
7 -
 8
8
 |
 |