Kenmore 6823 Use and Care Guide - Page 7
Tools Necessary - washer
 |
View all Kenmore 6823 manuals
Add to My Manuals
Save this manual to your list of manuals |
Page 7 highlights
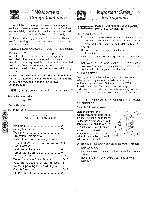
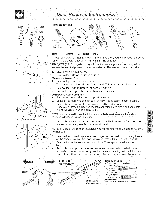
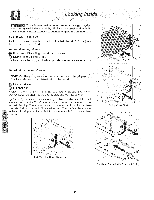
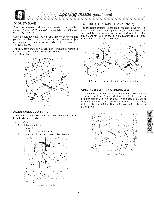
Screw I Tools Necessary: Adjustable Wrench 3/8" Fixed Wrench A _._ ...._. Top H nge "- Cover _' and Flat Head Screw Driver DOOR REMOVAL INSTRUCTIONS: If your refrigerator will not fit through an entrance area, you can reduce its size by removing the doors. Checkfirst by measuring the entrance. .... IMPORTANT: Before you beg n turn the refrigerator temperature control to 0 and remove the electrical power cord from the wall outlet. Remove food from door shelves. ....-.__ b_/, _ Top Hinge.. / .Wood Block ,,Pin Center 12.. DRiesmcoonvneectot eeglericllteric(asel esufigpuprlye. on page 5). To remove freezer door: 1. Remove top hinge cover and screws. 2. Trace around the hinge with a soft lead pencil. This makes reinstallation easier. 3. Remove top hinge and lift door off bottom hinge pin. 4. Reinstall door in opposite order and mannerof removal. To remove refrigerator door: 1. Place wood block under door to support its weight. 2. Unfasten the multi-wire cable bracket by removing its screw from the cabinet. 3. Detach the multi-wire cable connector located below the door. Place your thumbs on flat sides of each connector, grasp firmly, and bend both ends back and forth while pulling apart. NOTE: You may need to insert a flat screwdriver bet_veen the connector ends to release the locking tab (see illustration). 4. Detach the water tube from the connector located below the door. The connector releases when you press its outer sleeve inward. NOTE: If refrigerator has been used, have a container ready to catch excess water from tube. 5. Remove the bottom hinge screws and hinge, holding the door as its weight rests on the wood block. Lay the door on its side to avoid damage to cable and tube. 6. Remove the center hinge screws and hinge. Ensure plastic washer stays on 7. Reinstall door in opposite order and manner of removal. When both doors are reinstalled, connect water line by inserting tube and pushing until mark touches face of fitting, Connect cable, replace toe grille, and plug in electrical power cord, TO DISCONNECT 1. Press outer nng against face Connector Bush untiJ mark touches face of tiffing
-
 1
1 -
 2
2 -
 3
3 -
 4
4 -
 5
5 -
 6
6 -
 7
7 -
 8
8 -
 9
9 -
 10
10 -
 11
11 -
 12
12 -
13
-
14
-
15
-
16
-
17
-
18
-
19
-
20
-
21
 |
 |
