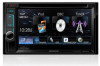
Kenwood DDX272 User Manual - Page 32
Other External Components
 |
View all Kenwood DDX272 manuals
Add to My Manuals
Save this manual to your list of manuals |
Page 32 highlights
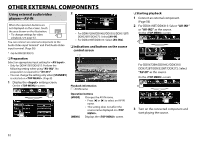
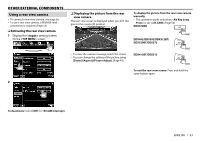
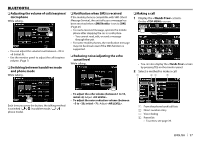
OTHER EXTERNAL COMPONENTS Using external audio/video 2 players-AV-IN When the operation buttons are not displayed on the screen, touch the area shown on the illustration. • To change settings for video playback, see page 43. You can connect an external component to the Audio Video input terminal* and iPod/Audio Video input terminal. (Page 56) * Only for DDX415BT/DDX315. ❏ Preparation Select an appropriate input setting for . • Only for DDX415BT/DDX315: Perform the following setting when using "AV-IN2". No preparation is required for "AV-IN1". • You can change the setting only when [STANDBY] is selected on . (Page 8) 1 Display the setting screen. On the screen: • For DDX672BH/DDX492/DDX392/DDX372BT/ DDX320BT/DDX272: Select [AV-IN]. • For DDX415BT/DDX315: Select [AV-IN2]. ❏ Indications and buttons on the source control screen 1 Playback information 1 AV-IN name Operation buttons [MODE] Changes the AV-IN name. • Press [H] or [I] to select an AV-IN name. • This setting does not affect the source name displayed on . [MENU] Displays the screen. ❏ Starting playback 1 Connect an external component. (Page 56) 2 For DDX415BT/DDX315: Select "AV-IN1" or "AV-IN2" as the source. On the screen: For DDX672BH/DDX492/DDX392/ DDX372BT/DDX320BT/DDX272: Select "AV-IN" as the source. On the screen: 3 Turn on the connected component and start playing the source. 32
-
 1
1 -
2
-
3
-
4
-
5
-
6
-
7
-
8
-
9
-
10
-
11
-
12
-
13
-
14
-
15
-
16
-
17
-
18
-
19
-
20
-
21
-
22
-
23
-
24
-
25
-
26
-
 27
27 -
 28
28 -
 29
29 -
 30
30 -
 31
31 -
 32
32 -
 33
33 -
 34
34 -
 35
35 -
 36
36 -
 37
37 -
38
-
39
-
40
-
41
-
42
-
43
-
44
-
45
-
46
-
47
-
48
-
49
-
50
-
51
-
52
-
53
-
54
-
55
-
56
-
57
-
58
-
59
-
60
-
61
-
62
-
63
-
64
-
65
-
66
-
67
-
68
 |
 |
