Kenwood DDX272 User Manual - Page 46
Memori, settings
 |
View all Kenwood DDX272 manuals
Add to My Manuals
Save this manual to your list of manuals |
Page 46 highlights
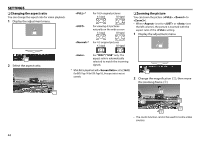
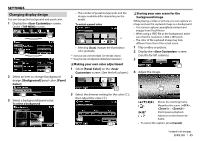
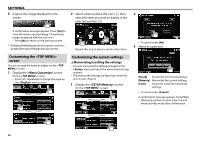
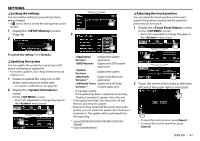
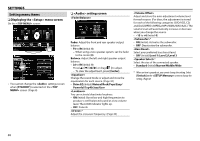
SETTINGS 5 Capture the image displayed on the screen. 2 Select where to place the icon (1), then 2 select the item you want to display in the selected position (2). A confirmation message appears. Press [Yes] to store the newly captured image. (The existing image is replaced with the new one.) • Press [No] to return to the previous screen. * Not displayed when playing an external component connected to the Audio Video input or iPod/Audio Video input terminal. Repeat this step to place icons for other items. • To cancel, press [No]. 3 Select an operation. Customizing the screen You can arrange the items to display on the screen. 1 Display the screen. On the screen: • Press [ ] repeatedly to change the page on the menu screen. Customizing the system settings ❏ Memorizing/recalling the settings • You can memorize the settings changed in the menu and recall the memorized settings anytime. • The memorized settings are kept even when the unit is reset. (Page 3 1 Display the screen. On the screen: [Recall] Recalls the memorized settings. [Memory] Memorizes the current settings. [Clear] Clears the currently memorized settings. • To cancel, press [Cancel]. A confirmation message appears. Press [Yes]. • When you perform recall or clear, the unit enters standby mode after confirmation. 46
-
 1
1 -
2
-
3
-
4
-
5
-
6
-
7
-
8
-
9
-
10
-
11
-
12
-
13
-
14
-
15
-
16
-
17
-
18
-
19
-
20
-
21
-
22
-
23
-
24
-
25
-
26
-
27
-
28
-
29
-
30
-
31
-
32
-
33
-
34
-
35
-
36
-
37
-
38
-
39
-
40
-
 41
41 -
 42
42 -
 43
43 -
 44
44 -
 45
45 -
 46
46 -
 47
47 -
 48
48 -
 49
49 -
 50
50 -
 51
51 -
52
-
53
-
54
-
55
-
56
-
57
-
58
-
59
-
60
-
61
-
62
-
63
-
64
-
65
-
66
-
67
-
68
 |
 |
