Kenwood DDX4031BT User Manual - Page 68
Accessories/Installation Procedure
 |
View all Kenwood DDX4031BT manuals
Add to My Manuals
Save this manual to your list of manuals |
Page 68 highlights
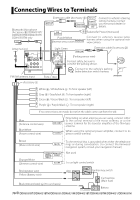
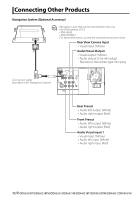
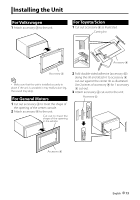
Accessories/Installation Procedure Accessories 1 ..........1 2 ..........1 (2m) 3*1 7 ..........6 8*3 ..........1 (3m) 9 Installation Procedure 1 To prevent a short circuit, remove the key from the ignition and disconnect the battery. 2 Make the proper input and output wire connections for each unit. 3 Connect the speaker wires of the wiring harness. 4 Connect the wiring harness wires in the following order: ground, battery, ignition. 5 Connect the wiring harness connector to the unit. 6 Install the unit in your car. 7 Reconnect the - battery. 8 Press the reset button. 9 Perform the Initial Setup. 4*2 5*2 6 ..........1 ..........1 ..........1 *1 DDX6031BT/DDX6031/ DDX4031BT/DDX4031 of sale in Australia only. *2 DDX6031BT/DDX6031/ DDX4031BT/DDX4031 of sale in Australia, China only. *3 DDX6031BT/ DDX6031BTM/ DDX4031BT/ DDX4031BTM only. ..........1 2WARNING • If you connect the ignition wire (red) and the battery wire (yellow) to the car chassis (ground), you may cause a short circuit, that in turn may start a fire. Always connect those wires to the power source running through the fuse box. • Do not cut out the fuse from the ignition wire (red) and the battery wire (yellow). The power supply must be connected to the wires via the fuse. After the Installation After the installation, perform the Initial Setup by referring to the instruction manual. ..........6 ¤ • Mounting and wiring this product requires skills and experience. For best safety, leave the mounting and wiring work to professionals. • Make sure to ground the unit to a negative 12V DC power supply. • Do not install the unit in a spot exposed to direct sunlight or excessive heat or humidity. Also avoid places with too much dust or the possibility of water splashing. • Do not use your own screws. Use only the screws provided. If you use the wrong screws, you could damage the unit. 68 DDX6031BT/DDX6031BTM/DDX6031/DDX6031M/DDX4031BT/DDX4031BTM/DDX4031/DDX4031M
-
 1
1 -
2
-
3
-
4
-
5
-
6
-
7
-
8
-
9
-
10
-
11
-
12
-
13
-
14
-
15
-
16
-
17
-
18
-
19
-
20
-
21
-
22
-
23
-
24
-
25
-
26
-
27
-
28
-
29
-
30
-
31
-
32
-
33
-
34
-
35
-
36
-
37
-
38
-
39
-
40
-
41
-
42
-
43
-
44
-
45
-
46
-
47
-
48
-
49
-
50
-
51
-
52
-
53
-
54
-
55
-
56
-
57
-
58
-
59
-
60
-
61
-
62
-
 63
63 -
 64
64 -
 65
65 -
 66
66 -
 67
67 -
 68
68 -
 69
69 -
 70
70 -
 71
71 -
 72
72 -
 73
73 -
74
-
75
-
76
-
77
-
78
-
79
-
80
 |
 |
