Kenwood DNX690HD Quick Start Guide - Page 24
Trim plate
 |
View all Kenwood DNX690HD manuals
Add to My Manuals
Save this manual to your list of manuals |
Page 24 highlights
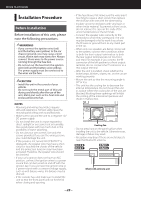
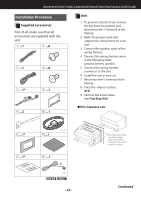
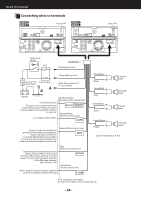
Quick Start Guide ● Toyota, Nissan or Mitsubishi car 7 (M5x6mm) or 8 (M5x7mm) Car Bracket ● Toyota/Scion cars 1) Cut out accessory 5 as illustrated. Cutting line 7 (M5x6mm) or 8 (M5x7mm) NOTE • Make sure that the unit is installed securely in place. If the unit is unstable, it may malfunction (eg, the sound may skip). Trim plate Attach accessory 9 to the unit. 9 ● General Motors cars 1) Cut out accessory 5 to meet the shape of the opening of the center console. 2) Attach accessory 5 to the unit. Cut out to meet the shape of the opening in the vehicle. 5 2) Fold double-sided adhesive (accessory 6) along the slit and attach it to accessory 5 cut-out against the center rib as illustrated. Use 2 pieces of accessory 6 for 1 accessory 5 cut-out. 3) Attach accessory 5 cut-out to the unit. 6 5 24
-
 1
1 -
2
-
3
-
4
-
5
-
6
-
7
-
8
-
9
-
10
-
11
-
12
-
13
-
14
-
15
-
16
-
17
-
18
-
 19
19 -
 20
20 -
 21
21 -
 22
22 -
 23
23 -
 24
24 -
 25
25 -
 26
26 -
 27
27 -
 28
28 -
 29
29 -
30
-
31
-
32
 |
 |
