Kenwood DPX-MP4030 User Manual - Page 31
Installation, of the CD.
 |
View all Kenwood DPX-MP4030 manuals
Add to My Manuals
Save this manual to your list of manuals |
Page 31 highlights
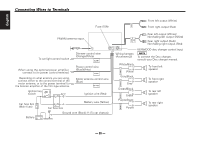
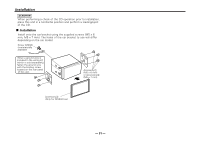
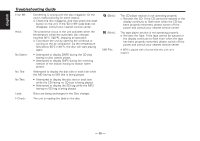
Installation 2CAUTION When performing a check of the CD operation prior to installation, place this unit in a horizontal position and perform a loading/eject of the CD. ■ Installation Install onto the car bracket using the supplied screws (M5 × 6 mm, M5 × 7 mm). The holes of the car bracket to use will differ depending on the car model. Screw (M4X8) (commercially available) When a ground wire is included in the wiring kit (which is sold separately), fasten the ground wire with the binding screw located on the rear panel of this unit. Accessory1 (M5 × 6 mm) or Accessory4 (M5 × 7 mm) Accessory3 (Only for NISSAN car) - 31 -
-
 1
1 -
2
-
3
-
4
-
5
-
6
-
7
-
8
-
9
-
10
-
11
-
12
-
13
-
14
-
15
-
16
-
17
-
18
-
19
-
20
-
21
-
22
-
23
-
24
-
25
-
 26
26 -
 27
27 -
 28
28 -
 29
29 -
 30
30 -
 31
31 -
 32
32 -
 33
33 -
 34
34 -
 35
35 -
 36
36 -
37
-
38
 |
 |

— 31 —
— 31 —
Installation
Installation
■
When performing a check of the CD operation prior to installation,
place this unit in a horizontal position and perform a loading/eject
of the CD.
2
CAUTION
Install onto the car bracket using the supplied screws (M5
×
6
mm, M5
×
7 mm). The holes of the car bracket to use will differ
depending on the car model.
When a ground wire is
included in the wiring kit
(which is sold separately),
fasten the ground wire
with the binding screw
located on the rear panel
of this unit.
Accessory
1
(M5
×
6 mm)
or Accessory
4
(M5
×
7 mm)
Accessory
3
(Only for NISSAN car)
Screw (M4X8)
(commercially
available)