Kenwood DPX505BT Instruction Manual - Page 37
Part list for installation, Basic procedure, Installing the unit without mounting sleeve, Connect
 |
View all Kenwood DPX505BT manuals
Add to My Manuals
Save this manual to your list of manuals |
Page 37 highlights
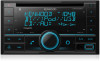
Installation/Connection Part list for installation (A) Round head screw ( ×6 ) ( ) (B) Flat head screw ( ×6 ) ( ) (C) Wiring harness ( ×1 ) Connect external components Basic procedure 1 Remove the key from the ignition switch, then disconnect the terminal of the car battery. 2 Connect the wires properly. See "Wiring connection" on page 32. 3 Install the unit to your car. See the following "Installing the unit (without mounting sleeve)". 4 Connect the terminal of the car battery. 5 Press BSRC to turn on the power. 6 Reset the unit. (Page 4) Installing the unit (without mounting sleeve) Align the holes in the unit (on both sides) with the vehicle mounting bracket and secure the unit with supplied screws. No Part 1 Expansion port (12 V 500 mA): To the optional SiriusXM Vehicle Tuner (commercially available) (Page 12) 2 Microphone input jack (Page 17) 3 Output terminals REAR: Rear output FRONT: Front output SW: Subwoofer output • When connecting an external amplifier to the output terminals of this unit, securely connect the amplifier ground wire to the car chassis to prevent damage to the unit. Use only the specified screws. Using wrong screws might damage the unit. ENGLISH 31
-
 1
1 -
2
-
3
-
4
-
5
-
6
-
7
-
8
-
9
-
10
-
11
-
12
-
13
-
14
-
15
-
16
-
17
-
18
-
19
-
20
-
21
-
22
-
23
-
24
-
25
-
26
-
27
-
28
-
29
-
30
-
31
-
 32
32 -
 33
33 -
 34
34 -
 35
35 -
 36
36 -
 37
37 -
 38
38 -
 39
39 -
 40
40 -
 41
41 -
 42
42 -
43
-
44
-
45
-
46
-
47
-
48
-
49
-
50
-
51
-
52
-
53
-
54
-
55
-
56
-
57
-
58
-
59
-
60
-
61
-
62
-
63
-
64
-
65
-
66
-
67
-
68
-
69
-
70
-
71
-
72
-
73
-
74
-
75
-
76
-
77
-
78
-
79
-
80
-
81
-
82
-
83
-
84
-
85
-
86
-
87
-
88
-
89
-
90
-
91
-
92
-
93
-
94
-
95
-
96
-
97
-
98
-
99
-
100
-
101
-
102
-
103
-
104
-
105
-
106
-
107
-
108
-
109
-
110
-
111
-
112
-
113
-
114
-
115
-
116
-
117
-
118
-
119
-
120
-
121
-
122
-
123
-
124
 |
 |
