Kenwood DRV-430 Operation Manual - Page 11
Names and Functions of Parts
 |
View all Kenwood DRV-430 manuals
Add to My Manuals
Save this manual to your list of manuals |
Page 11 highlights
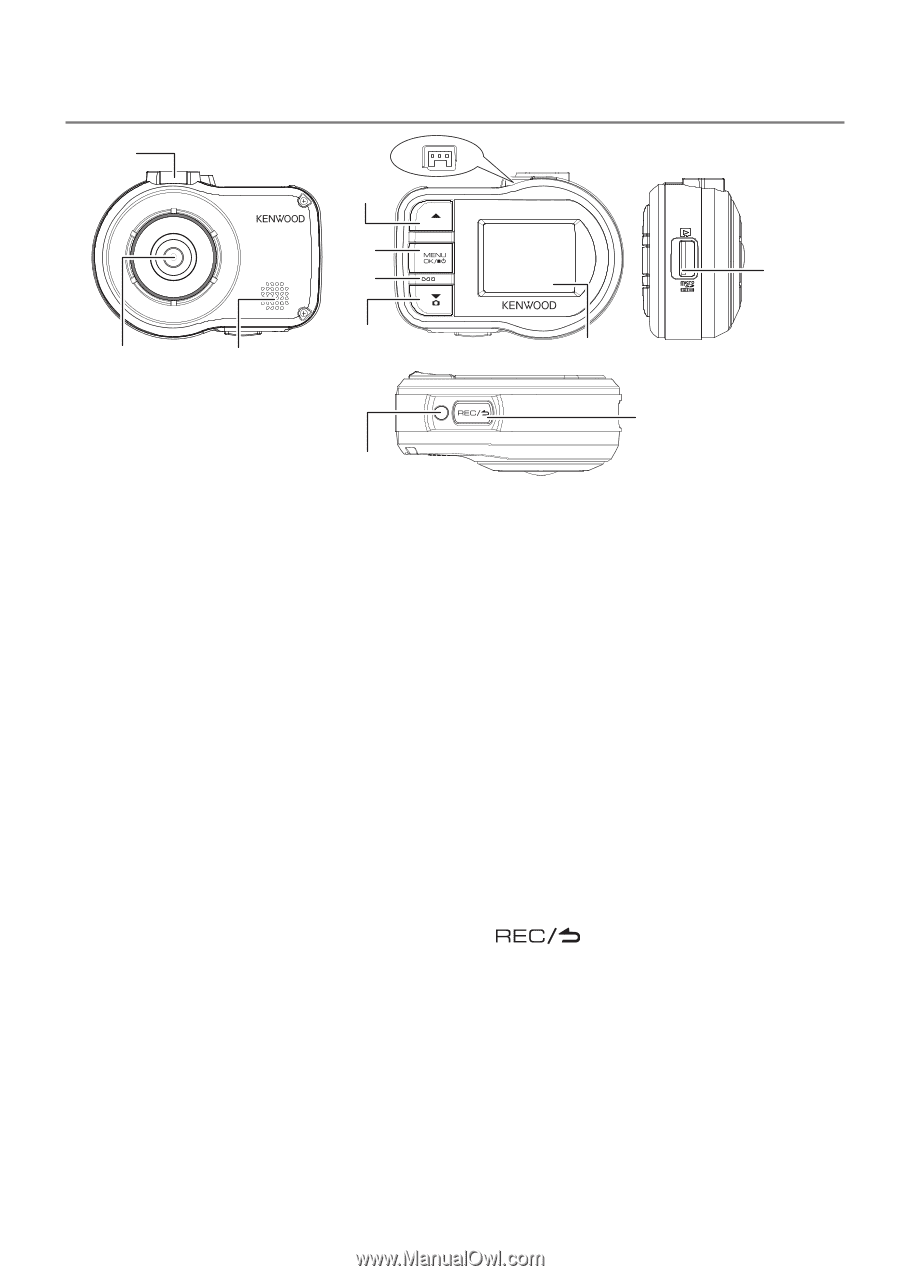
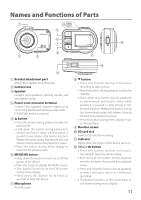
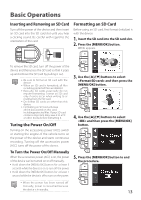
Names and Functions of Parts 1 4 5 6 0 7 8 9 2 3 @ ! 1 Bracket attachment part Attach the supplied mount bracket. 2 Camera lens 3 Speaker Outputs voice guidance, warning sounds, and file playback audio. Power cord connector terminal 4 Connect the supplied cigarette lighter plug cord or the Dashboard Camera power cable. (CA-DR100 Optinal accessory) 5 J button • Press this button during playback to play the previous file. • Hold down this button during playback to rewind, and hold it down while playback is paused to play slowly in the reverse direction. Release this button during rewinding to play, and release it during reverse slow playback to pause. • Press this button during menu display to return to the previous item. 6 MENU/OK button • Hold down this button to turn on or off the power of the device. • Press this button to display the MENU screen. • This button functions as the OK button during menu display. • Hold down this button for at least 25 seconds to reset the device. 7 Microphone Records audio. 8 K button • Press this button during continuous recording to take a photo. • Press this button during playback to play the next file. • Hold down this button during playback to fast-forward, and hold it down while playback is paused to play slowly in the forward direction. Release this button during fast-forwarding to play, and release it during forward slow playback to pause. • Press this button during menu display to go to the next item. 9 Monitor screen 0 SD card slot Insert an SD card for recording. ! Indicator Lights when the power of the device turns on. @ button • Press this button during continuous recording to start manual recording. • Each press of this button during playback switches between the paused and playback states. • Press and hold this button during playback or menu setting to return to continuous recording. • This button functions as the cancel, back, or exit button during menu display. 11
-
 1
1 -
2
-
3
-
4
-
5
-
 6
6 -
 7
7 -
 8
8 -
 9
9 -
 10
10 -
 11
11 -
 12
12 -
 13
13 -
 14
14 -
 15
15 -
 16
16 -
17
-
18
-
19
-
20
-
21
-
22
-
23
-
24
-
25
-
26
-
27
-
28
-
29
-
30
-
31
-
32
-
33
-
34
-
35
-
36
-
37
-
38
-
39
-
40
 |
 |