Kenwood KDC MP225 Instruction Manual - Page 12
Exit Name Set mode, Enter Menu mode - remote
 |
UPC - 019048161000
View all Kenwood KDC MP225 manuals
Add to My Manuals
Save this manual to your list of manuals |
Page 12 highlights
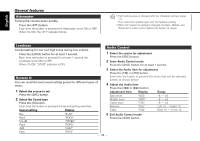
English General features Station/Disc Naming (SNPS/DNPS) Attaching a title to a Station or CD. 1 Receive/play the station/disc you want to attach a title to • A title can't be attached to a MD. • An external CD changer or an external CD player must be connected for disc naming 2 Enter Menu mode Press the [MENU] button for at least 1 second. "MENU" is displayed. 3 Select Name set mode Press the [FM] or [AM] button. Select the "NAME SET" display. 4 Enter Name set mode Press the [4] or [¢] button for at least 2 seconds. 5 Move the cursor to the enter character position Press the [4] or [¢] button. 6 Select the characters Press the [FM] or [AM] button. Characters can be entered by using a remote with a numbers buttons. Example:If "DANCE" is entered. Character Button Times pressed "D" [3] 1 "A" [2] 1 "N" [6] 2 "C" [2] 3 "E" [3] 2 7 Repeat steps 5 through 6 and enter the name. 8 Exit Name Set mode Press the [MENU] button. • When operation stops for 10 seconds the name at that time is registered, and Name Set mode closes. • Memory numbers - FM: 32 stations - AM: 16 stations - External CD changer/ player: Varies according to the CD changer/ player. Refer to the CD changer/ player manual. • The title of station/CD can be changed by the same operation used to name it. Theft Deterrent Faceplate The faceplate of the unit can be detached and taken with you, helping to deter theft. Removing the Faceplate Press the Release button. The faceplate is unlocked, allowing you to detach it. • The faceplate is a precision piece of equipment and can be damaged by shocks or jolts. For that reason, keep the faceplate in its special storage case while detached. • Do not expose the faceplate or its storage case to direct sunlight or excessive heat or humidity. Also avoid places with too much dust or the possibility of water splashing. Reattaching the Faceplate 1 Align the projections on the unit with the grooves on the faceplate. - 12 -
-
 1
1 -
2
-
3
-
4
-
5
-
6
-
 7
7 -
 8
8 -
 9
9 -
 10
10 -
 11
11 -
 12
12 -
 13
13 -
 14
14 -
 15
15 -
 16
16 -
 17
17 -
18
-
19
-
20
-
21
-
22
-
23
-
24
-
25
-
26
-
27
-
28
-
29
-
30
-
31
-
32
-
33
-
34
-
35
-
36
-
37
-
38
-
39
-
40
-
41
-
42
-
43
-
44
-
45
-
46
-
47
-
48
-
49
-
50
-
51
-
52
-
53
-
54
-
55
-
56
-
57
-
58
-
59
-
60
-
61
-
62
-
63
-
64
-
65
-
66
-
67
-
68
-
69
-
70
-
71
-
72
-
73
-
74
-
75
-
76
-
77
-
78
-
79
-
80
-
81
-
82
-
83
-
84
-
85
-
86
-
87
-
88
-
89
-
90
-
91
-
92
-
93
-
94
-
95
-
96
 |
 |