Kenwood TS-480SAT Operation Manual - Page 19
Mtr/ Clr, Agc/ 0/ Off, Fine/ Step, Multi, Scan/ Sg.sel, Fil/ Nar, Bc/ Cw.t, Menu/ F.lock, Tuning
 |
View all Kenwood TS-480SAT manuals
Add to My Manuals
Save this manual to your list of manuals |
Page 19 highlights
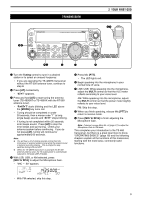
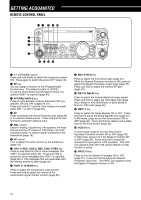
3 GETTING ACQUAINTED !9 @0 @1 @2 @3 HF/50MHz ALL MODE TRANSCEIVER TS-480 PF ANT 1/2 ATT/PRE AT AF SQL 1 REC 2 REC CH1 CH2 4 TX MONI 5 RF.G PWR MIC 7 8 NB/T VOX CLR 0 OFF MTR AGC 3 REC CH3 6 DELAY KEY 9 PROC ENT DNL NAR NR FIL BC STEP FINE CW.T SG.SEL SCAN MODE F.LOCK MENU MHz CL XIT RIT M.IN QMI M VFO QMR M/V A / B SPLIT A=B TF-SET MULTI IF SHIFT !4 !5 !6 !7 !8 @4@5@6 @7 @8 !4 MTR/ CLR key Press to select the meter scales {page 20} or exit from, abort, or reset various functions. Press and hold to clear memory channels {page 54}. !5 AGC/ 0/ OFF key Press to toggle the fast or slow response time for the Automatic Gain Control (AGC). Press and hold to switch the AGC OFF {page 35}. !6 ENT key Press to enter your desired frequency using the keypad {page 34} or lock out memory channels from the scan list {page 54}. !7 FINE/ STEP key Press to activate the Fine tuning function to allow more precise tuning {page 35}. Press and hold to select the frequency step size for the MULTI control {page 34}. !8 SCAN/ SG.SEL key Press to start or stop the Scan function {page 56}. Press and hold to select a Scan group {page 59}. !9 NR key Press to select the DSP Noise Reduction function, NR1, NR2 or OFF {page 47}. When the Noise Reduction function is turned ON, press and hold key to change the parameter of the Noise Reduction function {page 47}. @0 DNL key Press to turn the DNL (Digital Noise Limiter) function ON or OFF. The "DNL" icon appears when it is ON. Press and hold the key to change the level of DNL function {page 47}. @1 FIL/ NAR key Press to configure the low-cut and high-cut filter frequency for the DSP filter (AF). Press and hold to select the narrow IF filter if available {page 45}. @2 BC/ CW.T key Press to select the DSP Beat Cancel funtion, BC1 (Beat Cancel 1), BC2 (Beat Cancel 2) or OFF {page 47}. In CW mode, press to start the Auto Zerobeat in CW mode {page 29}. @3 LED Lights red when the transceiver is transmitting, lights green when the transceiver is receiving signals, and turns OFF when the transceiver mutes with the squelch function. @4 MODE key Press to change the operating mode pair. There are 4 pairs: USB/ LSB, CW/ CWR, FSK/ FSR, and AM/ FM. Press and hold for a second to toggle the mode within each pair: USB LSB, CW CWR, FSK FSR, or AM FM {page 19}. @5 MENU/ F.LOCK key Press to enter Menu mode {page 22}. Press and hold to activate the Frequency Lock function {page 63}. @6 MHz key Press to turn the MHz Up/ Down function ON or OFF. The MHz digit increases or decreases when you turn the MULTI control. Press and hold to change the increment/ decrement step value {page 34}. @7 Tuning control torque adjustment lever The lever behind the Tuning control adjusts the control torque level; turn clockwise for light torque or counterclockwise for heavy torque. @8 Tuning control Turn to select the desired frequency {page 19}. Use the convenient finger-tip cavity for continuous tuning. 11
-
 1
1 -
2
-
3
-
4
-
5
-
6
-
7
-
8
-
9
-
10
-
11
-
12
-
13
-
 14
14 -
 15
15 -
 16
16 -
 17
17 -
 18
18 -
 19
19 -
 20
20 -
 21
21 -
 22
22 -
 23
23 -
 24
24 -
25
-
26
-
27
-
28
-
29
-
30
-
31
-
32
-
33
-
34
-
35
-
36
-
37
-
38
-
39
-
40
-
41
-
42
-
43
-
44
-
45
-
46
-
47
-
48
-
49
-
50
-
51
-
52
-
53
-
54
-
55
-
56
-
57
-
58
-
59
-
60
-
61
-
62
-
63
-
64
-
65
-
66
-
67
-
68
-
69
-
70
-
71
-
72
-
73
-
74
-
75
-
76
-
77
-
78
-
79
-
80
-
81
-
82
-
83
-
84
-
85
-
86
-
87
-
88
-
89
-
90
-
91
-
92
-
93
-
94
-
95
-
96
-
97
-
98
-
99
-
100
-
101
-
102
-
103
-
104
 |
 |
