Kenwood TS-480SAT Operation Manual - Page 20
Qmi/ M.in, Qmr/ M, A/b / M/v, A=b/ Split, Multi, If Shift, Rit/ Xit
 |
View all Kenwood TS-480SAT manuals
Add to My Manuals
Save this manual to your list of manuals |
Page 20 highlights
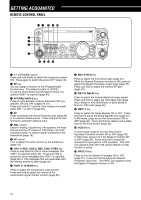
3 GETTING ACQUAINTED #8#7 #6 HF/50MHz ALL MODE TRANSCEIVER TS-480 PF ANT 1/2 ATT/PRE AT AF SQL 1 REC 2 REC CH1 CH2 4 TX MONI 5 RF.G PWR MIC 7 8 NB/T VOX CLR 0 OFF MTR AGC 3 REC CH3 6 DELAY KEY 9 PROC ENT DNL NAR NR FIL BC CW.T STEP SG.SEL FINE SCAN MODE F.LOCK MENU MHz CL XIT RIT M.IN QMI M VFO QMR M/V A / B SPLIT A=B TF-SET MULTI IF SHIFT @9 #0 #1 #2 #3 #9 #5 #4 @9 QMI/ M.IN key Press to store data to the Quick Memory. Press and hold to store the current operating frequencies and other data to the Memory channel. #0 QMR/ MsVFO key Press to recall data from the Quick Memory {page 55}. Press and hold to transfer the Memory Channel frequencies and other data to the VFO. #1 A/B / M/V key Press to select either VFO A or VFO B {page 18}. Press and hold to toggle between Memory and VFO modes. #2 A=B/ SPLIT key Press to duplicate the data in the currently selected VFO to the other VFO {page 35}. Press and hold to enter split-frequency operation which allows you to use different transmission and reception frequencies {page 30}. #3 MULTI control In VFO mode, rotate to step the operating frequency up or down {page 34}. In Memory Channel mode, rotate to select a Memory Channel {page 51}. Also, used for selecting Menu numbers when accessing the Menu mode {page 22} and as a selector to choose settings for various functions activated by Remote Control panel keys. #4 IF SHIFT control Rotate to shift the center frequency of the IF passband either lower or higher, to remove interference {page 45}. #5 / key Normally, press to step through all the Amateur radio bands consecutively {page 19}. Also used to make selections from the Menu {page 22} and to check the Start and End frequencies of the Scan function {page 53}. When both the split-frequency and the frequency lock function are actived, press and hold to perform the TF-SET function {page 30}. #6 CL key Press to clear the RIT/ XIT frequency to zero {pages 35, 37}. #7 XIT key Press to turn the XIT (Transmit Incremental Tuning) function ON or OFF {page 37}. When the XIT function is ON, the XIT icon appears. #8 RIT key Press to turn the RIT (Receive Incremental Tuning) function ON or OFF {page 35}. When the RIT function is ON, the RIT icon appears. #9 RIT/ XIT control When the RIT/ XIT function is ON, turn to adjust the offset frequency. The RIT/ XIT offset frequency appears on the sub-display {pages 35, 37}. 12
-
 1
1 -
2
-
3
-
4
-
5
-
6
-
7
-
8
-
9
-
10
-
11
-
12
-
13
-
14
-
 15
15 -
 16
16 -
 17
17 -
 18
18 -
 19
19 -
 20
20 -
 21
21 -
 22
22 -
 23
23 -
 24
24 -
 25
25 -
26
-
27
-
28
-
29
-
30
-
31
-
32
-
33
-
34
-
35
-
36
-
37
-
38
-
39
-
40
-
41
-
42
-
43
-
44
-
45
-
46
-
47
-
48
-
49
-
50
-
51
-
52
-
53
-
54
-
55
-
56
-
57
-
58
-
59
-
60
-
61
-
62
-
63
-
64
-
65
-
66
-
67
-
68
-
69
-
70
-
71
-
72
-
73
-
74
-
75
-
76
-
77
-
78
-
79
-
80
-
81
-
82
-
83
-
84
-
85
-
86
-
87
-
88
-
89
-
90
-
91
-
92
-
93
-
94
-
95
-
96
-
97
-
98
-
99
-
100
-
101
-
102
-
103
-
104
 |
 |
