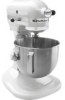
KitchenAid K4SSWH Use & Care Guide - Page 9
Assembling Your Bowl-Lift Stand Mixer - attachments
 |
View all KitchenAid K4SSWH manuals
Add to My Manuals
Save this manual to your list of manuals |
Page 9 highlights
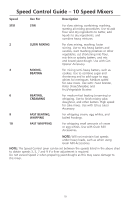
Assembling Your Bowl-Lift Stand Mixer Pre-Use Cleaning Before using your stand mixer for the first time, wash the mixing bowl and accessories (see "Care and Cleaning" section). Attaching Mixing Bowl 1. Be sure speed control is OFF and mixer is unplugged. 2. Place bowl lift handle in down position. 3. Fit bowl supports over locating pins. 4. Press down on back of bowl until bowl pin snaps into spring latch. 5. Raise bowl before mixing. 6. Plug mixer in proper electrical outlet (see "Electrical Requirements" section). Removing Mixing Bowl 1. Be sure speed control is OFF and mixer is unplugged. 2. Place bowl lift handle in down position. 3. Remove Flat Beater, Wire Whip*, or Dough Hook*. 4. Grasp bowl handle and lift straight up and off locating pins. Raising Mixing Bowl RAISE WARNING Injury Hazard Unplug mixer before touching beaters. Failure to do so can result in broken bones, cuts or bruises. Attaching Flat Beater, Wire Whip*, or Dough Hook* 1. Turn speed control to OFF and unplug. 2. Slip Flat Beater on beater shaft and press upward as far as possible. 3. Turn beater to right, hooking beater over the pin on shaft. PIN 4. Plug mixer in proper electrical outlet (see "Electrical Requirements" section). Removing Flat Beater, Wire Whip*, or Dough Hook* 1. Turn speed control to OFF and unplug. 2. Press beater upward as far as possible and turn left. 3. Pull beater from beater shaft. 4. Plug mixer in proper electrical outlet (see "Electrical Requirements" section). Solid State Speed Control Off Stir 2 4 6 8 10 1. Rotate handle to straight-up position. 2. Bowl must always be in raised, locked position when mixing. Lowering Mixing Bowl 1. Rotate handle back and down. *Sold separately for model K4SS. 7
-
 1
1 -
2
-
3
-
 4
4 -
 5
5 -
 6
6 -
 7
7 -
 8
8 -
 9
9 -
 10
10 -
 11
11 -
 12
12 -
 13
13 -
 14
14 -
15
-
16
-
17
-
18
-
19
-
20
-
21
-
22
-
23
-
24
-
25
-
26
-
27
-
28
-
29
-
30
-
31
-
32
-
33
-
34
-
35
-
36
-
37
-
38
-
39
-
40
-
41
-
42
-
43
-
44
-
45
-
46
-
47
-
48
-
49
-
50
-
51
-
52
-
53
-
54
-
55
-
56
-
57
-
58
-
59
-
60
-
61
-
62
-
63
-
64
-
65
-
66
-
67
-
68
-
69
-
70
-
71
-
72
 |
 |