KitchenAid KDRP463LSS Installation Instructions
KitchenAid KDRP463LSS - 36" Pro-Style Dual Fuel Range Manual
 |
View all KitchenAid KDRP463LSS manuals
Add to My Manuals
Save this manual to your list of manuals |
KitchenAid KDRP463LSS manual content summary:
- KitchenAid KDRP463LSS | Installation Instructions - Page 1
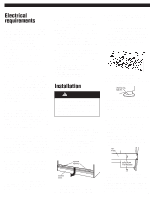
, if the range is moved. Failure to follow these instructions can result in death or serious burns to children and adults. ® For the way it's made ® Questions regarding features, operation, performance, parts or service? Call 1-800-422-1230 or visit our web site at www.kitchenaid.com. IMPORTANT - KitchenAid KDRP463LSS | Installation Instructions - Page 2
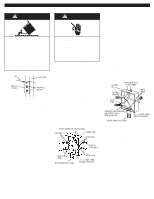
WARNING: If the information in this manual is not followed exactly, a fire or service must be performed by a qualified installer, service agency or the gas supplier. NOTE: The range cooktop is manufactured for use with Natural gas. To convert to L.P./Propane gas, see the Gas Conversion instructions - KitchenAid KDRP463LSS | Installation Instructions - Page 3
bracket. • L.P. conversion kit is included in literature package. • Backguard and island trim. The backguard included with the range must be installed panel 36" (91.4 cm) width 36" (91.4 cm) range with all sealed burners shown Cabinet opening dimensions 13" (33 cm) max. upper cabinet depth 36" ( - KitchenAid KDRP463LSS | Installation Instructions - Page 4
Conversion must be done by a qualified service technician. To convert to L.P. gas, use L.P. gas conversion kit part no. 8301439. The parts for this kit are in the literature package supplied with range applicable for Canada.) shutoff valve "open" position gas supply line F. to range 4 The - KitchenAid KDRP463LSS | Installation Instructions - Page 5
and install range. Failure to do so can result in back or other injury. Carefully move range close to the cabinet opening. Place the rack in oven. Place slack as possible between the junction box and the range so that the range can be moved if servicing is ever necessary. Do not cut the conduit. - KitchenAid KDRP463LSS | Installation Instructions - Page 6
servicing. Use 8 gauge copper wire. Electrically ground range. Failure to follow these instructions can result in death, fire, or electrical shock. This range from power supply white and bare grounding oven cable wires - factory crimped 4-wire cable from range U.L.- or CSA- listed conduit connector - KitchenAid KDRP463LSS | Installation Instructions - Page 7
. 9. Open manual shutoff valve in gas supply line. Wait a few minutes for gas to move through the line. 12. 13. Turn on power supply. "PF" should appear in the clock display. (Refer to your Use and Care Guide for instructions on using the electronic control.) 15. Slide range completely back so - KitchenAid KDRP463LSS | Installation Instructions - Page 8
out of the bay and set aside. locating feet slot for locating tab Refer to the Use and Care Guide that came with your Cooktop for instructions on cleaning and seasoning the griddle before using. locating tab C. D. Plug power supply cord into grounded outlet. rear spill guard Check the surface - KitchenAid KDRP463LSS | Installation Instructions - Page 9
tripped. If the oven still does not operate, contact your KitchenAid dealer or designated service company. 20. cooktop burners grille knob griddle knob A. Push range, read your KitchenAid Use and Care Guide. Keep Installation Instructions and Guide close to the range for easy reference. 9 - KitchenAid KDRP463LSS | Installation Instructions - Page 10
checkoff list RANGE If range does not operate ✓ ✓ ✓ Check that the circuit breaker is not tripped or the house fuse blown. Check that gas valves are turned to the "ON" position. See Use and Care Guide for troubleshooting list. If you need service In the event that your KitchenAid appliance should - KitchenAid KDRP463LSS | Installation Instructions - Page 11
L1 BK W W GDN R GRN W SPARK MODULE W N L2 W R Cooktop schematic VALVE SWITCHES YEL OR BRN (6) PLCS IGNITOR ELECTRODES Oven schematic L1 SUPPRESSOR WP#4451985 BK N W ELECTRONIC CONTROL P8-1 P8-2 P8-3 BK Y Y ORG DOOR SWITCH 2 ON LATCH ASSY ORG W W W L2 BK BK A BK P4-1 BK - KitchenAid KDRP463LSS | Installation Instructions - Page 12
Part No. 8301169 Rev. A © 2003 KitchenAid. ® Registered Trademark/Trademark of KitchenAid U.S.A., KitchenAid Canada licensee in Canada ® Prepared by KitchenAid, Benton Harbor, Michigan 49022 Printed in U.S.A. - KitchenAid KDRP463LSS | Installation Instructions - Page 13
Instructions d'installation Cuisinière style commercial - 91,4 cm (36 po) deux combustibles avec four autonettoyant thermique/ - KitchenAid KDRP463LSS | Installation Instructions - Page 14
Avant de commencer...Votre sécurité et celle des autres est très importante. Nous donnons de nombreux messages de sécurité importants dans ce manuel, et sur votre appareil ménager. Assurez-vous de toujours lire tous les messages de sécurité et de vous y conformer. Voici le symbole d'alerte de sé - KitchenAid KDRP463LSS | Installation Instructions - Page 15
Pièces fournies pour l'installation 4,4 cm (1-3/4 po) 2,5 cm (1 po) NOTE : Détendeur placé en bas/au centre de la cuisinière Largeur de la table de cuisson 91,4 cm (36 po) Dimensions du produit 23,5 cm (9-1/4 po) FF O FF O FFO FF O 2 vis - KitchenAid KDRP463LSS | Installation Instructions - Page 16
Alimentation en gaz AVERTISSEMENT C. Risque d'explosion Utiliser un conduit de raccordement - KitchenAid KDRP463LSS | Installation Instructions - Page 17
Installation électrique Si on utilise un conducteur distinct de liaison - KitchenAid KDRP463LSS | Installation Instructions - Page 18
AVERTISSEMENT AVERTISSEMENT 7A. Si le code local ne permet pas le raccordement du conducteur de liaison - KitchenAid KDRP463LSS | Installation Instructions - Page 19
5. Avec un connecteur de fils, connecter ensemble les deux conducteurs blancs. 6. Connecter le conducteur nu du câble de la cuisinière au conducteur de liaison - KitchenAid KDRP463LSS | Installation Instructions - Page 20
Installation du gril ou de la plaque - KitchenAid KDRP463LSS | Installation Instructions - Page 21
électronique, sans flamme de veille. Lorsqu'on place le bouton de commande - KitchenAid KDRP463LSS | Installation Instructions - Page 22
Liste de contrôle de l'installateur CUISINIÈRE Si une assistance est nécessaire Le personnel du Centre d'assistance - KitchenAid KDRP463LSS | Installation Instructions - Page 23
L1 NEU L1 NEU BL N BL N TERRE BL VERT ÉLECTROVANNE DU GRIL 120 V CA 60 HZ MONOPHASE 15 OU 20 A BL N N BL BL N BL N TERRE VERT ÉLECTROVANNE DE LA PLAQUE À FRIRE 120 V CA 60 HZ MONOPHASE 15 OU 20 A N N BL BL BL N N L N G ALLUMEUR DU GRIL MODULE D'ÉTINCELAGE N N L N G ALLUMEUR DE LA - KitchenAid KDRP463LSS | Installation Instructions - Page 24
É EN MODE D'ATTENTE/ARRÊT AVEC PORTE DU FOUR FERMÉE. Pièce n° 8301169 Rév. A ©2003 KitchenAid ® Marque déposée/marque de commerce de KitchenAid U.S.A.; emploi sous licence au Canada par KitchenAid Canada ® APPAREILS MÉNAGERS Préparé par KitchenAid, Benton Harbor, Michigan 49022 Imprimé aux É.-U.
-
 1
1 -
 2
2 -
 3
3 -
 4
4 -
 5
5 -
 6
6 -
 7
7 -
8
-
9
-
10
-
11
-
12
-
13
-
14
-
15
-
16
-
17
-
18
-
19
-
20
-
21
-
22
-
23
-
24
 |
 |
Part No. 8301169 Rev. A
Installation Instructions
IMPORTANT:
Installer:
Leave Installation
Instructions with the homeowner.
Homeowner:
Keep Installation
Instructions for future reference.
Save Installation Instructions for local
electrical inspector’s use.
Write down the model and serial numbers
before installing range.
Both numbers are on the model/serial
rating plate, located on the surface below
the control panel.
Model #___________________________
Serial # ___________________________
Questions regarding features,
operation, performance, parts or
service? Call 1-800-422-1230 or visit
our web site at www.kitchenaid.com.
IMPORTANT:
Read and save these
instructions.
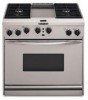
36" (91.4 cm)
Commercial Style
Dual Fuel Range
with self-cleaning thermal/convection oven
for residential use only
O F
OF
OF
OF
OF
OF
OF
OF
OF
OF
OF
OF
O F
OF
OF
OF
backguard
(required for some installations)
For the way it’s made
®
®
Tip Over Hazard
A child or adult can tip the range
and be killed.
Connect anti-tip bracket to wall
behind range.
Reconnect the anti-tip bracket, if
the range is moved.
Failure to follow these instructions
can result in death or serious
burns to children and adults.
WARNING