KitchenAid KDRP463LSS Installation Instructions - Page 8
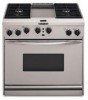
KitchenAid KDRP463LSS - 36" Pro-Style Dual Fuel Range Manual
 |
View all KitchenAid KDRP463LSS manuals
Add to My Manuals
Save this manual to your list of manuals |
Page 8 highlights
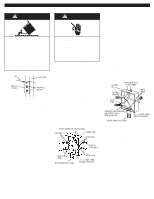
Installing the grille or griddle. Grille installation: Go to Step 16. Griddle installation: The griddle is factory installed. To complete the installation, go to Step 17. 17. Completing the griddle installation: griddle drip tray 16. griddle Installing the grille: log burner Reinstall the log burner. Make sure burner's rear flange is seated in slot. D. E. Plug power supply cord into grounded outlet. Check the surface burner and grille flames. Before completing the grille installation, go to "Check the operation of the surface burners, grille and griddle" on Page 9. F. A. B. Place drip tray in the well at the front of the griddle. Slide tray forward until it stops. A. Lift the log burner up out of the bay and set aside. locating feet slot for locating tab Refer to the Use and Care Guide that came with your Cooktop for instructions on cleaning and seasoning the griddle before using. locating tab C. D. Plug power supply cord into grounded outlet. rear spill guard Check the surface burner and griddle flames. Go to "Check the operation of the surface burners, grille and griddle" on Page 9. drip tray Place drip tray on bottom of grille bay and slide the tray forward so that it is located side-to-side and against the locating feet of the rear spill guard. B. Install the wave tray into the grille bay. The tab in the left rear corner of the bay must fit through the slot in the left rear corner of the wave tray. wave tray wave plate G. front spill guard insert feet into slots Insert the front spill guard feet into the slots in the rear spill guard as shown. The rear flange will rest on the burner box. C. 8 Place the wave plate on the wave tray as shown. The wave plate must be centered on the wave tray. H. I. Install the grille grate.
-
 1
1 -
2
-
 3
3 -
 4
4 -
 5
5 -
 6
6 -
 7
7 -
 8
8 -
 9
9 -
 10
10 -
 11
11 -
 12
12 -
 13
13 -
14
-
15
-
16
-
17
-
18
-
19
-
20
-
21
-
22
-
23
-
24
 |
 |
