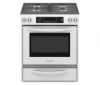
KitchenAid KGSS907SBL Installation Instructions
KitchenAid KGSS907SBL - 30" Slide-In Gas Range Manual
 |
UPC - 883049027517
View all KitchenAid KGSS907SBL manuals
Add to My Manuals
Save this manual to your list of manuals |
KitchenAid KGSS907SBL manual content summary:
- KitchenAid KGSS907SBL | Installation Instructions - Page 1
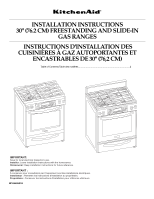
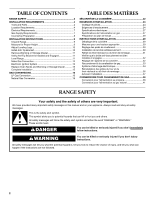
FREESTANDING AND SLIDE-IN GAS RANGES INSTRUCTIONS D'INSTALLATION DES CUISINIÈRES À GAZ AUTOPORTANTES ET ENCASTRABLES DE 30" (76,2 CM) Table of Contents/Table des matières 2 IMPORTANT: Save for local electrical inspector's use. Installer: Leave installation instructions with the homeowner. Homeowner - KitchenAid KGSS907SBL | Installation Instructions - Page 2
l'alimentation au propane 38 Conversion pour l'alimentation au gaz naturel 41 RANGE SAFETY Your safety and the safety of others are very important. We have provided many important safety messages in this manual and on your appliance. Always read and obey all safety messages. This is the safety - KitchenAid KGSS907SBL | Installation Instructions - Page 3
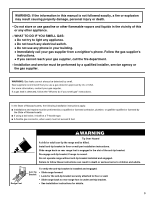
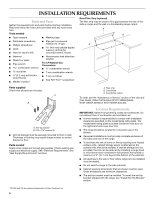
children and adults. Anti-Tip Bracket To verify the anti-tip bracket is installed and engaged: • Slide range forward. • Look for the anti-tip bracket securely attached to floor or wall. • Slide range back so rear range foot is under anti-tip bracket. • See installation instructions for details. 3 - KitchenAid KGSS907SBL | Installation Instructions - Page 4
, see the "Assistance or Service" section of the Use and Care Guide. Order Part Number W10113902A (black), W10113903A rating plate. The model/serial rating plate is located inside the oven door on the right-hand side oven door trim. ■ The range should be located for convenient use in the kitchen - KitchenAid KGSS907SBL | Installation Instructions - Page 5
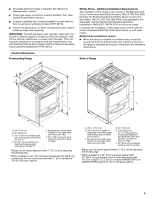
wood cabinet temperatures of 194° (90°C). Product Dimensions Freestanding Range Mobile Home - Additional Installation Requirements The installation of this range must conform to the Manufactured Home Construction and Safety Standard, Title 24 CFR, Part 3280 (formerly the Federal Standard for Mobile - KitchenAid KGSS907SBL | Installation Instructions - Page 6
opening dimensions shown are for 25" (64 cm) countertop depth, 24" (61 cm) base cabinet depth and 36" (91.4 cm) countertop height. IMPORTANT: If installing a range hood or microwave hood combination above the range, follow the range hood or microwave hood combination installation instructions for - KitchenAid KGSS907SBL | Installation Instructions - Page 7
cord. Failure to follow these instructions can result in death, fire, or electrical shock. IMPORTANT: The range must be electrically grounded in accordance a qualified service technician. No attempt shall be made to convert the appliance from the gas specified on the model/serial rating plate for - KitchenAid KGSS907SBL | Installation Instructions - Page 8
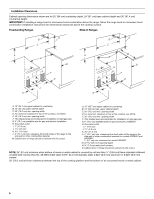
Canada). Gas Supply Pressure Testing Gas supply pressure for testing regulator must be at least 1" water column pressure above the manifold pressure shown on the model/serial rating plate. Line pressure testing above ½ psi gauge (14" WCP) The range ³⁄₈" (1.0 cm) dimension. Countertop must be level - KitchenAid KGSS907SBL | Installation Instructions - Page 9
. Remove oven racks and parts package from inside oven. 2. To place range on its back, take 4 cardboard corners from the carton. Stack one cardboard corner on top of another. Repeat with the other 2 corners. Place them lengthwise on the floor behind the range to support the range when it is laid on - KitchenAid KGSS907SBL | Installation Instructions - Page 10
with the range on its back or with the range supported on 2 legs after the range has been placed back to a standing position. NOTE: To place range back up tip the range and be killed. Install anti-tip bracket to floor or wall per installation instructions. Slide range back so rear range foot is - KitchenAid KGSS907SBL | Installation Instructions - Page 11
and engaged. Please reference the "Assistance or Service" section of the Use and Care Guide, or the cover or "Warranty" section of the User Instructions, to contact service. Level Range 1. Place a rack in oven. 2. Place level on rack and check levelness of range, first side to side; then front to - KitchenAid KGSS907SBL | Installation Instructions - Page 12
and channel lock pliers to attach the flexible connector to the gas company personnel, and authorized service personnel. Failure to do so thread) D. Flexible connector HG F E. Manual gas shutoff valve F. ½" or ¾" , connect the gas supply to the range. Complete Connection 1. Locate gas pressure - KitchenAid KGSS907SBL | Installation Instructions - Page 13
manual cooktop burner caps and grates from parts package. Align notches in burner caps an extension cord. Failure to follow these instructions can result in death, fire, or to the "OFF" position. ■ Check that the range is plugged in and the circuit breaker has not service company for assistance. 13 - KitchenAid KGSS907SBL | Installation Instructions - Page 14
cone of bluish-green, with an outer mantle of dark blue, and should be clean and soft in character. No yellow tips, blowing or lifting of flame should to be adjusted, locate the air shutter near the center rear of the range. Use a flat-blade screwdriver to loosen the locking screw. Rotate the air - KitchenAid KGSS907SBL | Installation Instructions - Page 15
-green, with an outer mantle of dark blue, and should be clean and soft in character. No yellow tips, blowing or lifting of flame Troubleshooting" in the Use and Care Guide or User Instructions. 8. When the range has been on for 5 minutes, check for heat. If the range is cold, turn off the range - KitchenAid KGSS907SBL | Installation Instructions - Page 16
in death, explosion, or fire. A C A. To range B. Manual shutoff valve "closed" position C. Gas supply line 2. Unplug range or disconnect power. 3. Remove warming drawer or storage drawer. See the "Remove Warming or Storage Drawer" section for instructions. Locate gas pressure regulator at rear of - KitchenAid KGSS907SBL | Installation Instructions - Page 17
LP Gas Orifice Spud Chart for Standard Surface Burners Burner Location Burner Rating Color Size Right front Left front Right rear Left rear 5,000 0.95 mm 0.70 mm 5. Place Natural gas orifice spuds in plastic parts bag for future use and keep with package containing literature. 6. Replace burner - KitchenAid KGSS907SBL | Installation Instructions - Page 18
tip bracket installed and engaged. Failure to follow these instructions can result in death or serious burns to children and adults. To Convert Gas Pressure Regulator 1. Turn manual shutoff valve to the "closed" position. B A C A. To range B. Manual shutoff valve "closed" position C. Gas supply line - KitchenAid KGSS907SBL | Installation Instructions - Page 19
Natural Gas Orifice Spud Chart for Standard Surface Burners Burner Location Burner Rating Size Right front Left front Right rear Left rear 6,000 Btu mm 1.61 mm 1.10 mm 5. Place LP gas orifice spuds in plastic parts bag for future use and keep with package containing literature. 6. Replace burner - KitchenAid KGSS907SBL | Installation Instructions - Page 20
for TripleTier® Flame Burners Burner Location Burner Rating Size Left front (external TripleTier® burner) . 8. Place LP gas orifice spuds in plastic parts bag for future use and keep with package containing Warming or Storage Drawer" section for instructions. 3. Complete installation. See "Make - KitchenAid KGSS907SBL | Installation Instructions - Page 21
Notes 21 - KitchenAid KGSS907SBL | Installation Instructions - Page 22
et ce qui peut se produire en cas de non-respect des instructions. AVERTISSEMENT : Si les renseignements dans ce manuel ne sont pas exactement entretien doivent être effectués par un installateur qualifié, une agence de service ou le fournisseur de gaz. AVERTISSEMENT : L'odorat ne permet pas - KitchenAid KGSS907SBL | Installation Instructions - Page 23
Fixer la bride antibasculement au plancher ou au mur, conformément aux instructions d'installation. Faire glisser de nouveau la cuisinière de façon à antibasculement n'est pas installée et engagée. Le non-respect de ces instructions peut causer un décès ou des brûlures graves aux enfants et aux - KitchenAid KGSS907SBL | Installation Instructions - Page 24
ces nécessaires avant de commencer l'installation. Lire et suivre les instructions fournies avec les outils indiqués ici. Outillage nécessaire ■ plan de travail A Pour commander, voir la section "Assistance ou service" du Guide d'utilisation et d'entretien. Commander la pièce numéro W10113902A - KitchenAid KGSS907SBL | Installation Instructions - Page 25
Dimensions Part 280). Lorsque cette norme n'est pas applicable, l'installation doit satisfaire aux critères de la norme Standard for Manufactured Home Installations, ANSI A225.1/NFPA 501A ou aux dispositions des codes locaux. Au Canada E. Longueur de la poignée au support à l'arrière de la cuisinière - KitchenAid KGSS907SBL | Installation Instructions - Page 26
installation d'une hotte ou d'un ensemble hotte/micro-ondes au-dessus de la cuisinière, suivre les instructions fournies avec la hotte de cuisinière ou de four à micro-ondes concernant les dimensions de dégagement à respecter au-dessus de la surface de la table de cuisson. Cuisinières autoportantes - KitchenAid KGSS907SBL | Installation Instructions - Page 27
Standard), ou CAN/CGA B149 (édition la plus récente). IMPORTANT : Les tests de fuite de la cuisinière doivent être effectués selon les instructions du fabricant. Type de gaz Gaz naturel : La conception de cette cuisinière a été homologuée par CSA International pour l'alimentation au gaz naturel, ou - KitchenAid KGSS907SBL | Installation Instructions - Page 28
fournisseur de gaz propane détermine les matériaux à utiliser et la dimension appropriée. REMARQUE : On doit utiliser un composé d'étanchéité pour pi (304,8 m) au-dessus du niveau de la mer (pas applicable au Canada). Tests de pressurisation de la canalisation de gaz On doit tester le détendeur sous - KitchenAid KGSS907SBL | Installation Instructions - Page 29
de plus de 30" (76,2 cm), ajuster la dimension de ³⁄₈" (1 cm). Il faut que le plan de la cuisinière. Le non-respect de cette instruction peut causer une blessure au dos ou d'autre blessure la longueur derrière la cuisinière à titre de support de la cuisinière lorsque celle-ci est placée - KitchenAid KGSS907SBL | Installation Instructions - Page 30
que la cuisinière repose sur sa partie postérieure ou qu'elle est supportée par 2 pieds après avoir été replacée en position verticale. REMARQUE : Fixer la bride antibasculement au plancher ou au mur, conformément aux instructions d'installation. Faire glisser de nouveau la cuisinière de façon à - KitchenAid KGSS907SBL | Installation Instructions - Page 31
ment les deux boucles vers l'avant puis sortir le tiroir d'un pouce supplémentaire. 5. À l'aide du tournevis Phillips, monter la bride antibasculement sur le mur ou sur le plancher avec les deux pour poursuivre l'installation de la cuisinière à l'aide des instructions d'installation suivantes. 31 - KitchenAid KGSS907SBL | Installation Instructions - Page 32
ère si la bride antibasculement n'est pas installée et engagée. Consulter la section "Assistance ou Service" du guide d'utilisation et d'entretien, la couverture ou la section "Garantie" des instructions d'utilisation pour obtenir les coordonnées des personnes à contacter. Réglage de l'aplomb de la - KitchenAid KGSS907SBL | Installation Instructions - Page 33
autorisé de chauffage, le personnel autorisé d'une compagnie de gaz, et le personnel d'entretien autorisé. Le non-respect de ces instructions peut causer un décès, une explosion ou un incendie. Raccordement typique à une canalisation rigide On doit utiliser une combinaison de raccords pour - KitchenAid KGSS907SBL | Installation Instructions - Page 34
enlever la broche de liaison à la terre. Ne pas utiliser un adaptateur. Ne pas utiliser un câble de rallonge. Le non-respect de ces instructions peut causer un décès, un incendie ou un choc électrique. 7. Brancher sur une prise à 3 alvéoles reliée à la terre. Système d'allumage électronique Allumage - KitchenAid KGSS907SBL | Installation Instructions - Page 35
Si le brûleur ne s'allume pas correctement : ■ Ramener le bouton de commande de la table de cuisson à la position "Off" (arrêt). ■ Vérifier que la cuisinière est branchée , que le disjoncteur ne s'est pas déclenché et qu'aucun fusible n'est grillé. ■ Vérifier que chaque robinet d'arrêt est ouvert. ■ - KitchenAid KGSS907SBL | Installation Instructions - Page 36
assurer qu'il est bien installé sur les glissières. Réinstallation du tiroir de remisage : 1. Placer les extrémités des rails du tiroir dans les guides de la cavité. 2. Fermer le tiroir en le faisant glisser. A Brûleur à gaz B. Élément de chauffage électrique périphérique REMARQUE : Pour que le br - KitchenAid KGSS907SBL | Installation Instructions - Page 37
arrêt d'alimentation en gaz est ouvert. 6. Lire le Guide d'utilisation et d'entretien ou les Instructions d'utilisation. ■ Si le robinet d'arrêt de l'alimentation besoin d'assistance ou de service : Veuillez consulter la section "Assistance ou service" dans le Guide d'utilisation et d'entretien ou - KitchenAid KGSS907SBL | Installation Instructions - Page 38
Fixer la bride antibasculement au plancher ou au mur, conformément aux instructions d'installation. Faire glisser de nouveau la cuisinière de façon section "Retrait du tiroir-réchaud ou du tiroir de remisage" pour des instructions. Identifier le détendeur à l'arrière du compartiment du tiroir de - KitchenAid KGSS907SBL | Installation Instructions - Page 39
5. Utiliser une clé mixte de 7 mm pour enlever le gicleur externe. Faire tourner le gicleur dans le sens antihoraire. Conserver le gicleur externe à part. 6. Remplacer le gicleur pour gaz naturel par le gicleur pour propane correct. Le tableau qui suit permet de sélectionner le gicleur pour propane - KitchenAid KGSS907SBL | Installation Instructions - Page 40
tiroir de remisage. Voir la section "Réinstallation des grilles du four et du tiroir-réchaud ou du tiroir de remisage" pour des instructions. 3. Achever l'installation. Voir les sections "Raccordement au gaz" et "Système d'allumage électronique". Il est très important de vérifier l'établissement de - KitchenAid KGSS907SBL | Installation Instructions - Page 41
section "Retrait du tiroir-réchaud ou du tiroir de remisage" pour des instructions. Identifier le détendeur à l'arrière du tiroir de remisage ou Fixer la bride antibasculement au plancher ou au mur, conformément aux instructions d'installation. Faire glisser de nouveau la cuisinière de façon à - KitchenAid KGSS907SBL | Installation Instructions - Page 42
pour engager le tourne-écrou sur le gicleur interne; faire tourner le gicleur dans le sens antihoraire puis soulever pour l'enlever; conserver le gicleur à part. 5. Utiliser une clé mixte de 7 mm pour enlever le gicleur externe. Faire tourner le gicleur dans le sens antihoraire; conserver le gicleur - KitchenAid KGSS907SBL | Installation Instructions - Page 43
tiroir de remisage. Voir la section "Réinstallation des grilles du four et du tiroir-réchaud ou du tiroir de remisage" pour des instructions. 3. Achever l'installation. Voir les sections "Raccordement à la canalisation de gaz" et "Système d'allumage électronique". Il est très important de vérifier - KitchenAid KGSS907SBL | Installation Instructions - Page 44
. All rights reserved. Tous droits réservés. ® Registered Trademark/TM Trademark of KitchenAid, U.S.A., KitchenAid Canada licensee in Canada ® Marque déposée/TM Marque de commerce de KitchenAid, U.S.A., Emploi sous licence par KitchenAid Canada au Canada 11/11 Printed in U.S.A. Imprimé aux É.-U.
-
 1
1 -
 2
2 -
 3
3 -
 4
4 -
 5
5 -
 6
6 -
 7
7 -
8
-
9
-
10
-
11
-
12
-
13
-
14
-
15
-
16
-
17
-
18
-
19
-
20
-
21
-
22
-
23
-
24
-
25
-
26
-
27
-
28
-
29
-
30
-
31
-
32
-
33
-
34
-
35
-
36
-
37
-
38
-
39
-
40
-
41
-
42
-
43
-
44
 |
 |
INSTALLATION INSTRUCTIONS
30" (76.2 CM) FREESTANDING AND SLIDE-IN
GAS RANGES
INSTRUCTIONS D'INSTALLATION DES
CUISINIÈRES À GAZ AUTOPORTANTES ET
ENCASTRABLES DE 30" (76,2 CM)
Table of Contents/Table des matières
..................................................................................
2
W10440537A
IMPORTANT:
Save for local electrical inspector's use.
Installer:
Leave installation instructions with the homeowner.
Homeowner:
Keep installation instructions for future reference.
IMPORTANT :
À conserver pour consultation par l'inspecteur local des installations électriques.
Installateur :
Remettre les instructions d'installation au propriétaire.
Propriétaire :
Conserver les instructions d'installation pour référence ultérieure.