KitchenAid KRFF707ESS Use & Care Guide - Page 8
Replace the Drawer Fronts
 |
View all KitchenAid KRFF707ESS manuals
Add to My Manuals
Save this manual to your list of manuals |
Page 8 highlights
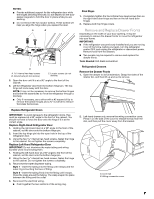
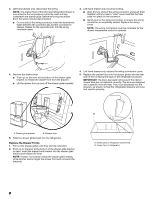
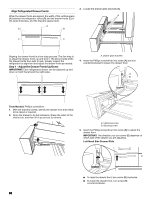
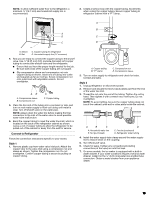
3. Left-hand drawer only, disconnect the wiring. NOTE: The drawer front of the left-hand refrigerated drawer is connected to the temperature control by wires running underneath the drawer glide. Before removing the drawer front, the wires must be disconnected. ■ On one side of the wiring connector, insert the screwdriver blade between the connector tab and the connector to release. Repeat for the opposite side. Pull the wiring connector apart. 3. Left-hand drawer only, reconnect wiring. ■ Align the two ends of the wiring connector and push them together until you hear a "click" sound and feel the tabs snap into place on the connector. ■ Gently pull on the wiring connection to ensure the wiring connection is completely seated. Replace the wiring cover. NOTE: The wiring connection must be complete for the drawer temperature control to operate. 4. Remove the drawer front. ■ Push up on the lever at the bottom of the drawer glide bracket to release the drawer front from the bracket. ■ Lift the drawer front up and off the drawer glide brackets. 4. Left-hand drawer only, replace the wiring connection cover. 5. Replace the drawer bins onto the drawer glides with the rear side of the bin facing the back of the refrigerator as shown. IMPORTANT: The Door Ajar alarm will sound if the interior drawer bins are not replaced correctly. The bins are designed with a specific front and rear. They must be placed into the drawers, as shown, so that the refrigerated drawers will close and operate properly. A B A. Drawer glide bracket B. Release lever 5. Slide the drawer glides back into the refrigerator. Replace the Drawer Fronts 1. Pull out the drawer glides until they are fully extended. 2. Push up on the lever at the bottom of the drawer glide bracket to open. Insert the drawer front bracket into the drawer glide bracket and release the lever. NOTE: It helps if one person holds the drawer glides steady while another person aligns the drawer front and connects the brackets. B A A. Faces back of refrigerator (insert first) B. Faces front of refrigerator 8
-
 1
1 -
2
-
 3
3 -
 4
4 -
 5
5 -
 6
6 -
 7
7 -
 8
8 -
 9
9 -
 10
10 -
 11
11 -
 12
12 -
 13
13 -
14
-
15
-
16
-
17
-
18
-
19
-
20
-
21
-
22
-
23
-
24
-
25
-
26
-
27
-
28
-
29
-
30
-
31
-
32
-
33
-
34
-
35
-
36
-
37
-
38
-
39
-
40
-
41
-
42
-
43
-
44
-
45
-
46
-
47
-
48
-
49
-
50
-
51
-
52
-
53
-
54
-
55
-
56
-
57
-
58
-
59
-
60
-
61
-
62
-
63
-
64
-
65
-
66
-
67
-
68
-
69
-
70
-
71
-
72
-
73
-
74
-
75
-
76
-
77
-
78
-
79
-
80
-
81
-
82
-
83
-
84
-
85
-
86
-
87
-
88
-
89
-
90
-
91
-
92
-
93
-
94
-
95
-
96
-
97
-
98
-
99
-
100
-
101
-
102
-
103
-
104
-
105
-
106
-
107
-
108
-
109
-
110
-
111
-
112
-
113
-
114
-
115
-
116
-
117
-
118
-
119
-
120
 |
 |
