Kodak I1410 User Guide - Page 23
Start and stop scanning, Document preparation, Paper Types, Paper inks, Correction Fluids
 |
UPC - 041778232408
View all Kodak I1410 manuals
Add to My Manuals
Save this manual to your list of manuals |
Page 23 highlights
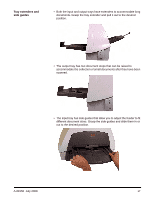
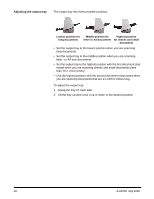
Start and stop scanning Document preparation Before you start scanning, make sure the scanner is on and ready for operation, which is indicated by the green indicator light being on and constant. Scanning is controlled by application software designed to capture images. To start and stop scanning, refer to the documentation provided with your application software. • A batch of documents to be fed into the scanner must be arranged so the leading edges of all documents are aligned and centered in the input tray; this allows the feeder to introduce documents into the scanner one at a time. • Remove all staples and paper clips before scanning. Staples and paper clips on documents may damage the scanner and documents. • Documents should be in good condition. • Torn, damaged or crushed pages can be transported successfully through the scanner. However, no scanner can transport every possible type of damaged paper. If in doubt about whether a specific damaged document can be transported through the scanner, place the document in a clear protective sleeve. Sleeves should be manually fed, one at a time, folded edge first, while lifting the gap release lever. NOTE: You also can use the optional Kodak i1400 Series A3 Flatbed to scan. • When scanning documents in a clear protective sleeve, the input tray guides must be adjusted to accommodate the width of the sleeve. Paper Types: Bond, Laser, Inkjet, Offset NOTE: Chemically coated papers may cause more rapid wear/swelling of the rollers. Paper inks: All inks on the paper must be dry before scanning is started. This includes: Standard offset printing, Inkjet printer, Thermal transfer, Handwriting inks. Correction Fluids: Liquid Paper®, Tipp-Ex®, Wite-out®, and other similar correction fluids must be dry before scanning is started. Paper Weights: 7.3 to 200 g/m2 kg (9 to 110 lbs.) Maximum Document Size: 30.5 x 86 cm (12 x 34 in.) Minimum Document Size: 8.9 x 5 cm (3.5 x 2.5 in.) A-61550 July 2008 19
-
 1
1 -
2
-
3
-
4
-
5
-
6
-
7
-
8
-
9
-
10
-
11
-
12
-
13
-
14
-
15
-
16
-
17
-
 18
18 -
 19
19 -
 20
20 -
 21
21 -
 22
22 -
 23
23 -
 24
24 -
 25
25 -
 26
26 -
 27
27 -
 28
28 -
29
-
30
-
31
-
32
-
33
-
34
-
35
-
36
-
37
-
38
-
39
-
40
-
41
-
42
-
43
-
44
-
45
-
46
-
47
-
48
-
49
-
50
-
51
-
52
-
53
-
54
-
55
-
56
-
57
-
58
-
59
-
60
-
61
-
62
-
63
-
64
-
65
-
66
-
67
-
68
-
69
-
70
-
71
-
72
-
73
-
74
-
75
-
76
 |
 |
