Konica Minolta bizhub 501 bizhub 361/421/501 Network Scan/Fax/Network Fax Oper - Page 295
Cannot receive data - service manual
 |
View all Konica Minolta bizhub 501 manuals
Add to My Manuals
Save this manual to your list of manuals |
Page 295 highlights
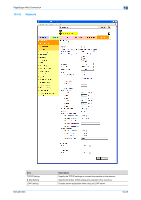
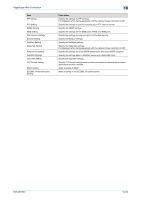
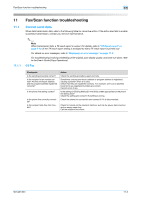
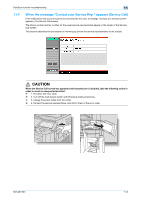
Fax/Scan function troubleshooting 11 11.2 11.2.1 Cannot receive data When data reception fails, refer to the following table for corrective action. If the action also fails to enable successful reception, contact your service representative. 2 Note When reception fails, an TX result report is output. For details, refer to "TX Result report" on page 7-10. (If the TX result report setting is arranged so that a TX result report is printed out) For details on error messages, refer to "Displaying an error message" on page 11-6. For troubleshooting involving misfeeding of the original, poor display quality, and toner run-down, refer to the User's Guide [Copy Operations]. G3 Fax Symptom Cannot receive data Does not print out received data Checkpoint Is paper supplied in place? Is paper misfeed? Is the toner run down? Is the receiving mode set to manual reception? Is the phone line correctly connected? Is [Closed Network RX] enabled? Is the F-coded SUB address sent from the sender correct? Is the PC-Fax RX function specified? Is TSI RX distribution is specified? Is the Memory RX function specified? Action When the paper supply icon is lit, it indicates that the paper tray is empty and received documents are stored in the memory. Replenish paper. For details on the paper supply procedure, refer to the User's Guide [Copy Operations]. When paper misfeeding is occuring, received documents are stored in the memory. Remove paper that has been stuck. For details on removing stuck paper, refer to the User's Guide [Copy Operations]. If all toner has been used up, document reception is not possible. Promptly replace the toner cartridge. For details on replacing the toner cartridge, refer to the User's Guide [Copy Operations]. When [Receive Mode] in the Utility screen is set to [Manual RX], manual receiving operation is necessary. Refer to "Manual RX (phone only)" on page 5-3, perform operations for receiving data. Isn't the phone line disconnected? Check the phone line connection and connect it if it is disconnected. If [Closed Network RX] is enabled, the machine only receives faxes from specified senders. Contact your network administrator. When a confidential user box or relay user box is set up and a wrong SUB address is received, a communication error occurs and data reception may fail. Contact the sender to check the setting of the SUB address. Check to see if any PC-Fax RX user box stores the received data. Check to see if any TSI RX user box stores the received data. If the Memory RX function is specified, perform the following steps to print out the received document: 1. Touch [User Box]. 2. Touch [Use Document]. 3. Touch [System]. 4. Touch [Memory RX User Box], and then click [OK]. 5. If a user box password has been specified, enter the password, then [OK]. 6. Select the document to be printed, and then touch [Print]. Another solution is to specify [OFF] for [Memory RX Setting]. 501/421/361 11-4
-
 1
1 -
2
-
3
-
4
-
5
-
6
-
7
-
8
-
9
-
10
-
11
-
12
-
13
-
14
-
15
-
16
-
17
-
18
-
19
-
20
-
21
-
22
-
23
-
24
-
25
-
26
-
27
-
28
-
29
-
30
-
31
-
32
-
33
-
34
-
35
-
36
-
37
-
38
-
39
-
40
-
41
-
42
-
43
-
44
-
45
-
46
-
47
-
48
-
49
-
50
-
51
-
52
-
53
-
54
-
55
-
56
-
57
-
58
-
59
-
60
-
61
-
62
-
63
-
64
-
65
-
66
-
67
-
68
-
69
-
70
-
71
-
72
-
73
-
74
-
75
-
76
-
77
-
78
-
79
-
80
-
81
-
82
-
83
-
84
-
85
-
86
-
87
-
88
-
89
-
90
-
91
-
92
-
93
-
94
-
95
-
96
-
97
-
98
-
99
-
100
-
101
-
102
-
103
-
104
-
105
-
106
-
107
-
108
-
109
-
110
-
111
-
112
-
113
-
114
-
115
-
116
-
117
-
118
-
119
-
120
-
121
-
122
-
123
-
124
-
125
-
126
-
127
-
128
-
129
-
130
-
131
-
132
-
133
-
134
-
135
-
136
-
137
-
138
-
139
-
140
-
141
-
142
-
143
-
144
-
145
-
146
-
147
-
148
-
149
-
150
-
151
-
152
-
153
-
154
-
155
-
156
-
157
-
158
-
159
-
160
-
161
-
162
-
163
-
164
-
165
-
166
-
167
-
168
-
169
-
170
-
171
-
172
-
173
-
174
-
175
-
176
-
177
-
178
-
179
-
180
-
181
-
182
-
183
-
184
-
185
-
186
-
187
-
188
-
189
-
190
-
191
-
192
-
193
-
194
-
195
-
196
-
197
-
198
-
199
-
200
-
201
-
202
-
203
-
204
-
205
-
206
-
207
-
208
-
209
-
210
-
211
-
212
-
213
-
214
-
215
-
216
-
217
-
218
-
219
-
220
-
221
-
222
-
223
-
224
-
225
-
226
-
227
-
228
-
229
-
230
-
231
-
232
-
233
-
234
-
235
-
236
-
237
-
238
-
239
-
240
-
241
-
242
-
243
-
244
-
245
-
246
-
247
-
248
-
249
-
250
-
251
-
252
-
253
-
254
-
255
-
256
-
257
-
258
-
259
-
260
-
261
-
262
-
263
-
264
-
265
-
266
-
267
-
268
-
269
-
270
-
271
-
272
-
273
-
274
-
275
-
276
-
277
-
278
-
279
-
280
-
281
-
282
-
283
-
284
-
285
-
286
-
287
-
288
-
289
-
 290
290 -
 291
291 -
 292
292 -
 293
293 -
 294
294 -
 295
295 -
 296
296 -
 297
297 -
 298
298 -
 299
299 -
 300
300 -
301
-
302
-
303
-
304
-
305
-
306
-
307
-
308
-
309
-
310
-
311
-
312
-
313
-
314
-
315
-
316
-
317
-
318
-
319
-
320
-
321
 |
 |