Konica Minolta bizhub C308 bizhub C368/C308 Quick Start Guide - Page 56
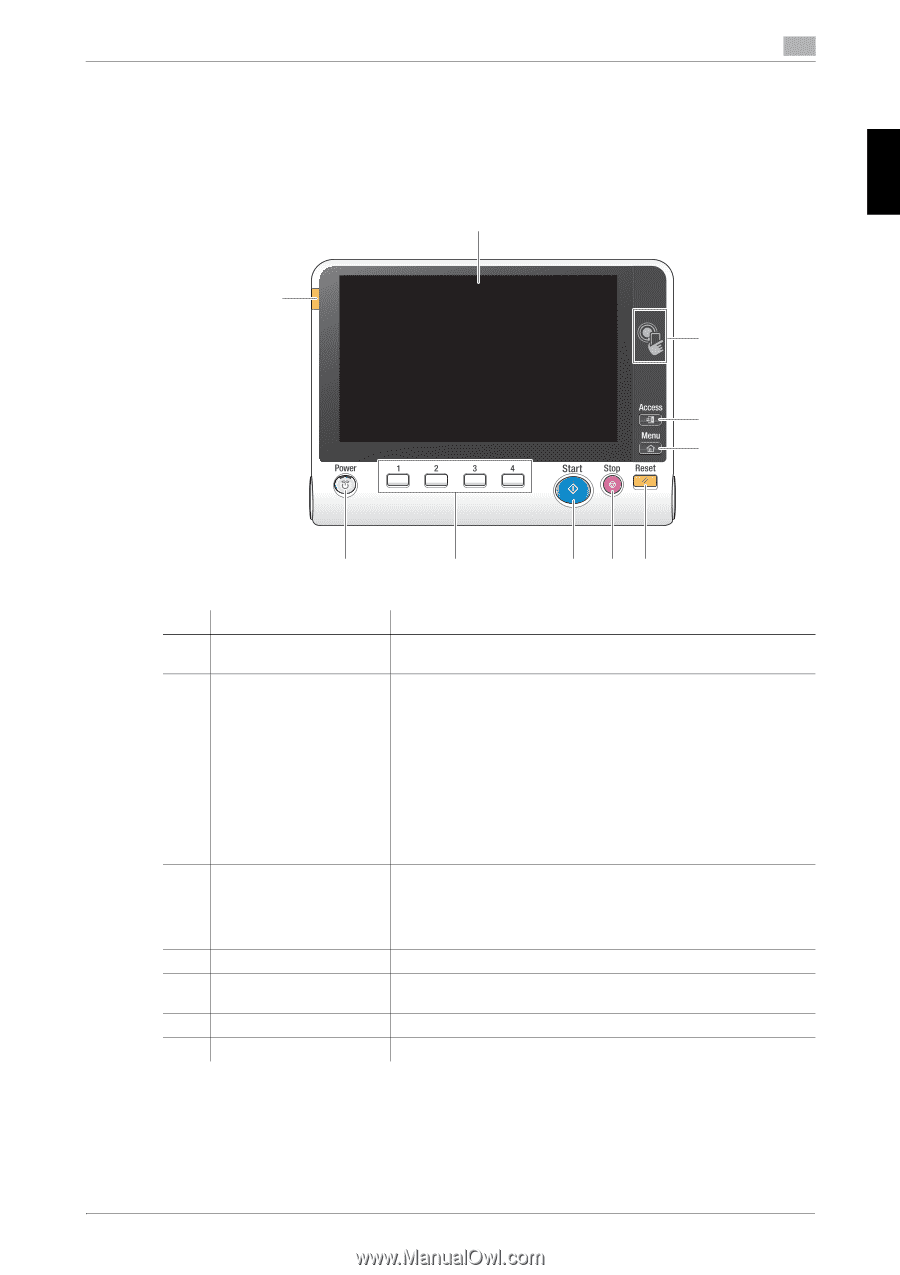
Control Panel, 2.5.1 Name of parts, Name of parts
 |
View all Konica Minolta bizhub C308 manuals
Add to My Manuals
Save this manual to your list of manuals |
Page 56 highlights
About This Machine Chapter 2 2.5 Control Panel 2.5 Control Panel The Keypad KP-101 is equipped on the right side of the Control Panel. 2.5.1 Name of parts 1 10 2 2 3 4 9 No. Name 1 Touch Panel 2 NFC area 3 Access 4 Menu 5 Reset 6 Stop 7 Start 8 7 65 Description Various screens and messages are displayed. Directly touch the Touch Panel to configure each setting. Used to associate this machine with an NFC-compatible Android terminal. You can place an Android terminal with Mobile for Android installed on the NFC area to establish a pairing with this machine or to perform user authentication. This area is also used to associate this machine with an iOS terminal that supports Bluetooth LE. The Local Interface Kit EK-609 is required to use the Bluetooth LE function. You can place an iOS terminal with Mobile for iPhone/iPad installed on the NFC area to establish a pairing with this machine or to perform user authentication. For details, refer to the User's Guide CD. If user authentication or account track is enabled, enter the user name and password for user authentication or the account name and password for account track, then press this key to start the use of this machine. After a target operation is completed, press this key once again to end the use of this machine. Press this key to display the main menu. Press this key to reset all settings, excluding the registered ones, that you entered using the Control Panel. Press this key to temporarily stop an active copy, scan, or print job. Press to start the copy, scan or fax operation. bizhub C368/C308 2-21
-
 1
1 -
2
-
3
-
4
-
5
-
6
-
7
-
8
-
9
-
10
-
11
-
12
-
13
-
14
-
15
-
16
-
17
-
18
-
19
-
20
-
21
-
22
-
23
-
24
-
25
-
26
-
27
-
28
-
29
-
30
-
31
-
32
-
33
-
34
-
35
-
36
-
37
-
38
-
39
-
40
-
41
-
42
-
43
-
44
-
45
-
46
-
47
-
48
-
49
-
50
-
 51
51 -
 52
52 -
 53
53 -
 54
54 -
 55
55 -
 56
56 -
 57
57 -
 58
58 -
 59
59 -
 60
60 -
 61
61 -
62
-
63
-
64
-
65
-
66
-
67
-
68
-
69
-
70
-
71
-
72
-
73
-
74
-
75
-
76
-
77
-
78
-
79
-
80
-
81
-
82
-
83
-
84
-
85
-
86
-
87
-
88
-
89
-
90
-
91
-
92
-
93
-
94
-
95
-
96
-
97
-
98
-
99
-
100
-
101
-
102
-
103
-
104
-
105
-
106
-
107
-
108
-
109
-
110
-
111
-
112
-
113
-
114
-
115
-
116
-
117
-
118
-
119
-
120
-
121
-
122
-
123
-
124
-
125
-
126
-
127
-
128
-
129
-
130
-
131
-
132
-
133
-
134
-
135
-
136
-
137
-
138
-
139
-
140
-
141
-
142
-
143
-
144
-
145
-
146
-
147
-
148
-
149
-
150
-
151
-
152
-
153
-
154
-
155
-
156
-
157
-
158
-
159
-
160
-
161
-
162
-
163
-
164
-
165
-
166
-
167
-
168
-
169
-
170
-
171
-
172
-
173
-
174
-
175
-
176
-
177
-
178
-
179
-
180
-
181
-
182
-
183
-
184
-
185
-
186
-
187
-
188
-
189
-
190
-
191
-
192
-
193
-
194
-
195
-
196
-
197
-
198
-
199
-
200
-
201
-
202
-
203
-
204
-
205
-
206
-
207
-
208
-
209
-
210
-
211
-
212
-
213
-
214
-
215
-
216
-
217
-
218
-
219
-
220
-
221
-
222
-
223
-
224
-
225
-
226
-
227
-
228
-
229
-
230
-
231
-
232
-
233
-
234
-
235
-
236
-
237
-
238
-
239
-
240
-
241
-
242
-
243
-
244
-
245
-
246
-
247
-
248
-
249
-
250
-
251
-
252
-
253
-
254
-
255
-
256
-
257
-
258
-
259
-
260
-
261
-
262
-
263
-
264
 |
 |