Konica Minolta bizhub C552 Product Guide - Page 24
To Set Up A Secure Print In Print Mode
 |
View all Konica Minolta bizhub C552 manuals
Add to My Manuals
Save this manual to your list of manuals |
Page 24 highlights
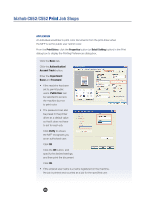
bizhub C652/C552 Print Job Shops TO SET UP A "SECURE PRINT" IN PRINT MODE Steps/Keystrokes: Open the File (in this case a new Word document): 1. Type your name on the document. 2. From the Dropdown menu, choose File, and Print. 3. Go to the Printer Name box and choose the Konica Minolta MFP PCL Printer. 4. Click on Properties. 5. From the Basic tab, confirm Original Orientation indicates Portrait. 6. Leave Paper Size on Same as Original Size. 7. Leave Zoom on Auto. 8. Confirm Paper Tray on Auto. 9. On the upper right side of the Basic Tab you will see the Output Method dropdown menu; change the output method from Print to Secure Print (2nd field listed). "Output Method" menu is where you designate your document to be printed in "Secure Document" mode. 10.A "User Settings Dialog box will open. 11. Enter Secure as the Secure Print I.D. and x as the Password. 12. Click OK three times. 22
-
 1
1 -
2
-
3
-
4
-
5
-
6
-
7
-
8
-
9
-
10
-
11
-
12
-
13
-
14
-
15
-
16
-
17
-
18
-
 19
19 -
 20
20 -
 21
21 -
 22
22 -
 23
23 -
 24
24 -
 25
25 -
 26
26 -
 27
27 -
 28
28 -
 29
29 -
30
-
31
-
32
-
33
-
34
-
35
-
36
-
37
-
38
-
39
-
40
-
41
-
42
-
43
-
44
-
45
-
46
-
47
-
48
-
49
-
50
-
51
-
52
-
53
-
54
-
55
-
56
-
57
-
58
-
59
-
60
-
61
-
62
-
63
-
64
-
65
-
66
-
67
-
68
-
69
-
70
-
71
-
72
-
73
-
74
-
75
-
76
-
77
-
78
 |
 |
