Kyocera 1030DN Operation Guide - Page 47
Output Tray and Rear Cover, Cassette, MP Tray
 |
View all Kyocera 1030DN manuals
Add to My Manuals
Save this manual to your list of manuals |
Page 47 highlights
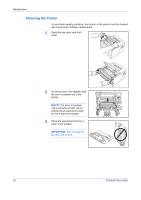
Output Tray and Rear Cover 1 If paper is not completely ejected into the output tray, open the rear cover and remove the jammed paper by pulling it out. 2 Open and close the top cover to clear the error. The printer warms up and resumes printing. Cassette 1 Pull out the cassette. Remove any partially fed paper. Check to see if paper is loaded correctly. If not, reload the paper. 2 Push the cassette back in securely. Open and close the top cover to clear the error. The printer warms up and resumes printing. MP Tray 1 Remove the paper from the MP tray. IMPORTANT: Do not try to remove paper that has already been partially fed, proceed to step 2. OPERATION GUIDE 23
-
 1
1 -
2
-
3
-
4
-
5
-
6
-
7
-
8
-
9
-
10
-
11
-
12
-
13
-
14
-
15
-
16
-
17
-
18
-
19
-
20
-
21
-
22
-
23
-
24
-
25
-
26
-
27
-
28
-
29
-
30
-
31
-
32
-
33
-
34
-
35
-
36
-
37
-
38
-
39
-
40
-
41
-
 42
42 -
 43
43 -
 44
44 -
 45
45 -
 46
46 -
 47
47 -
 48
48 -
 49
49 -
 50
50 -
 51
51 -
 52
52 -
53
-
54
-
55
-
56
-
57
-
58
-
59
-
60
-
61
-
62
-
63
-
64
-
65
-
66
 |
 |

OPERATION GUIDE
23
Output Tray and Rear Cover
1
If paper is not completely ejected
into the output tray, open the rear
cover and remove the jammed
paper by pulling it out.
2
Open and close the top cover to clear the error.
The printer warms up and resumes printing.
Cassette
1
Pull out the cassette. Remove any
partially fed paper.
Check to see if paper is loaded
correctly. If not, reload the paper.
2
Push the cassette back in securely.
Open and close the top cover to clear the error. The printer warms up and
resumes printing.
MP Tray
1
Remove the paper from the MP
tray.
IMPORTANT:
Do not try to
remove paper that has already
been partially fed, proceed to step
2.