Kyocera KM-1650 1650/2050/2550 Operation Guide Rev-4 (Basic) - Page 108
Lighter, Darker, Photo, Symptom, Items to check, Corrective procedure, Reference
 |
View all Kyocera KM-1650 manuals
Add to My Manuals
Save this manual to your list of manuals |
Page 108 highlights
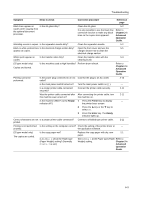
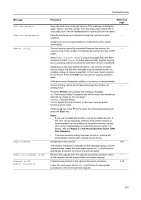
Troubleshooting Symptom Items to check Corrective procedure Reference page The copies come out too dark. Is the auto exposure adjustment mode set? To adjust the overall exposure level, perform the auto exposure adjustment procedure. Refer to Chapter 3 in Advanced Operation Guide. Is the manual exposure mode set? Use the Lighter key or the Darker key 3-3 to adjust the exposure level properly. To adjust the overall exposure, perform Refer to the relevant exposure adjustment Chapter 3 in procedure in each image quality mode. Advanced Operation Guide. A moire pattern (the Is the original a printed photograph? Set the image quality mode to Photo. 3-2 phenomenon where the dots do not appear to be lined up properly but seem to be grouped together in patterns) appears on the copies. The copies are not clear. Did you select an image quality mode Select an appropriate image quality 3-2 properly according to the type of the mode. original? The copies are dirty. Is the platen or the original cover dirty? Clean the platen and/or the original 5-1 cover. The copy image is skewed. Were the originals set correctly? When using the platen, set the original 3-1 securely along the original size indicator plates. When using the optional document 4-2 processor, adjust the original insert guides securely before setting the originals. Was the paper set correctly? Check the width guide plate position in 2-1 the cassette. Paper jams occur often. Is the paper loaded properly in the Load the paper properly. 2-1 cassette? Depending upon the type and storage - condition of the paper, finished copies may curl tightly, resulting in a paper jam. Remove the paper from the cassette, turn it over, and set it in the cassette again. Is the paper curled, folded over or Replace the paper with new paper. 2-1 wrinkled? Is there any jammed paper or loose Carry out the appropriate procedure to 6-8 scraps of paper remaining inside the remove the paper. machine? Does the size of the paper set in the Make sure the size of the paper set in 2-4 multi-bypass tray match the registered the multi-bypass tray matches the size? registered size. 6-2
-
 1
1 -
2
-
3
-
4
-
5
-
6
-
7
-
8
-
9
-
10
-
11
-
12
-
13
-
14
-
15
-
16
-
17
-
18
-
19
-
20
-
21
-
22
-
23
-
24
-
25
-
26
-
27
-
28
-
29
-
30
-
31
-
32
-
33
-
34
-
35
-
36
-
37
-
38
-
39
-
40
-
41
-
42
-
43
-
44
-
45
-
46
-
47
-
48
-
49
-
50
-
51
-
52
-
53
-
54
-
55
-
56
-
57
-
58
-
59
-
60
-
61
-
62
-
63
-
64
-
65
-
66
-
67
-
68
-
69
-
70
-
71
-
72
-
73
-
74
-
75
-
76
-
77
-
78
-
79
-
80
-
81
-
82
-
83
-
84
-
85
-
86
-
87
-
88
-
89
-
90
-
91
-
92
-
93
-
94
-
95
-
96
-
97
-
98
-
99
-
100
-
101
-
102
-
 103
103 -
 104
104 -
 105
105 -
 106
106 -
 107
107 -
 108
108 -
 109
109 -
 110
110 -
 111
111 -
 112
112 -
 113
113 -
114
-
115
-
116
-
117
-
118
-
119
-
120
-
121
-
122
-
123
-
124
-
125
-
126
-
127
-
128
-
129
-
130
-
131
-
132
-
133
-
134
-
135
-
136
-
137
-
138
-
139
-
140
 |
 |
