LG 42LG700H Owners Manual - Page 103
Reference:proceduresforadding Channel Label, Icons/custom, Channel Labels2-5-4, Menu Mode
 |
UPC - 719192174597
View all LG 42LG700H manuals
Add to My Manuals
Save this manual to your list of manuals |
Page 103 highlights
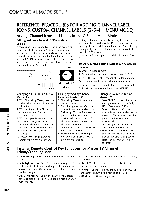
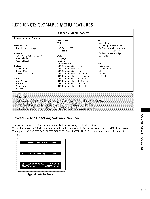
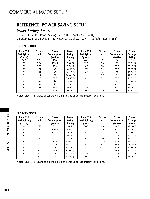
COMMERCIAL MODE SETUP N 0 I'rl N 0 I-I-I I-I-I -t c 102 REFERENCE:PROCEDURESFOR ADDING CHANNEL LABEL ICONS/CUSTOM CHANNEL LABELS(2-5-4 + MENU MODE) Adding Channel Icons and Labels in the 2-5-4 + Menu Mode Editing/Adding Labels Channel ICONs and/or If there is no pre-assigned ICON, you can make a cus- tom channel label of up to 7 characters to help in identifying the channel or network. At your option, channel labels can also be added in addition to a pre- assigned ICON. You may also add labels for the Aux input sources to clearly identify the devices that are connected to the Aux inputs. (Icon) [\JI BBBBB[2 N ETW0 RK 12 3 4 56 7 (Label) Editing and adding the labels can only be done if there are channels entered into the TV's channel map either by using the method described in item 6 (page 18), by cloning or by the use of the master remote control from the PPV provider. Note: A blank letter space is available between 'Z' and ,!,. To Do Channel Follows Editing/Labeling, 1. Enter TV Installer menu. Proceed as 2. Once the installer menu appears, press '2', '5', '4', 'MENU'. This enters the channel label editing mode. Add your channel icons and channel labels in this menu, see below. (You can do this more than once.) 3. To exit the menu when done press "MENU". Changing a Channel's ICON on Master "IV 1. With Channel Up/Down, select the channel you want to change the Icon for. 2. With the Right or Left ADJ arrow, select the thin letter T on the channel ID display. 3. With the Up or Down arrow, select the desired ICON you want to appear to identify the channel. (If you know the ICON number, enter the number followed by Enter / Select.) 4. Proceed with Changing/Adding Labels or go to the next channel. Changing/Adding Channel Labels on Master TV 1. Channel Up/Down to select the desired channel 2. Press the Right or Left ADJ arrow repeatedly until the numbers 1 to 7 show up. The number shows the position of the character that can be changed. Number 1 is the first character, number 2 the second character and so on. 3. With the Up or Down arrow, select the desired character. 4. Proceed to the next number position or use Channel Up/Down to go to the next channel. Changing Source Labels on Master "IV 1. Press "INPUT" to select the desired Aux input source; A/V 1, A/V 2, HDMI Component, RGB etc. 2. Press the Right or Left arrow repeatedly until the numbers 0 to 9 shows up. The number shows the position of the character that can be changed. 3. Use the Up or Down arrows to select the desired character. 4. Press "INPUT" for the next Aux source or proceed with Changing Icon or Changing/Adding Labels. Press Ch Up/Down to return to channels. Installer Remote Control Key Functions for Master TV Channel Editing/Labeling Menu CHANNEL Up/Down - Tunes in the next channel in scan. 01_0 - 9 - Use to enter the index number of the ICON, if known. Left/Right Arrows - Select the item to change. If 'T' is shown, the ICON can be changed. If a number is shown, it indicates the position of the character that can be changed. Up/Down Arrows - Select the ICON or the character to be displayed. Tip: Arrows can be held down for fast scrolling. 01_ENTER/SELECT - Changes the ICON after the number has been entered. 01_INPUT - Changes the Aux input label. ("Source" on the remote shown in this manual is INPUT.) 0_MENU - Exits the editing process.
-
 1
1 -
2
-
3
-
4
-
5
-
6
-
7
-
8
-
9
-
10
-
11
-
12
-
13
-
14
-
15
-
16
-
17
-
18
-
19
-
20
-
21
-
22
-
23
-
24
-
25
-
26
-
27
-
28
-
29
-
30
-
31
-
32
-
33
-
34
-
35
-
36
-
37
-
38
-
39
-
40
-
41
-
42
-
43
-
44
-
45
-
46
-
47
-
48
-
49
-
50
-
51
-
52
-
53
-
54
-
55
-
56
-
57
-
58
-
59
-
60
-
61
-
62
-
63
-
64
-
65
-
66
-
67
-
68
-
69
-
70
-
71
-
72
-
73
-
74
-
75
-
76
-
77
-
78
-
79
-
80
-
81
-
82
-
83
-
84
-
85
-
86
-
87
-
88
-
89
-
90
-
91
-
92
-
93
-
94
-
95
-
96
-
97
-
 98
98 -
 99
99 -
 100
100 -
 101
101 -
 102
102 -
 103
103 -
 104
104 -
 105
105 -
 106
106 -
 107
107 -
 108
108 -
109
-
110
-
111
-
112
-
113
-
114
-
115
-
116
-
117
-
118
-
119
-
120
-
121
-
122
-
123
-
124
-
125
-
126
-
127
-
128
-
129
-
130
-
131
-
132
-
133
-
134
-
135
 |
 |
