LG CBGS3628S INSTALLATION - Page 8
Installing the Cooktop
 |
View all LG CBGS3628S manuals
Add to My Manuals
Save this manual to your list of manuals |
Page 8 highlights
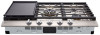
en-us_main.book.book Page 8 Friday, November 4, 2022 8:08 AM 8 INSTALLATION - Dimension/Clearance 30" Cooktop 36" Cooktop A Width of upper plate 30" (760mm) 36" (915mm) B Depth of upper plate 21 11/16" (533mm) C Height of cooktop base 3 3/4" (95 mm) D Width of cooktop base 28 1/4" (717 mm) 33 5/8" (854 mm) E Depth of cooktop base 19 3/8" (492 mm) F Width of cutout 28 1/2" (724 mm) 33 7/8" (860 mm) G Depth of cutout 19 5/8" (498 mm) H Distance from cutout to side wall on the left of unit. / Distance from cutout to side wall on the right of the unit. 211 13/16" (300 mm) I Distance from front edge of cutout to front edge of countertop 21 5/8" (41 mm) J Distance between cutout and the wall behind the cooktop 22 3/4" (69 mm) K Width of unprotected overhead cabinets 230" (760 mm) 236" (915 mm) L Depth of unprotected overhead cabinets 113" (330 mm) M Clearance from countertop to unprotected overhead surface 230" (760 mm) N Clearance from countertop to nearest cabinet on either side of unit 218" (457 mm) Installing the Cooktop Installing the Cooktop Unit 1 Locate the electrical outlet and gas shut-off valve beneath the cabinet. Never reuse old flexible connectors. Install a manual shut-off valve b in the gas line in an easily accessible location outside the cooktop. Be sure you know how and where to shut off the gas supply to the cooktop. Install the electrical outlet 12˝ a below the countertop. 3 Remove the retainer brackets from the literature package. 2 Carefully lower the cooktop into the countertop cutout, making sure not to trap any wires. 4 Install the retainer brackets a to the bottom of the cooktop unit c. then snug the screws b against the bottom of the countertop d as shown.
-
 1
1 -
2
-
 3
3 -
 4
4 -
 5
5 -
 6
6 -
 7
7 -
 8
8 -
 9
9 -
 10
10 -
 11
11 -
 12
12 -
 13
13 -
14
-
15
-
16
-
17
-
18
-
19
-
20
-
21
-
22
-
23
-
24
-
25
-
26
-
27
-
28
-
29
-
30
-
31
-
32
-
33
-
34
-
35
-
36
-
37
-
38
-
39
-
40
-
41
-
42
-
43
-
44
 |
 |
