LG DLGX8388NM Owner's Manual - Page 13
HOW TO USE - steam dryer
 |
View all LG DLGX8388NM manuals
Add to My Manuals
Save this manual to your list of manuals |
Page 13 highlights
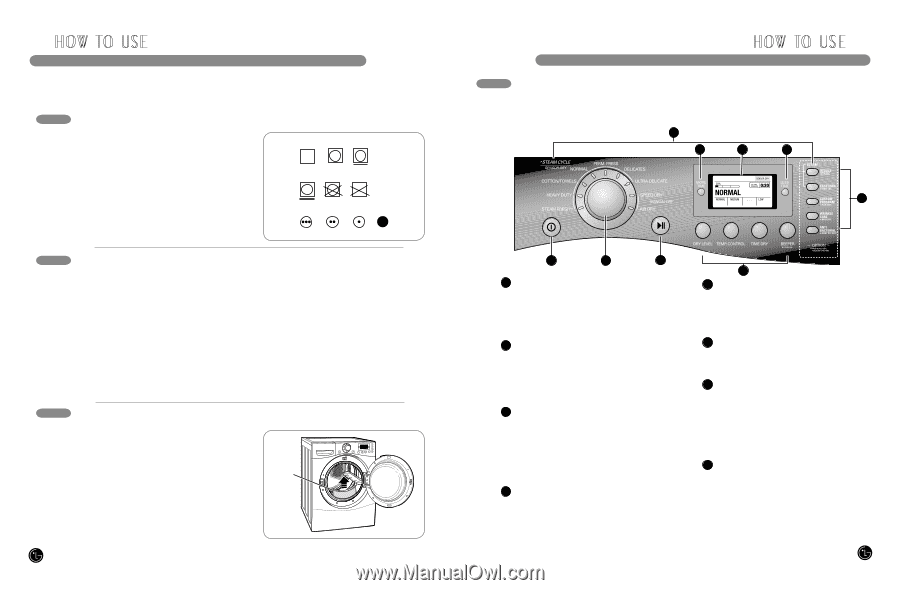
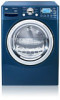
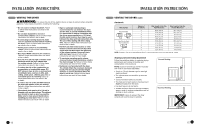
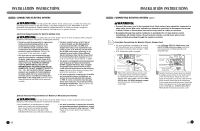
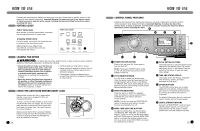
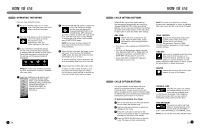
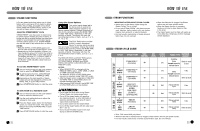
HOW TO USE Following are instructions for starting and using your new dryer. Please refer to specific sections of this manual for more detailed information. Important Warning: To reduce the risk of fire, electric shock, or injury to persons, read this entire manual, including the Important Safety Instructions, before operating this dryer. SORTING LOADS Fabric Care Labels Most articles of clothing feature fabric care labels that include instructions for proper care. Grouping Similar Items For best results, sort clothes into loads that can be dried with the same drying cycle. Different fabrics have different care requirements, and some fabrics will dry more quickly than others. Fabric Care Labels Tumble dry Dry Normal Permanent Press/ wrinkle resistant Heat setting Gentle/ delicate Do not tumble dry Do not dry (used with do not wash) High Medium Low No heat/air Loading the Dryer wWARNING: To reduce the risk of fire, electric shock, or injury to persons when using this appliance, follow basic precautions, including the following: • Check all pockets to make sure that they are empty. Items such as clips, pens, coins, and keys can damage both your dryer and your clothes. Flammable objects such as lighters or matches could ignite, causing a fire. Failure to do so can result in fire, explosion, or death. • Never dry clothes that have been exposed to oil, gasoline, or other flammable substances. Washing clothes will not completely remove oil residues. Failure to obey this warning can result in fire, explosion, or death. • Combine large and small items in a load. • Damp clothes will expand as they dry. Do not overload the dryer; clothes require room to tumble dry properly. • Close zippers, hooks, and drawstrings to prevent these items from snagging or tangling on other clothes. CHECK THE LINT FILTER BEFORE EVERY LOAD Always make sure the lint filter is clean before starting a new load; a clogged lint filter will increase drying times. To clean, pull the lint filter straight up and roll any lint off the filter with your fingers. Do not rinse or wash the filter to remove lint. Push the lint filter firmly back into place. See "Care and Cleaning" for more information. Always ensure the lint filter is properly installed before running the dryer. Running the dryer with a loose or missing lint filter may damage the dryer and articles in the dryer. Lint Filter 24 HOW TO USE CONTROL PANEL FEATURES Following are instructions for starting and using your new dryer. Please refer to specific sections of this manual for more detailed information. Important Warning: To reduce the risk of fire, electric shock, or injury to persons, read this entire manual, including the Important Safety Instructions, before operating this dryer. 8 4 6 4 7 1 2 3 1 POWER ON/OFF BUTTON Press to turn the dryer ON. Press again to turn the dryer OFF. NOTE: Pressing the ON/OFF button during a cycle will cancel that cycle and any load settings will be lost. 2 CYCLE SELECTOR KNOB Turn this knob to select the desired cycle. Once the desired cycle has been selected, the standard presets will be shown in the display. On MANUAL DRY cycles, these settings can be adjusted using the cycle setting buttons anytime before starting the cycle. 3 START/PAUSE BUTTON Press this button to START the selected cycle. If the dryer is running, use this button to PAUSE the cycle without losing the current settings. NOTE: If you do not press the START/PAUSE button to resume a cycle within 4 minutes, the dryer automatically turns off. 4 MORE TIME/LESS TIME BUTTONS To adjust the drying time, use these buttons with MANUAL DRY, TIME DRY, and steam fresh™ cycles, as well as the reduce static and easy iron options. Press the MORE TIME button to increase the selected manual cycle time by a minute; press LESS TIME to decrease the cycle time by a minute. 5 5 CYCLE SETTING BUTTONS Use these buttons to select the desired cycle settings for the selected cycle. The current settings are shown in the display. Press the button for that option to view and select other settings. 6 TIME AND STATUS DISPLAY The display shows the settings, estimated time remaining, options, and status messages for your dryer. 7 OPTION BUTTONS The OPTION buttons allow you to select additional cycle options. Certain buttons also allow you to activate special functions by pressing and holding the button for 3 seconds. For detailed information about the individual options, please see the following pages. 8 USEFUL STEAM FUNCTIONS During the steam fresh™ cycle and when selecting Steam options, the swirl nozzle injects fabrics with hot steam to refresh, reduce static, and help make ironing easy. 25
-
 1
1 -
2
-
3
-
4
-
5
-
6
-
7
-
 8
8 -
 9
9 -
 10
10 -
 11
11 -
 12
12 -
 13
13 -
 14
14 -
 15
15 -
 16
16 -
 17
17 -
 18
18 -
19
-
20
-
21
-
22
-
23
-
24
-
25
-
26
-
27
-
28
-
29
-
30
-
31
-
32
-
33
-
34
-
35
-
36
-
37
-
38
-
39
-
40
-
41
-
42
-
43
-
44
-
45
 |
 |