LG DLGX8388NM Owner's Manual - Page 7
Leveling The Dryer, Reversing The Door Swing, Changing The Dryer Vent Location - dryers
 |
View all LG DLGX8388NM manuals
Add to My Manuals
Save this manual to your list of manuals |
Page 7 highlights
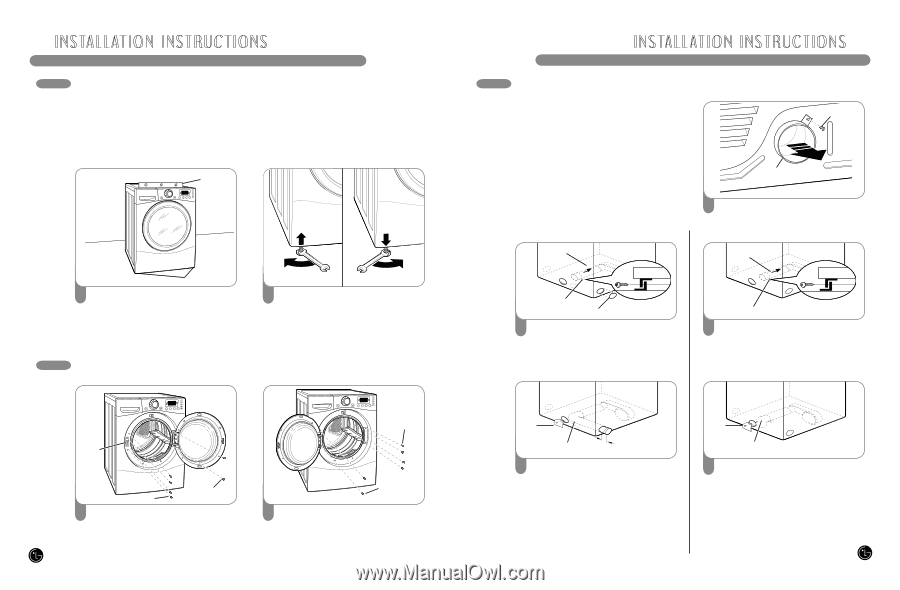
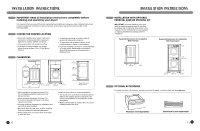
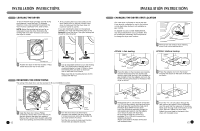
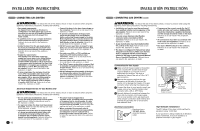
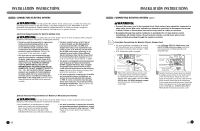
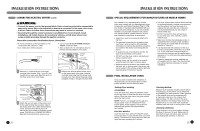
INSTALLATION INSTRUCTIONS LEVELING THE DRYER To ensure that the dryer provides optimal drying performance, it must be level. To minimize vibration, noise, and unwanted movement, the floor must be a perfectly level, solid surface. NOTE: Adjust the leveling feet only as far as necessary to level the dryer. Extending the leveling feet more than necessary can cause the dryer to vibrate. Level • All four leveling feet must rest solidly on the floor. Gently push on the top corners of the dryer to make sure that the dryer does not rock from corner to corner. If you are installing the dryer on the optional pedestal, you must use the leveling feet on the pedestal to level the dryer. The dryer leveling feet should be fully retracted. Leveling Feet 1 Position the dryer in the final location. Place a level across the top of the dryer. 2 Use an adjustable wrench to turn the leveling feet. Turn clockwise to raise the dryer or counterclockwise to lower it. Raise or lower the leveling feet until dryer is level from side to side and front to back. Make sure that all 4 leveling feet are in firm contact with the floor. REVERSING THE DOOR SWING The swing of the dryer door can be reversed to fit your installation location. Door Latch Latch Screws Hinge Screws 1 Open the dryer door. Using a Phillips screwdriver, remove the 2 screws that secure the door hinge to the dryer door opening. Remove the 4 screws from the latch side of the dryer door opening, and remove the door latch. 12 Latch Screws Hinge Screws 2 Turn the door around so the hinge is reversed, and reattach the door using the 2 screws previously removed. Reinstall the door latch and the 4 screws. Test the door swing to make sure the door moves freely and latches securely. INSTALLATION INSTRUCTIONS CHANGING THE DRYER VENT LOCATION Your new dryer is shipped to vent to the rear. It can also be configured to vent to the bottom or side (right-side venting is not available on gas models). An adapter kit, part number 383EEL9001B, may be purchased from your LG retailer. This kit contains the necessary duct components to change the dryer vent location. Retaining Screw Rear Exhaust Duct OPTION 1: Side Venting Adapter duct 1 Remove the rear exhaust duct retaining screw. Pull out the exhaust duct. OPTION 2: Bottom Venting Adapter Duct Bracket Knockout 2 Press the tabs on the knockout and carefully remove the knockout for the desired vent opening (right-side venting is not available on gas models). Press the adapter duct onto the blower housing and secure to the base of the dryer as shown. Bracket 2 Press the adapter duct onto the blower housing and secure to the base of the dryer as shown. Cover Plate Elbow 11/2" (3.8 cm) 3 Preassemble a 4-in. (10 cm) elbow to the next 4-in. (10 cm) duct section, and secure all joints with duct tape. Be sure that the male end of the elbow faces AWAY from the dryer. Insert the elbow/duct assembly through the side opening and press it onto the adapter duct. Secure in place with duct tape. Be sure that the male end of the duct protrudes 1½ in. (3.8 cm) to connect the remaining ductwork. Attach cover plate to the back of the dryer with included screw. Cover Plate Elbow 3 Insert the 4-in. (10 cm) elbow through the rear opening and press it onto the adapter duct. Be sure that the male end of the elbow faces down through hole in the bottom of the dryer. Secure in place with duct tape. Attach the cover plate to the back of the dryer with included screw. 13
-
 1
1 -
 2
2 -
 3
3 -
 4
4 -
 5
5 -
 6
6 -
 7
7 -
 8
8 -
 9
9 -
 10
10 -
 11
11 -
 12
12 -
13
-
14
-
15
-
16
-
17
-
18
-
19
-
20
-
21
-
22
-
23
-
24
-
25
-
26
-
27
-
28
-
29
-
30
-
31
-
32
-
33
-
34
-
35
-
36
-
37
-
38
-
39
-
40
-
41
-
42
-
43
-
44
-
45
 |
 |