LG HMC030KD1 Service Manual - Page 24
Connection, piping, Indoor
 |
View all LG HMC030KD1 manuals
Add to My Manuals
Save this manual to your list of manuals |
Page 24 highlights
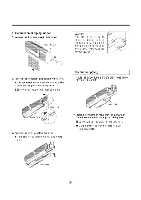
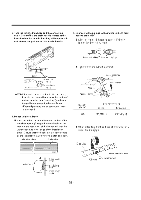
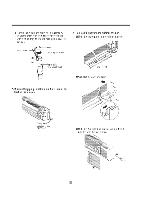
2) Connection of piping-Indoor 1. Remove the 2 screws of right side panel. Right side panel CAUTION When install, make sure that the remaining parts must be removed clearly so as not to damage the piping and drain hose, especially power cord and connecting cable. • a • ••• 2. Remove the front right side panel by the arrow. ■ The connector can be disconnected by pulling it while pressing the connectors hook. ■ Remove the 1 screw for fixing lower panel. For left rear piping 1. Route the indoor tubing and the drain hose in the direction of rear left. Lower panel Main PCB 3. Remove the lower panel by the arrow. ■ Take care not to scratch the wall and mat to drop. lil 'at Drain hose 2. Insert the connecting cable into the indoor unit from the outdoor unit through the piping hole. ■ Do not connect the cable to the indoor unit. • Make a small loop with the cable for easy connection later. Lower panel - 24 -
-
 1
1 -
2
-
3
-
4
-
5
-
6
-
7
-
8
-
9
-
10
-
11
-
12
-
13
-
14
-
15
-
16
-
17
-
18
-
 19
19 -
 20
20 -
 21
21 -
 22
22 -
 23
23 -
 24
24 -
 25
25 -
 26
26 -
 27
27 -
 28
28 -
 29
29 -
30
-
31
-
32
-
33
-
34
-
35
-
36
-
37
-
38
-
39
-
40
-
41
-
42
-
43
-
44
-
45
-
46
-
47
-
48
-
49
-
50
-
51
-
52
-
53
-
54
-
55
-
56
-
57
-
58
-
59
-
60
-
61
-
62
-
63
-
64
 |
 |