LG LUV200R Owner's Manual - Page 9
Warning
 |
View all LG LUV200R manuals
Add to My Manuals
Save this manual to your list of manuals |
Page 9 highlights
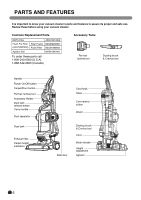
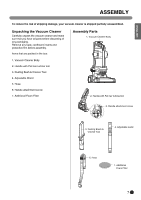
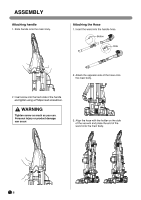
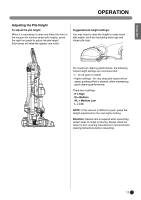
ASSEMBLY Attaching handle 1. Slide handle onto the main body. Attaching the Hose 1. Insert the wand into the handle hose. Button Hole 2. Attach the opposite side of the hose onto the main body. 2. Insert screw into the back side of the handle and tighten using a Phillips head screwdriver. WARNING Tighten screw as much as you can. Personal injury or product damage can occur. 3. Align the hose with the holder on the side of the vacuum and place the end of the wand onto the main body. 8
-
 1
1 -
2
-
3
-
 4
4 -
 5
5 -
 6
6 -
 7
7 -
 8
8 -
 9
9 -
 10
10 -
 11
11 -
 12
12 -
 13
13 -
 14
14 -
15
-
16
-
17
-
18
-
19
-
20
-
21
-
22
-
23
-
24
-
25
-
26
-
27
-
28
-
29
-
30
-
31
-
32
-
33
-
34
-
35
-
36
-
37
-
38
-
39
-
40
-
41
-
42
-
43
-
44
-
45
-
46
-
47
-
48
-
49
-
50
-
51
-
52
-
53
-
54
-
55
-
56
-
57
-
58
-
59
-
60
-
61
-
62
-
63
-
64
-
65
-
66
-
67
-
68
-
69
-
70
-
71
-
72
-
73
-
74
-
75
 |
 |

1. Slide handle onto the main body.
Attaching handle
Attaching the Hose
2. Insert screw into the back side of the handle
and tighten using a Phillips head screwdriver.
1. Insert the wand into the handle hose.
2. Attach the opposite side of the hose onto
the main body.
3. Align the hose with the holder on the side
of the vacuum and place the end of the
wand onto the main body.
Button
Hole
Tighten screw as much as you can.
Personal injury or product damage
can occur.
WARNING
ASSEMBLY
8