LG LUWD1CW Owners Manual - Page 11
Installation
 |
View all LG LUWD1CW manuals
Add to My Manuals
Save this manual to your list of manuals |
Page 11 highlights
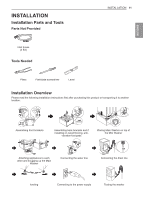
ENGLISH INSTALLATION Installation Parts and Tools Parts Not Provided INSTALLATION 11 Inlet hoses (2 EA) Tools Needed Pliers Flat-blade screwdriver Level Installation Overview Please read the following installation instructions first after purchasing this product or transporting it to another location. Assembling front brackets 1 1 2 3 Assembling back brackets and if installing on wood flooring, anti- vibration foot pads Placing Main Washer on top of the Mini Washer Attaching appliances to each other and snugging up the Main Washer Connecting the water line Connecting the drain line leveling Connecting to the power supply Testing the washer
-
 1
1 -
2
-
3
-
4
-
5
-
 6
6 -
 7
7 -
 8
8 -
 9
9 -
 10
10 -
 11
11 -
 12
12 -
 13
13 -
 14
14 -
 15
15 -
 16
16 -
17
-
18
-
19
-
20
-
21
-
22
-
23
-
24
-
25
-
26
-
27
-
28
-
29
-
30
-
31
-
32
-
33
-
34
-
35
-
36
-
37
-
38
-
39
-
40
-
41
-
42
-
43
-
44
-
45
-
46
-
47
-
48
-
49
-
50
-
51
-
52
-
53
-
54
-
55
-
56
-
57
-
58
-
59
-
60
-
61
-
62
-
63
-
64
-
65
-
66
-
67
-
68
-
69
-
70
-
71
-
72
-
73
-
74
-
75
-
76
-
77
-
78
-
79
-
80
-
81
-
82
-
83
-
84
-
85
-
86
-
87
-
88
-
89
-
90
-
91
-
92
-
93
-
94
-
95
-
96
 |
 |

11
INSTALLATION
ENGLISH
INSTALLATION
Installation Parts and Tools
Parts Not Provided
Inlet hoses
(2 EA)
Tools Needed
Pliers
Flat-blade screwdriver
Level
Installation Overview
Please read the following installation instructions first after purchasing this product or transporting it to another
location.
Assembling front brackets
Assembling back brackets and if
installing on wood flooring, anti-
vibration foot pads
Placing Main Washer on top of
the Mini Washer
1
1
2
3
Attaching appliances to each
other and snugging up the Main
Washer
Connecting the water line
Connecting the drain line
leveling
Connecting to the power supply
Testing the washer