LG LUWD1CW Owners Manual - Page 15
If installing on wood flooring, attach an anti, flooring. Using pads on hard flooring may cause,
 |
View all LG LUWD1CW manuals
Add to My Manuals
Save this manual to your list of manuals |
Page 15 highlights
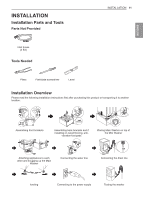
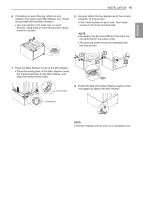
ENGLISH INSTALLATION 15 6 If installing on wood flooring, attach an anti- vibration foot pad to each Mini Washer foot. (Pads are provided with the Main Washer.) ••Use anti-vibration foot pads only on wood flooring. Using pads on hard flooring may cause machine vibration. 8 Securely attach the two appliances at the corners using the 14 long screws. ••First, insert screws on each side. Then insert screws on the front and back side. NOTE ••Assembly may be more difficult if the steps are not performed in the proper order. ••The stacking switch should be assemble with two long screws. 1 1 2 3 7 Place the Main Washer on top of the Mini Washer. ••Place the leveling feet of the Main Washer inside the bracket openings on the Mini Washer, and align the bracket screw holes. Leveling feet 9 Extend the feet of the Main Washer slightly until it is snugged up against the Mini Washer. Leveling feet NOTE ••The Mini Washer will not work as a standalone unit.
-
 1
1 -
2
-
3
-
4
-
5
-
6
-
7
-
8
-
9
-
 10
10 -
 11
11 -
 12
12 -
 13
13 -
 14
14 -
 15
15 -
 16
16 -
 17
17 -
 18
18 -
 19
19 -
 20
20 -
21
-
22
-
23
-
24
-
25
-
26
-
27
-
28
-
29
-
30
-
31
-
32
-
33
-
34
-
35
-
36
-
37
-
38
-
39
-
40
-
41
-
42
-
43
-
44
-
45
-
46
-
47
-
48
-
49
-
50
-
51
-
52
-
53
-
54
-
55
-
56
-
57
-
58
-
59
-
60
-
61
-
62
-
63
-
64
-
65
-
66
-
67
-
68
-
69
-
70
-
71
-
72
-
73
-
74
-
75
-
76
-
77
-
78
-
79
-
80
-
81
-
82
-
83
-
84
-
85
-
86
-
87
-
88
-
89
-
90
-
91
-
92
-
93
-
94
-
95
-
96
 |
 |
