Lantronix xPrintServer - Office Quick Start Guide - Page 3
What's, Inside - manual
 |
View all Lantronix xPrintServer - Office manuals
Add to My Manuals
Save this manual to your list of manuals |
Page 3 highlights
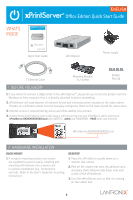
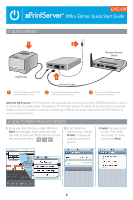
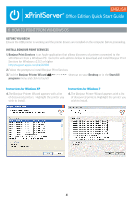
WHAT'S INSIDE Office Edition Quick Start Guide AirPrint AirPrint enables you to wirelessly print photos, e-mail, web pages, and documents from your iPad, iPhone, and iPod touch without the need to install a driver. 13266xPrintQSG_OfficeEd_resize_16.indd 1 9/30/13 9:23 AM Quick Start Guide ENGLISH Office Edition Quick Start Guide xPrintServer Power supply 3' Ethernet Cable Mounting Bracket & 2 Screws Rubber Feet (4) 1 BEFORE YOU BEGIN 1. If you intend to connect a USB printer to the xPrintServer™, please be sure to test the printer from the Windows or Mac computer that it is directly attached to before proceeding. 2. xPrintServer will auto-discover all network (wired and wireless) printers located on the same subnet. Printers on a different subnet must be manually configured. Refer to the User's Guide for instructions. 3. Internet access is required during set-up and when adding new printers. 4. Custom Set-Up & xPrintServer User Guide: Using a web browser log into your xPrintServer admin interface at xPrintServer-XXXXXXXXXXXX.local with USER ID = admin and PASSWORD = PASS (both case sensitive) xPrintServer-XXXXXXXXXXXX.local 2 HARDWARE INSTALLATION RACK MOUNT 1. A versatile mounting bracket and screws are supplied to assist in easily installing and mounting xPrintServer into a server rack in various orientations (e.g., horizontal or vertical). Refer to the User's Guide for mounting instructions. DESKTOP 1. Place the xPrintServer upside down on a smooth, flat surface. 2. Peel off the rubber feet from the adhesive strip and place them adhesive-side down onto each corner of the xPrintServer. 3. Turn the xPrintServer over so that it is resting on the rubber feet. 1
-
 1
1 -
 2
2 -
 3
3 -
 4
4 -
 5
5 -
 6
6 -
 7
7 -
 8
8 -
 9
9 -
10
-
11
-
12
-
13
-
14
-
15
-
16
-
17
-
18
-
19
-
20
-
21
-
22
-
23
-
24
-
25
-
26
-
27
-
28
-
29
-
30
-
31
-
32
-
33
-
34
-
35
-
36
-
37
-
38
-
39
-
40
-
41
-
42
-
43
-
44
-
45
-
46
-
47
-
48
-
49
-
50
-
51
-
52
 |
 |
