Lenovo H330 Lenovo H3 Series Hardware Replacement Guide - Page 17
Slide the computer cover to the rear of the chassis to remove.
 |
View all Lenovo H330 manuals
Add to My Manuals
Save this manual to your list of manuals |
Page 17 highlights
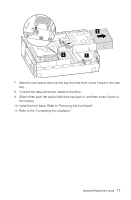
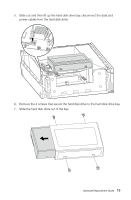
3. Disconnect all cables attached to the computer. This includes power cords, input/output (I/O) cables, and any other cables that are connected to the computer. Refer to "Locating connectors on the rear of the computer". 4. Remove the 3 screws that secure the computer cover at the rear of the chassis. 5. Slide the computer cover to the rear of the chassis to remove. Note: For this procedure, it helps to lay the computer flat. 14 Hardware Replacement Guide
-
 1
1 -
2
-
3
-
4
-
5
-
6
-
7
-
8
-
9
-
10
-
11
-
 12
12 -
 13
13 -
 14
14 -
 15
15 -
 16
16 -
 17
17 -
 18
18 -
 19
19 -
 20
20 -
 21
21 -
 22
22 -
23
-
24
-
25
-
26
-
27
-
28
-
29
 |
 |

14
Hardware Replacement Guide
3.
Disconnect all cables attached to the computer. This includes power cords,
input/output (I/O) cables, and any other cables that are connected to the
computer. Refer to “Locating connectors on the rear of the computer”.
4.
Remove the 3 screws that secure the computer cover at the rear of the
chassis.
5.
Slide the computer cover to the rear of the chassis to remove.
Note:
For this procedure, it helps to lay the computer flat.