Lenovo IdeaCentre A300 Lenovo IdeaCentre A300 User Guide v1.0 - Page 17
Wireless keyboard and mouse instructions
 |
View all Lenovo IdeaCentre A300 manuals
Add to My Manuals
Save this manual to your list of manuals |
Page 17 highlights
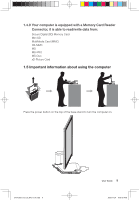
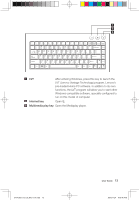
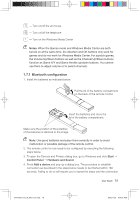
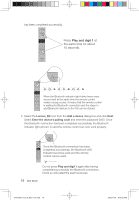
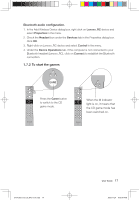
1.6 Wireless keyboard and mouse instructions (Only some models are equipped with wireless keyboard and mouse) Before using the wireless keyboard and mouse, carefully read the configuration instructions in the Quick Reference poster. If you fail to connect the wireless keyboard and mouse according to the steps shown in the Quick Reference poster, you may also connect using the instructions below. Notes: • Before using the method below, enter the system and prepare a set of wired keyboard and mouse. • If you want to install a new set of wireless keyboard and mouse, follow the steps below. 1. Using the wired keyboard and mouse to enter the system. 2. After installing the batteries into the wireless keyboard and mouse battery compartments, make sure the power switch on the back of the mouse is in the ON position (the keyboard does not have a power switch). 3. Press the wireless connect buttons on the right side of the keyboard and the back of the mouse for over 5 seconds. When the keyboard and mouse wireless indicator lights blink green, turn the computer on immediately. Note: If the wireless indicator lights stop blinking, press the connect buttons on the keyboard and mouse again. 4. To open the Devices and Printers dialog box, go to Windows and click Start → Control Panel → Hardware and Sound. Press Add a device to pop-up a dialog box. 5. Select the Lenovo Bluetooth Mouse and click Next to establish the bluetooth connection. 6. Select the Lenovo Bluetooth keyboard and click Next. (Press Add a device icon if the dialog box is closed and press the connect button again.) 7. Enter the pairing code and press the Enter key to complete the bluetooth connection. 12 User Guide 31041269_A3_UG_EN_V1.0.indd 12 2009.11.24 10:54:22 AM
-
 1
1 -
2
-
3
-
4
-
5
-
6
-
7
-
8
-
9
-
10
-
11
-
 12
12 -
 13
13 -
 14
14 -
 15
15 -
 16
16 -
 17
17 -
 18
18 -
 19
19 -
 20
20 -
 21
21 -
 22
22 -
23
-
24
-
25
-
26
-
27
-
28
-
29
-
30
-
31
-
32
-
33
-
34
-
35
-
36
-
37
-
38
-
39
-
40
-
41
-
42
-
43
-
44
-
45
-
46
-
47
-
48
-
49
-
50
-
51
 |
 |